

Building an RV-12 (Part 2)
I have been a pilot since 2005, and while I have done a fair amount of flying since that time, I have always rented the planes I have flown. This has both advantages and disadvantages, but for me the advantages have always been greater. Since earning my license, I have never really had any place I needed to fly. I have taken trips to see my in-laws around the Chicago area. I have picked up my Mom from various business trips that she’s taken, and I’ve done a few business flights, but none of these things were consistent enough need to warrant my own plane.
The ownership dream
It’s not that I haven’t been tempted, mind you. Like most pilots, I have my favorite aircraft (Republic SeaBee, Lake LA-4, Cessna Skymaster, to name a few) and have often dreamed of driving to the airport, opening up the hangar, and seeing my own aircraft sitting right there just waiting to be fired up. Having a window in my office doesn’t help either. Looking out on a nice sunny day, I feel a strong pull to stop when I’m doing, head to the airport, and take off, knowing that my airplane will be ready to go. However, obligations to family and business have kept those dreams at bay.
It helps that I can rent possibly the nicest Cessna 172SP in the tri-state area virtually anytime I like, so I can satisfy my flying itch when it needs scratching. I can also say that I have really appreciated not having to deal with the hassles that inevitably go along with ownership, like oil changes, annuals, and the guilt I’d feel when I go three to four months between flying.
Working in the oil analysis business, I can see the problems that develop in aircraft engines when they aren’t flown enough. Still, when you rent an aircraft, you never really know it like you would as an owner. All the little quirks that might identify a particular airplane are lost on me and if something changes in the one I fly, I don’t know if it’s a normal occurrence or possibly a problem.
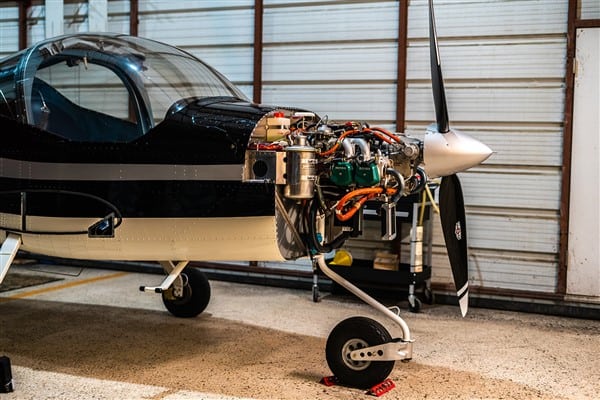
Enter the RV-12
All of this changed with the unfortunate passing of my father Jim Stark back in November. He was assembling a Van’s RV-12 kit plane at the time of his death. It was always his dream to build an airplane, but until he retired and moved to a different house where he actually had some room to work, building an airplane was never in the cards.
I was the prime motivator in getting him working on an airplane, though I was never really interested in building one myself. If I were to ever get a plane, I would just bite the bullet and buy one, skipping all of the time it takes to assemble once, which can easily stretch out into a multiple-year endeavor. However, when Dad died I suddenly found myself with a half-finished airplane and a bunch of tools I don’t know how to use. So after some discussion with my wife, we decided to jump in and start building.
One of the big factors in this decision was how fun the RV-12 is to fly. I took a demo flight at Oshkosh last summer and decided that this was a plane I could easily get used to. The only downfall was that it only had two seats, so I couldn’t take my wife and kids anywhere at the same time. But I could see that this was a good introduction to aircraft ownership and also fun to build.
The up-side to building your own plane is you will know exactly how it all goes together and you can also do all of your own maintenance, which can be a big time- and money-saver down the road. Plus, depending on how the building goes, I could make a 4-seat RV-10 my next project and then I’d have something the whole family could take somewhere. But that’s getting ahead of myself.
Attacking the learning curve
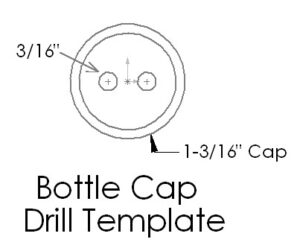
I have what I consider to be a fairly strong mechanical background, but I’ve never done anything on an aircraft other than fly it. So far, building the RV-12 has been an adventure. The laboratory business is all metric, but I quickly learned that the metric system has no place in the aircraft industry. In fact, in some areas like drill bits, they don’t even use standard measurements, so buying my drill bits at the hardware store is out.
It also appears that deburring parts will be a large part of my life for the next few years. Fortunately my wife is ready and willing to help and will probably be the driving force in getting this project done. Deburring parts is a good place to start, at least until she is strong enough to run the rivet gun (better start hitting the gym, baby!).
its (a tool box and a section of wing), so I bought those and have been trying my hand at running a rivet gun. The results weren’t pretty, but I keep saying to myself that I’ll be more careful when it comes time to actually work on the plane. At least I hope I will.
I also bought a set of DVDs that show exactly how to build the RV-12 step by step. I know this is something Dad wouldn’t have approved of (he never met a set of instructions he didn’t throw away), but I don’t have the advantage of having an A&P license like he did, so I’ll take any help I can get. At this point, I’m just getting started, but with any luck the project will move quickly. Now if you’ll excuse me, I’ve got a fuselage to finish!
 This year has been different, but it’s not really the plane’s fault. My wife and I started the inspection in mid-July, when the weather was nice and there was still plenty of year left, but didn’t get it completely done until just last weekend (the end of January). Again, the plane is still fairly new (only at 46 hours now), so there really weren’t that many problems to address. No, this year the problem was with me. Life and work tend to have a way of keeping you busy and this year it’s been a struggle to string a few weeks together to do the inspection.
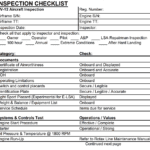
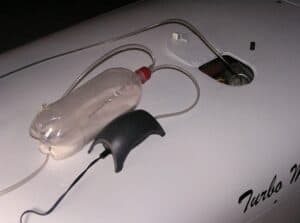
 Unless you suspect a problem, a short-run filter inspection would also be of minimal value, for the same reason—there really isn’t enough time for any significant metal to accumulate. So how about a situation where you are halfway through a typical oil change? Where you have enough time on the oil for an analysis to tell you something, but not enough time that the oil really needs to be changed? For situations like that, you might want to get an oil sample by pulling one up via the dipstick tube. We sell a pump for just