


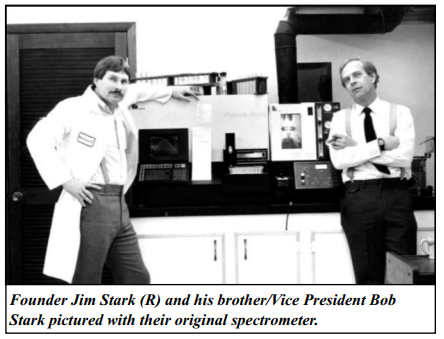
A New World of Unleaded Gas
It’s been an exciting last few years in the aviation world. For decades, leaded 100LL avgas was the only practical option for fueling piston-driven planes, but the tide has been slowly shifting toward unleaded. Swift Fuel’s UL94 and 100R, along with General Aviation Modifications Inc’s (GAMI) G100UL are becoming more widely available, and unleaded avgas should only grow more convenient and affordable as more options enter the market. We at Blackstone have been grateful for a handful of early adopters who have provided us with some interesting initial insights, which we’ll break down later in this article. But first, let’s start with a brief history of leaded fuel in aircraft. Why has it hung on so long, though leaded fuels were phased out of automotive use in the mid-1990s?
History of Unleaded Innovations
Fuel manufacturers began adding tetraethyllead to gasoline as an octane-booster in the 1920s, which prevented the unstable combustion that led to engine knock, also known as “detonation.” Detonation can cause serious damage to pistons and other components, so avoiding it has always been an important engineering challenge. Removing lead from mogas due to safety concerns required adding alternative octane-boosters, like ethanol. Some of these caused issues with fuel systems in older vehicles that weren’t designed with them in mind, but fortunately these problems were eliminated as newer models were introduced, which were designed to run exclusively on 87-octane E10 pump gas.
Things played out a bit differently in aircraft, for a few reasons. Plane engines run hotter than automotive and also lack the modern tech that allowed automotive engines to get past their reliance on leaded gas – things like knock sensors and computer-controlled ignition, mixture, and timing. These higher temps and simpler technology mean aircraft require higher-octane fuels (commonly 100-octane) to prevent detonation. Planes are also subject to more stringent maintenance guidelines, which help them run longer. While the average car lasts about 12 years on the road, planes designed 50+ years ago are still flying, which means any new avgas approved for fleet-wide use would need to be backwards compatible with significantly more and older engines. Despite these unique challenges though, the FAA, as well as private fuel manufacturers have been working away on a solution.
Fun fact: Valve seat recession is a complaint made by some of the first pilots running unleaded fuels. While we don’t have evidence to support this as a widespread problem (valve seats are not a wearing item, so because no oil circulates over them, we’re not able to gauge how they’re wearing in oil analysis), hardened valve seats and possibly adjustments to fuel/air mixtures may help alleviate this problem when present. As manufacturers experiment with different octane-boosting additives, additional adjustments may be needed to keep engines running and wearing their best, the same way industry responded to the automotive world going unleaded.
Aviation’s Unleaded Transition
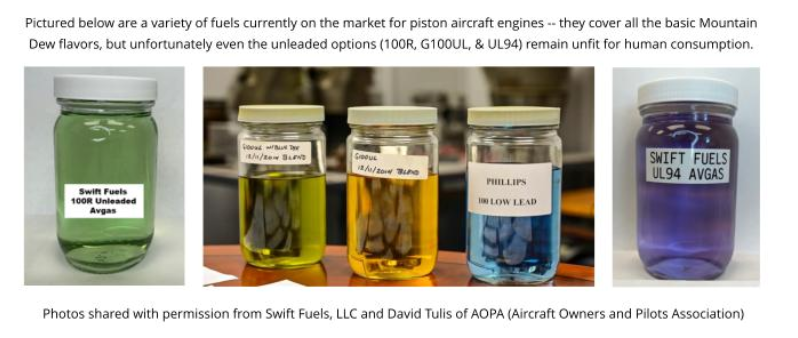
In February 2022, the FAA launched its EAGLE program, aimed at, “eliminating leaded aviation fuels in piston-engine aircraft safely by the end of 2030.” While a fleet-wide option has yet to emerge, GAMI’s G100UL can safely fuel a large variety of aircraft…after first acquiring a supplemental type certificate. Swift’s UL94 is another increasingly common option for fueling lower compression planes. Swift also recently released their own 100-octane offering, 100R. Still, because most airfields are only equipped to carry one type of gasoline, a majority of the oil samples we receive still come from planes running plain old 100LL. This is why a handful of airfields who have switched over entire fleets to unleaded have been so helpful; they’ve allowed us to establish robust unleaded averages to draw comparison with long-established leaded fuel averages.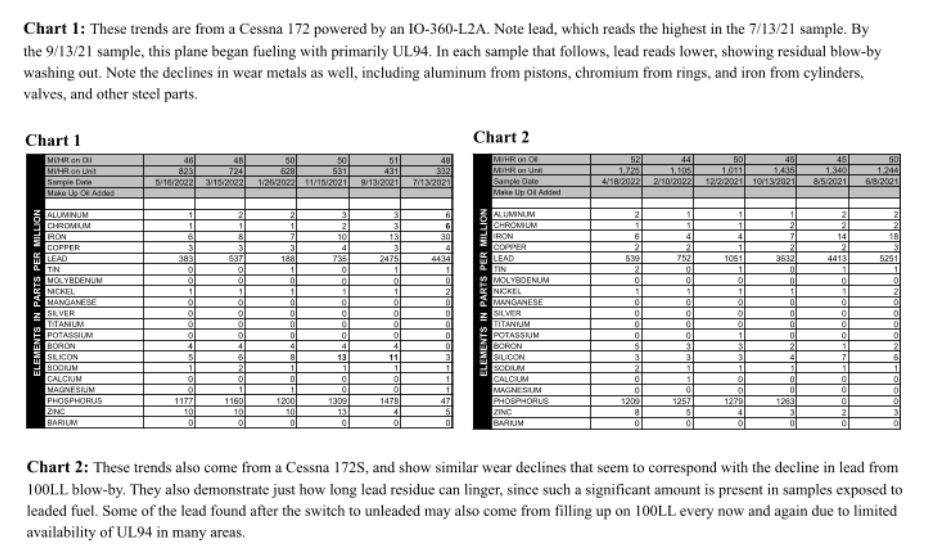
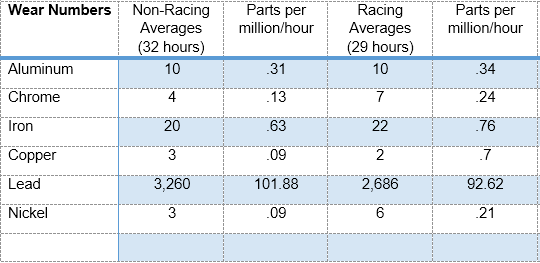
Trade Winds Aviation in San Jose, California is one excellent example. Since 2022, their Cessna 172s have run exclusively on UL94. This has provided many examples of Lycoming IO-360-L2A engines making the transition from leaded to unleaded fuel. In Charts 1 and 2, you can see the parts-per-million of lead from 100LL blow-by gradually declining. Interestingly, the levels of wear metals also decline – a trend that has shown up repeatedly in other planes switching to unleaded. This strongly suggests UL94 is easier on wearing parts.
Trade Winds Aviation’s switch to UL94 has also allowed us to populate a new universal average file specific to Lycoming IO-360-L2A engines running unleaded fuel. Comparing these averages to long-standing leaded averages seems to tell a similar story – when these planes run on unleaded, they really seem to wear less. Charts 3 and 4 show leaded and unleaded universal averages for this engine type, while Charts 5 and 6 draw similar comparisons between Rotax 912ULS engines running leaded and unleaded fuel. Rotax are unique among aircraft, in that they’ve always been able to safely run on unleaded pump mogas due to their liquid-cooled cylinder heads.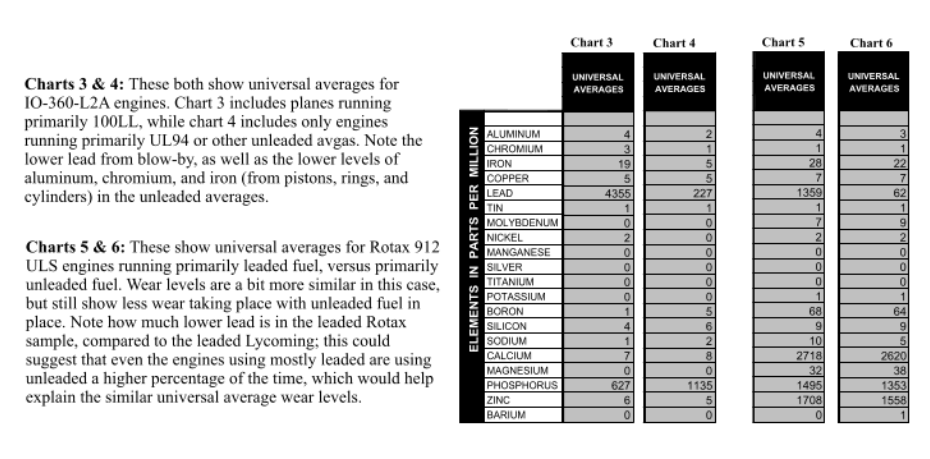
Notice how both of these unleaded universal averages still contain fairly high lead readings, relative to the dominant wear metal – iron. This is a consequence of how challenging it still is to fill up on 100% unleaded avgas. Pilots find themselves at airports with leaded as their only option, so lead rarely drops all the way to zero. Unfortunately, that means that bearing wear is still difficult to assess even in aircraft running unleaded. Lead comes from the outer babbitt of the bearings, so in automotive samples, it can serve as an early warning sign of lower-end trouble. For this reason, the advent of a widespread, all-fleet unleaded option would have the added benefit of allowing us to identify aircraft bearing problems just as readily as we already can in automotive samples.
Conclusions – In the Data and in the Cockpit
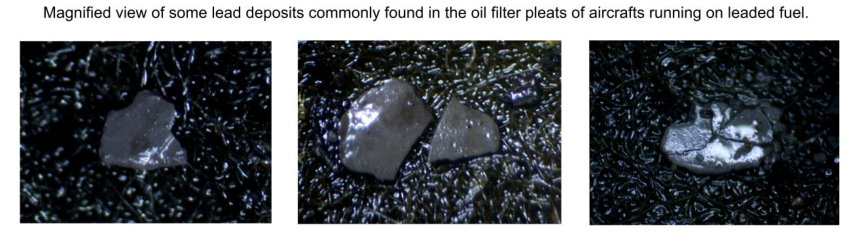
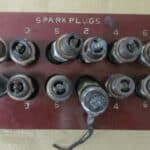
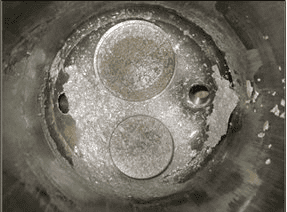
This begs the question: if unleaded fuel results in less wear, especially in the cylinder area, why is that? We know that leaded fuel leaves plenty of deposits behind – we see these every day when we examine aircraft filter pleats, which commonly contain a smattering of soft, gritty lead deposits throughout. While they aren’t cautionary findings in a filter, these same lead deposits tend to foul spark plugs and could potentially have an overall abrasive/corrosive effect on any parts they come in contact with. Given how common it is to find thousands of ppm of lead in used oil samples, this could impact all the oil-sharing parts, but it makes sense that the cylinder-area would show the highest wear disparity, since it’s the area most exposed to blow-by. Reports on the ground seem to support this idea.
We spoke to Juan Raya, Director of Maintenance at Trade Winds Aviation, who explained that their UL94 transition began with the Santa Clara county leaded avgas ban in early 2022. Their airfield was forced to either switch to unleaded, or close up shop. This was no small feat, but ultimately wound up being worth the trouble and expense. Their engines began running so much cleaner that their previous routine of reaming valves every 500 hours became completely unnecessary. Lower compressions in high-time engines also diminished, and they reported their planes regularly flying to TBO and beyond without spark plug fouling issues. The switch also eliminated their need for biohazard waste disposal – they no longer had a coffee can lying around, full of lead deposits removed from spark plugs. Raya noted that the difference is especially noticeable when comparing their UL94 planes to those out of their sister location, XL Aviation in Livermore – they’re still running primarily 100LL, and, “still loaded with deposits.” Best of all, they are reporting no exhaust valve recession or really any mechanical drawbacks related to the switch.
We’re still in the early days of the aviation world adopting exclusively unleaded fuels, but from what we have to go by today, it’s having a really positive impact on engines. As we so often say in our reports, “we’ll learn a lot more as trends continue.” But from here, the future looks bright. If you begin fueling your plane with unleaded, be sure to note it on the paperwork, and we’ll add it to our unleaded averages for the engine type. We’re especially eager for samples from Continental engines running unleaded. Your sample data helps build the body of knowledge we’re able to pass onto our customers – and it might just appear in future articles like this one!
A word of caution: We do not suggest switching fuels unless you know your engine can handle it. Any high-compression engine and/or turbo-charged engine should stick to 100LL until a suitable unleaded alternative is widely available and fully accepted by the FAA and the engine manufacturer. Running an engine on a lower octane fuel than what it is rated for can lead to detonation and there is no faster way to destroy an engine than that. The oil reports in this article are primarily from flight school engines and those tend to look really good anyway. Your results may vary.


