In the Thick of it!

Analyst Chris Tulley hits the Hot Rod circuit and reports the effects on his oil

In the spring of 1995, the editorial staff of the tenured HOT ROD magazine had a decision to make. The publication was set to host a run of brand-new HOT ROD Power festivals, muscle car meet-ups where locals could show off their own rides, see cutting-edge tech from manufacturers country-wide, and dream of new, faster ways to drain their bank accounts. Said magazine staff wanted to be a part of the fun and show off their own project cars, which would prove difficult, as they were based in Bakersville, Ca., while the inaugural Power festival was set in Norwalk, Ohio. The solution; drive their heavy Chevys, rat rods, and budget dusters over 2,000 miles to Ohio, then say a quick prayer to Lee Petty and the motor spirits that they could make it back home. 200 other drivers joined the ranks, sparking the birth of the HOT ROD Power Tour. “My car doesn’t just have to sit at a car show, I can drive it.”
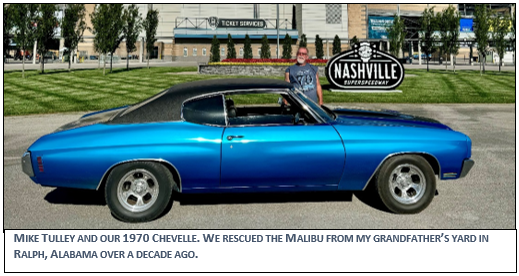
So here’s the gist. Five racetracks in five days, spanning stretches of American highway and automotive history. The 30th annual HOT ROD Power Tour just wrapped up June 15th, where over the course of five days, over 5,000 cars, including my own 1970 Chevelle, and at least 100,000 attendees came together to sweat out 1,800 miles of tour.

Bouncing from drag strip to road course, this year’s tour kicked off at the National Corvette Museum in Bowling Green, Ky., where the tour ended in 2023. Bright and early Tuesday morning, the caravan headed south to Nashville Superspeedway, where participants could spin a few laps. Day three; The University of Louisville. Next stop, National Trail Raceway, outside of Columbus, Ohio. The checkered flag flew over mecca; the Lucas Oil Raceway in Indianapolis. That’s where the tour will start in 2025.
I wanted to know how a tour like this would affect our favorite topic; my oil. I have been blessed to go on about 10 Power Tours so far with my father and our Chevelle. This is the third engine in the car, and I’ll have a fourth upgrade next year. This year we ran a 1969 Chevy 355cid small block. So I wanted to know how the oil looked to start, and what condition would it end up in nearly 2,000 miles later.

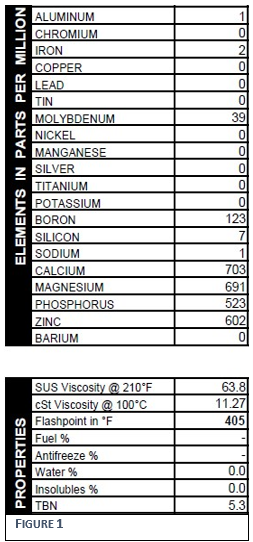
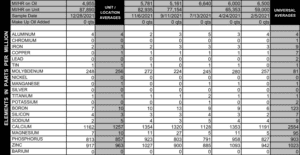
First, we took a sample of virgin Valvoline Full Synth 10W/30 (Figure 1). Calcium, a detergent-dispersal additive, was the leading element at 703 ppm. Magnesium, zinc, and phosphorus all read above 500 ppm, and there was some boron and molybdenum in the mix as well. Pretty typical cocktail of additives, overall. The TBN started at 5.3. The higher that TBN reads, the better active additives can stave acidity and corrosion.

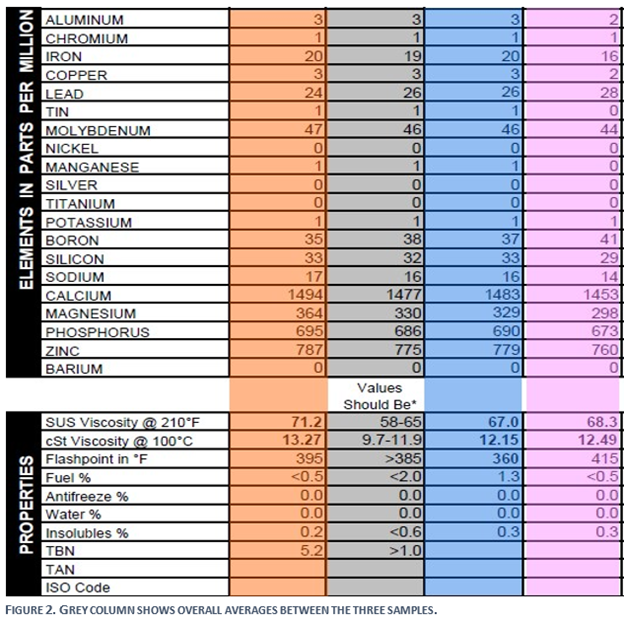
For the second sample (Figure 2, pink column), we drained the engine, added the Valvoline, and immediately pulled a sample via the dipstick. There was some iron and lead present from the previous fill, at 16 and 28 ppm, respectively. Carryover is inevitable, as oil changes fail to get every last drop out of the galleys channel of the block. We had used an oil additive recently, something along the lines of Lucas Oil, so calcium bumped up to 1,453 ppm. Zinc and phosphorus jumped up a little as well, but magnesium dropped by over 50% to 298 ppm. The viscosity increased as well, as did the amount of insolubles, so maybe that magnesium was grabbing carbon build-up to keep it from settling and coagulating. At least, that’s my idea of what a detergent dispersal does. Why the magnesium decreased is beyond my chemical knowledge. I’m more of an expert at “press gas, go fast”, it seems.

Sample number three (Figure 2, blue column) looked better than I expected, which is good for the engine, but it doesn’t make for the most exciting article. We pulled the sample in the middle of the week, then topped of the engine with about 4 ounces of fresh Valvoline. This sample saw roughly 900 miles of highway and backroads, and only an hour of road course time. As much as I wanted to drag race throughout the week, my tire budget didn’t approve.

The most notable addition to this analysis was fuel dilution at 1.3% by volume. Did the engine get above 190°F during this run? Obviously. But think of how many times the engine was stopped and restarted. Between gas stations, hotels, breakfast, and the many times I decided I needed a better parking spot, I bet we cranked the engine at least 15 times a day. That’s ample opportunity for fuel to enter the block. It wasn’t enough fuel to thin the viscosity below specifications for 10W/30, which is the main concern with fuel in oil. Fuel wasn’t present in any of the other samples. Iron, from steel parts like cylinders, shafts, and lifters, is the wear metal that tracks closely with use, and it increased by just 4 ppm. Lead dropped by 2, showing that the bearings didn’t wear a bit. That’s encouraging, because I certainly got on the throttle.

The final sample (Figure 2, orange column) reveals a cool instance of cause and effect. So imagine thousands of hot rods coming through a small town in southern Kentucky. Every red light, every stop sign was backed up for miles. There wasn’t a single Slim Jim or Diet Coke left in the county. I have radiator for a big block, and two electric fans to combat engine overheating. At one point, in the bumper to bumper traffic, my fan relays blew, and my engine temps rose to nearly 260°F, roughly 40° too high for comfort. As we were literally sweating out the situation, my oil was unable to cool the engine, an imperative feature that could have resulted in a tow-ride home.

After replacing the fuses, we never had another mechanical issue. The viscosity of the sample came back thicker than expected for 10W/30, an obvious sign of the high heat. Now if you think a little heat can impair classic American ingenuity, you’d be right in a lot of cases. But not mine. Iron read at 20 ppm once again. Sure, take into account up to 5% deviation from the testing equipment. Maybe iron was actually at 18 or 22 ppm. Either way, running at high temps without a fan did cause my oil to thicken a bit, but it didn’t hurt the wearing parts at all. Not a single increase in wear metals down the line.

The last kicker was the TBN reading. We only tested it on the virgin and the final samples, to see an exact start and finish. Remember when I said the TBN read at 5.3 in the virgin sample? It ended at 5.2. 1,896 miles later, and the active additive in the oil only degraded by a fraction of a decimal. The low end of a TBN is 2.0. After that, an oil can turn acidic, leading to corrosion.

Not only is that a testament to the additive package in Valvoline (not sponsored, but willing), but the overall efficacy of the engine and the American spirit.

We’ll see how next year goes, but no matter what, my Pops and I are in it for the long haul. Happy 30th Anniversary, HOT ROD Power Tour!


By |2025-01-14T15:23:48-05:00January 14, 2025|Articles, Gas/Diesel Engine|Comments Off on In the Thick of it!

Landslide!

Imagine the awesome event of a landslide. There’s no doubt it’s a brutal force of nature. If you’re unfortunate enough to be caught in one, you might not survive. A landslide is gravity pulling terra firma down a slope with such force that it takes all things, natural and manmade, with it. The very earth that supports us unmoors from its surroundings, changes shape, and becomes destructive. While it may not be obvious at first glance, this landslide can help us understand oil analysis.

Take a picture

Back to your mental image of the landslide: it starts off with a few pebbles rolling down a hill. Those pebbles strike others, and the dirt slide gains momentum. The process escalates and the mass of the movement increases. Larger rocks and patches of earth are dislodged, and the process continues until the whole hillside is involved, taking trees, boulders, and anything else in the way. Now stop: Take a mental picture of the landslide in full force. Step back and look at the frozen picture. Everything on the hillside that started off peacefully and at rest is in the process of roaring toward the bottom of the slope.

If you looked at your picture of the landslide from afar, you’d see a cloud of dust and dirt at the front edge of the sliding mass, and lingering far behind it. The dust cloud itself would actually hide much of the larger detail of rocks and trees crashing along the slope. Without looking at the larger debris contained in the mess, could you determine the makeup and extent of the landslide from the dust cloud alone? For the most part you could, and that’s how oil analysis works.

Normal vs. abnormal

One of the limitations to oil analysis is that we can only tell you about the wear metals that we can see with the spectrometer, which are between about 1 and 15 microns in size. (How big is a micron? One-millionth of a meter. One inch contains 25,400 microns. The period in this sentence is about 615 microns.)

If you have a mechanical problem with your engine, the oil filter should collect the larger metallic particles (usually those larger than 40 microns). These are the boulders in the landslide. There is also a wide range of rocks and stones present in the landslide that don’t become airborne. They still ride the slide to the bottom of the hill, but they don’t hang suspended in the dirt cloud. These are the particles that fall out of suspension and don’t make it to the lab with your oil sample.

Then there’s the dust cloud. We compare the “dust” we see in an oil sample to what is average for a particular type of engine, transmission, differential, etc. We expect all mechanical machines to produce wear in the course of normal operation. But there is normal wear, and there’s abnormal wear. When we find abnormal wear in your “dust cloud,” we may be looking at a potential landslide in your engine.

Avoiding the trees

Fortunately, we don’t have to wait for a landslide to occur before we can determine what’s going on your engine. While the dust cloud accompanying the slide is a one-time occurrence, we can repeatedly analyze the oil from your engine and see trends developing. One snapshot gives you a look at whether the dust we find appears normal or abnormal. But a series of snapshots gives us a clearer picture of the condition of the engine. By trending the results from one oil change to the next, we can see whether the dust cloud is growing or subsiding. If it’s growing, eventually there will be boulders and you’ll need to take action to save the engine.

Occasionally we are asked about the dust: How much is too much? In other words, when someone has a particular metal that’s reading high, they often want to know how high it needs to be before they really start to worry. The answer is, there’s no single answer.

Lots of things affect the amount of wear we find — the type of engine it is, how it’s driven, and what conditions it’s operated in. What’s more important than the level of wear is the wear trend that’s developing. Someone who routinely races a Subaru 2.5L engine in Las Vegas is probably going to find higher wear on a routine basis than a person who uses the same engine to mainly go to work and the grocery store in Minnesota. If the racer’s wear is always high, and it always reads at about the same high levels from sample to sample, we’d probably consider it normal for that particular engine. If the grocery-store engine was producing low, steady wear, and then wear suddenly jumped up to the racer’s levels, we’d worry. That’s why it’s important to establish wear trends for your particular vehicle, and why we can’t always say, “Okay, when iron gets to X level, it’s a definite problem.”

Avoiding the full-on, catastrophic landslide is not hard to do if you practice routine oil analysis. To keep the boulders and trees out of your engine, pay attention to what you find when you change the oil or have it changed. Some metals are normal in new engines, but once past 10,000 or 15,000 miles, you should not be normally finding any metals that you can see. If you do find metal, it’s probably not too late to stop the slide — but it’s better to avoid it in the first place, if you can, through the trend analysis of your engine’s wear.

By |2024-09-19T09:01:39-04:00June 12, 2024|Aircraft, Articles, Gas/Diesel Engine|Comments Off on Landslide!

ZDDWhat?

Any search on the Internet today with regard to oil additives will eventually bring up the supposed problem that there is a lack of anti-wear additive called zinc dialkyl-dithiophosphate (shortened to ZDDP and showing up as the elements zinc and phosphorus ) in the new oils. People are worried the lack of ZDDP is causing the destruction of many older flat-tappet engines.

This first part of the problem seems to stem from an EPA mandate that all oil companies either reduce or eliminate ZDDP from their oils. While I’m sure the EPA mandates a lot of things, if they are telling the oil companies to get rid of this additive in their oils, the oil companies certainly aren’t listening.

Any automotive engine oil sample you send will have both zinc and phosphorus in it and at fairly high levels (anywhere from 500 to 1,000 ppm and often times a lot more). But is the Zn and P in the form of ZDDP? Are there other compounds that could leave Zn and P in the oil? So the first part of this issue isn’t really an issue at all, and that brings up the second part of the issue.

Is a lack of ZDDP really a problem for flat-tappet engines? My first inclination would be to say no, and that’s because 99% of all piston aircraft engines don’t use that additive in their oil.

Most aircraft engines are air-cooled, so they tend to run hot. Due to this, they require the use of an ashless oil. That simply means that when the oil burns, it must burn completely and not leave any ash behind. Aircraft engines are mostly flat-tappet engines and they seem to get along just fine without ZDDP. So is the second part of the problem really a problem?

I’m a mechanical engineer by training, and when I was in school, we learned the best way to answer that would be to follow the scientific method.

The Scientific Method

If you made it this far, then I guess you weren’t tired when you started reading this because the mere mention of the scientific method has been known to cause many a high school and collage kid to nod off almost immediately. For those who don’t remember what that method is, here’s quick refresher. But wait, before you continue reading, go get a cup of coffee because I don’t want to lose any of you.

  1. Define the question
  2. Gather information and resources (observe)
  3. Form hypothesis
  4. Perform experiment and collect data
  5. Analyze data
  6. Interpret data and draw conclusions that serve as a starting point for new hypothesis
  7. Publish results
  8. Retest (frequently done by other scientists)

1. Define the question: Is the lack of ZDDP a problem?

Apparently, the lack of ZDDP in the oil is causing the demise of older engines that still use flat tappets because without that anti-wear additive present, the camshaft lobes and tappets grind down to nothing, especially when the engine is brand new.

The thing is, this doesn’t necessarily happen to all of the camshaft lobes, just a select few. The magazine Popular Mechanics recently did an article on this and they showed a picture of a camshaft with one lobe worn down to nothing. I have my doubts about this because if there really was a problem with the oil, wouldn’t it affect all of the camshaft lobes and not just one? I don’t pretend to know all there is to know about camshaft design and surface hardness, but I know enough to reason that all of the lobes and tappets are lubricated by oil, and if the oil was indeed substandard, then wouldn’t it affect all of the lobes the same way?

Figure 1: Aeroshell W65

This brings us to our next point: What would happen if you ran an oil that didn’t have any ZDDP in it at all? If that additive is so important, wouldn’t the complete lack of it cause camshafts to self destruct in a short period of time? I don’t think so, because aircraft engines do it all the time and the good majority of those last to 2,000 hours and well beyond.

2. Gather information and resources (observe)

Not much to do here. I did have to order some oil that didn’t contain ZDDP. That was Aeroshell W65 (see Figure 1). It’s a 30W oil commonly used by aircraft engines during colder months. That viscosity is close to the 10W/30 (at 210ºF) that I’ve run since the rebuild. It’s important to note that while this oil doesn’t contain any additives that we read, it is known as an ashless dispersant oil, so there are some additives in there.

 3. Form hypothesis: The lack of ZDDP isn’t a problem at all

Never did understand this part. Isn’t it the same as define the question? Maybe I was asleep at the time. In any case, here is goes. I don’t think the lack of ZDDP is a problem at all, based on all of the normal looking aircraft engines we analyze that do not run that additive.

4. Perform experiment and collect data: My own engine

Since this is my experiment, I decided to use my own engine at a guinea pig. Back in 2004 I rebuilt the GM 350 engine in my 1984 Check ¾ ton pick-up truck. The rebuilding process didn’t quite go as planned but the engine has been running well since then and since it has flat tappets, I thought it would be a good engine to test. I control the operating conditions and another plus is that if the engine decides to explode, I’m the only one to blame and I won’t sue myself for damages, though there may be some lawyers who would take that case.

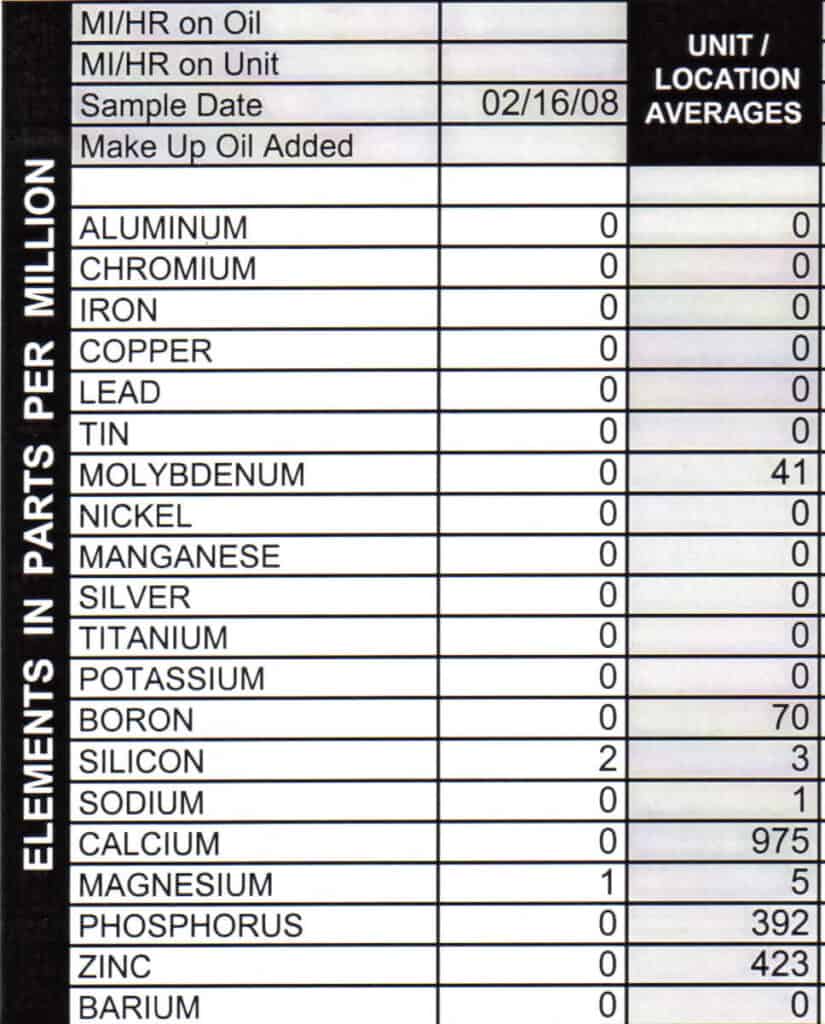
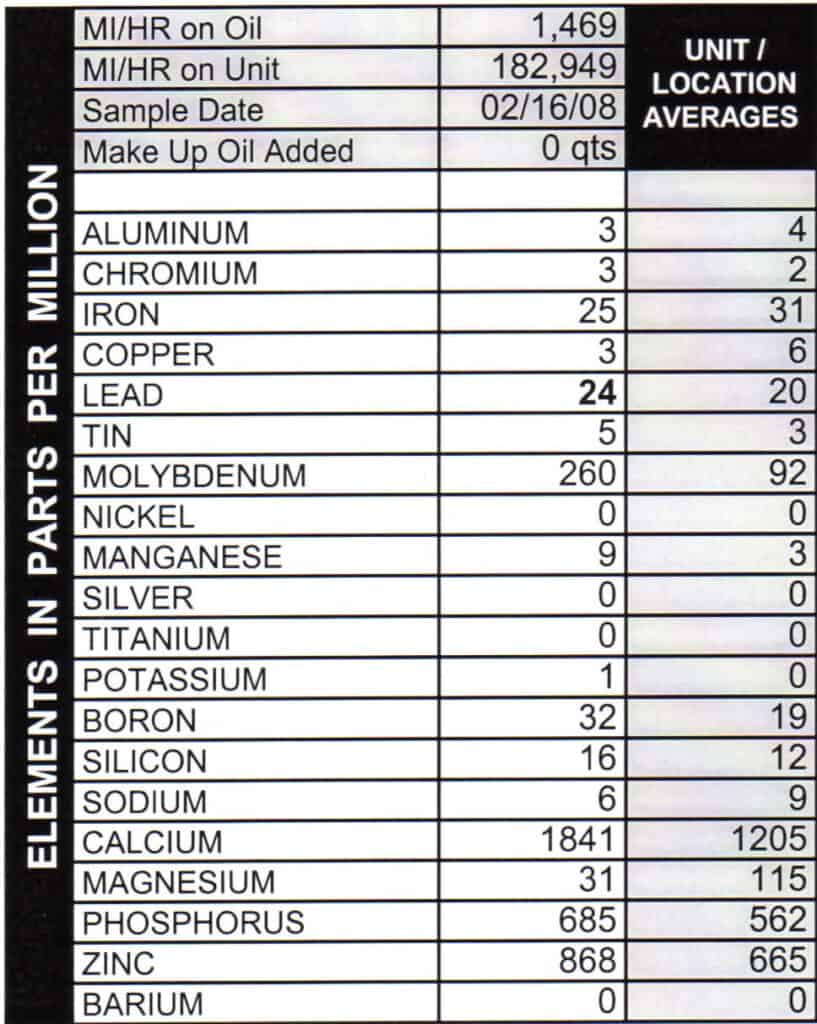
I changed oil originally back in February of 2008. Here is the report on the oil that I took out (see Figure 2). Not the best data, especially at lead, from bearings, but at least it’s consistent.

Figure 2: The original oil was Havoline 10W/30

5. Analyze data

That was the easy part. I’ve been looking at oil reports every afternoon since 1997, and I don’t have to pay for the samples.

6. Interpret data and draw conclusions that serve as a starting point for a new hypothesis

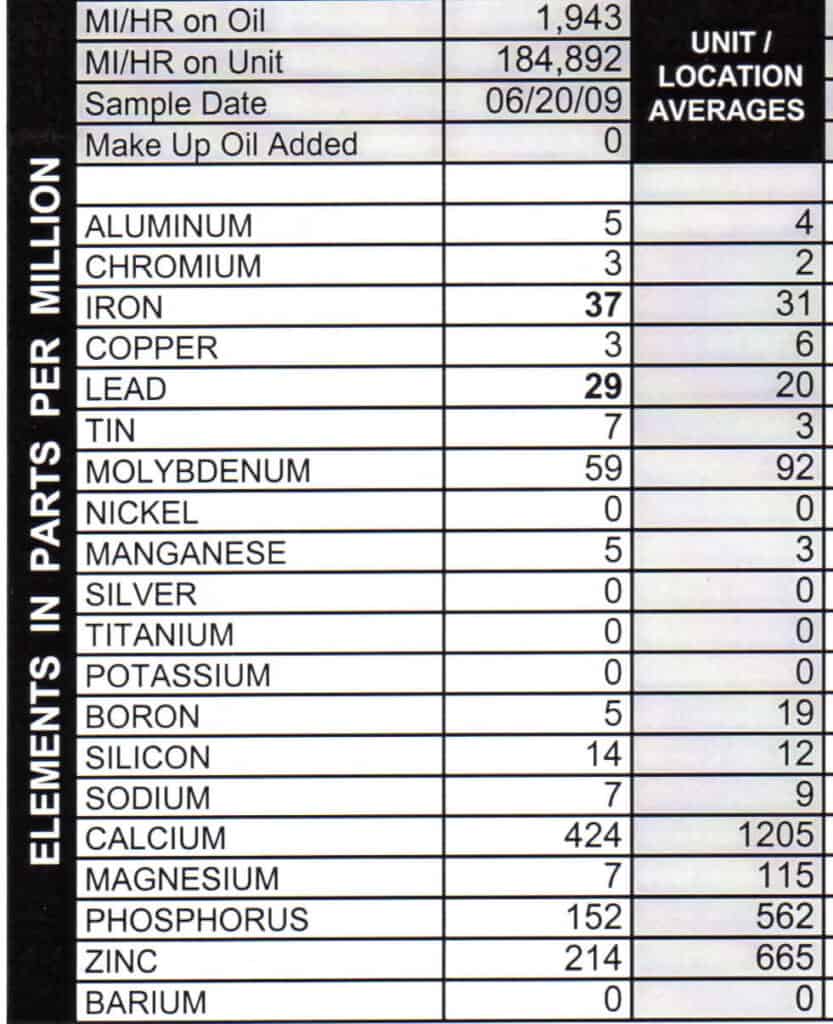
After 16 months and 1,943 miles I decided it was time to change the oil. You can see the results in Figure 3. At first glance it would seem that the engine’s steel parts didn’t really agree with the new oil. Iron went up to 37 ppm, which isn’t really a problem level, but more than I had been seeing.

Figure 3: The first run on Aeroshell W65

However, it’s also important to note that this was the longest I had run the oil since the rebuild, both in time and mileage. Also, the engine doesn’t have any emission controls (don’t tell the EPA) and had an open breather coming off one of the valve covers.

So with it being exposed to the atmosphere, there is always a chance for rust to form on the parts, and that could account for the increase in iron. Lead was still excessive, but that didn’t really change, and nothing else unusual was present.

Note that this oil still had some additive in it (molybdenum, calcium, phosphorus, and zinc). These are leftover from the last fill and it turns out for this engine, about 20% of the old oil remains in the engine after an oil change. This is important to note because 20% of the metals are leftover from the last oil fill as well.

But the data from one sample doesn’t make for good science and I still had more Aeroshell to use, so I ran it again. This would help make sure the data was consistent and also make sure the lingering additives from the regular engine oil weren’t affecting my results.

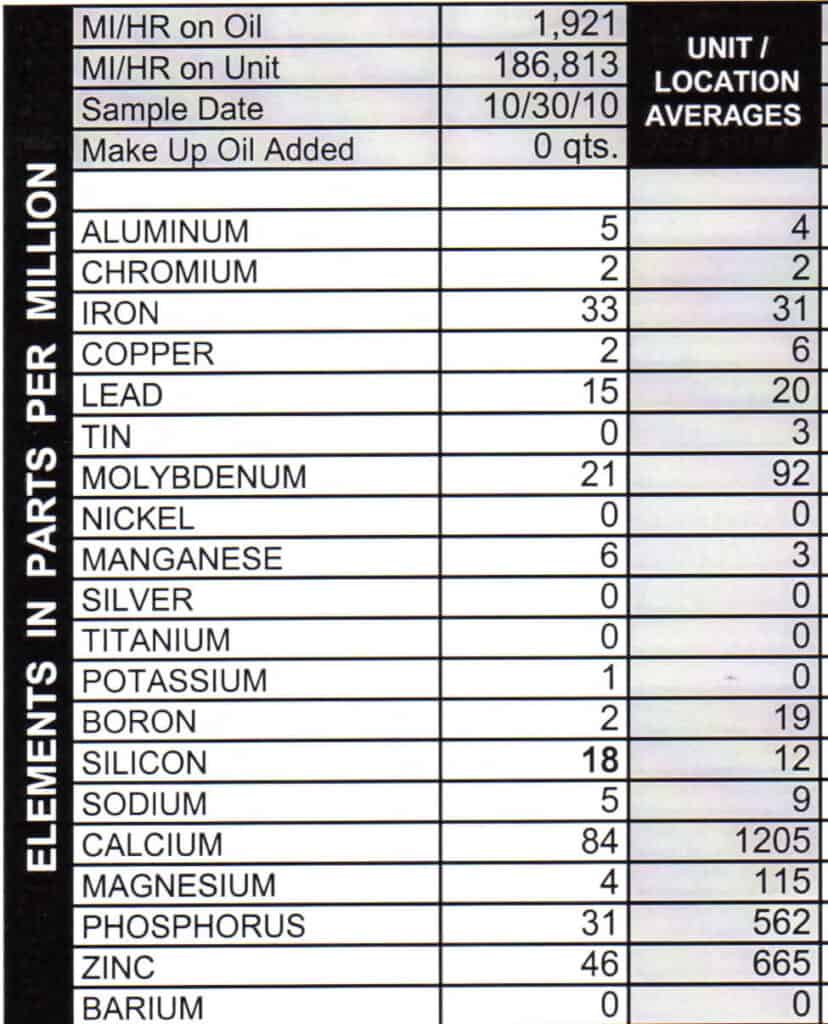
Figure 4: Wear improves!

The second oil was changed on October 30, 2010, after another 16 months and 1,921 miles this time (see Figure 4). At first glance you will notice a nice improvement in wear, especially lead. Does this mean the Aeroshell W65 is actually working better then other oils? Alas, no. When you don’t see in the data is that I took a 675-mile road trip during this oil run and I strongly suspect that highway trip is the reason for the improved wear, rather than any miraculous improvement due to Aeroshell.

This is an important fact to think about whenever you are looking at someone else’s oil report. Driving conditions can have a large effect on the data and unless you know what those conditions are, it is very easy to draw the wrong conclusions.

The conclusion I can draw is that no, my engine did not self-destruct running this oil. I didn’t actually visually inspect the camshaft, before or after this test, so I don’t know how much, if any, actual wear occurred in that area. So the test isn’t perfect in that regard, but I can say the engine is still running just fine.

So do we have a starting point for a new hypothesis now? Yes. Would my engine be okay if I had used this oil during break-in? Maybe, but we’ll won’t know until I rebuild another engine. When I do, I plan on use another oil that’s popular in the aircraft community: straight mineral oil with no additive whatsoever. Probably about 80% to 90% of the aircraft engines are broken in on this type of oil and they seem to do fine.

Are there any other new hypotheses? I’m sure there will be many that come by and most of them will center on how this test is invalid for some reason or another. And in response to that I would refer to section 8 of the scientific method and see what happens if you have the balls!

7. Publish results: That’s what you are reading

Not much to talk about here, and that brings us to our last point on the scientific method

8. Retest (frequently done by other scientists)

In this case, the other scientists are you and while I’m not suggesting any of you run Aeroshell in your automotive engines, you can use oil analysis to help solve questions you may have. Is synthetic oil really better than petroleum oil? Is that additive you’re using really helping? Feel free to draw up your own hypothesis and run your own tests. Don’t just buy an oil or additive, start using it, and then never stop just because the engine is running just fine. And by all means, don’t just take the word of the people who make oil and additives. Be objective and run some testing. I think you’ll be surprised by the results.

By |2024-09-19T09:07:44-04:00January 16, 2024|Articles, Gas/Diesel Engine, Marine|Comments Off on ZDDWhat?

To All the Oils I’ve Loved Before

I get asked on a regular basis what type of oil is the best, and we typically don’t give out recommendations because we see very little difference between brands. But that doesn’t mean I don’t have favorites. For me, there is a lot more that goes into picking a favorite oil than just how well the engine wears while it’s in use.

One factor is what Dad used. I can remember “helping” change oil with him back in the ’70s when the oil cans were round and you had to jab a separate spout into the can just to pour the oil out. Back then he was a Pennzoil man and I didn’t think to question why. So when I started buying my own oil and changing it, I thought about using Pennzoil, but being a bit of a rebel in my teenage years, I wasn’t going to do everything like Dad did.

I started out liking Texaco Havoline. It came in a cool black bottle and Texas was far away from Indiana so the oil was kind of exotic. I used it for years and my engine never blew up so it mast be good oil right?

Then I found Castrol GTX. Their white bottle wasn’t all that special, but they did offer a free NFL hat if you bought a case. That was an excellent reason to switch in my mind, and I still wear my Detroit Lions had with pride. (Yes, that’s right, I’m a Lions fan, and mark my words, they will win it all someday! If the Saints can win it, there’s always hope for the Lions.)

My engine ran for years on Castrol and never blew up, so that must be good oil right? Then Castrol quit offering hats, so it was time to switch, and I decided to try Quaker State. Made from sweet Pennsylvania crude, I’m sure. They had a cool green bottle and my engine never blew up using it, so it’s good oil.

But I was never completely sold on Quaker State, and when I found Wolf’s Head oil, I know it was time for a change. I’m not sure, but I suspect it’s made from the first pressing of dead wolves’ heads, and while the animal lovers might not approve, it’s better than Baby Seal Head oil, so I didn’t feel too bad running it. That oil seems to work just fine, my engine never blew up using it, but it was kind of out of the way for me to buy it, so I switched again.

This time I cheaped out and went with Meijer oil. For those who don’t know, Meijer is a big superstore like Wal-Mart, and after running a test on it, it turned out to have the exact same additive package as Castrol, my former favorite, so I was sold.

Until this point I had steered clear of non-name brand oils (their bottles aren’t very pleasing to the eye), but then I realized that big chain stores don’t really make oil, they just buy it from a major oil company and repackage it as their own. This revelation sold my father on Wal-Mart’s Super Tech oil and almost sold me on Meijer forever, but then my wife started doing all the shopping. I never made it to Meijer anymore, so once again it was time to switch.

Since then I have never really settled on one brand. Working at an oil lab, I’m interested to see what different oils people are using, so I switch on a regular basis and I mostly go with what’s on sale. Valvoline, Pennzoil, Mobil, it doesn’t really matter. I’m too cheap to go with synthetics, but I can still be swayed by a cool-looking bottle every now and then. And given my fondness for a low price, I recently found a new favorite oil.

All kidding aside, we really don’t care what oil you use. Some guys swear by this oil or that oil, but they all do the same thing and we honestly don’t see any appreciable difference in wear when people switch brands. We think oil is oil, and we’re sticking with it.

By |2024-09-19T09:08:28-04:00July 28, 2023|Articles, Gas/Diesel Engine, Marine|Comments Off on To All the Oils I’ve Loved Before

TBN/TAN: Do You Need One?

“Do I need a TBN?” It’s a question that comes up a lot. The TBN is a test we do on engine oil, while the TAN is meant for transmissions and other gear lubes or hydraulic oils. These tests are widely discussed on internet forums, where facts and misconceptions can be hard to distinguish. So let’s dig into the science behind them!

What is a TBN or TAN?

The Total Acid Number and Total Base Number are ways to determine how acidic oil has become (TAN), or how effectively it can neutralize the acids that form from combustion and other factors (TBN). An increasing TAN indicates more acidity, while a decreasing TBN shows an oil’s acid-neutralizing additives are being used up. You may remember the pH scale from science class. pH is a more familiar measure of acidity in everyday life. So why don’t we use pH on oil?

pH stands for “potential of hydrogen” and measures the flow of hydrogen ions in a water-based solution. pH doesn’t apply to oil because these ions can’t flow through oil – it’s a poor conductor. That’s why oil is used as an insulator for transformers and other applications that call for interrupting the flow of electrical current. Fortunately, we can use titration to get around this obstacle. Titration is used to determine the concentration (in this case, the acidity level) of an unknown solution (oil) by exposing it to measured quantities of a known solution (acid or base).

Running the tests

We start by mixing one gram of oil with a happy blend of toluene, chloroform, isopropyl alcohol, and a splash of H2O. (Kids, don’t try this at home!) The solvent breaks down the oil into a solution that is a better conductor, so we can measure the pH. The next step differs slightly for the TAN or TBN.

For the TAN, we add a cocktail of chemicals – let’s call it Bruce – to the toluene solution, a little at a time. This continues until the pH reaches 11. The lab techs then use an equation to calculate the TAN from the amount of Bruce added to the oil-toluene blend.

The TBN follows a similar methodology, except the solution added is more acidic – more of a Boris than a Bruce.

The end goal for the TBN titration is a pH of 3, and as with the TAN, the lab people are doing some math to transform the amount of Boris added to the oil into your TBN number.

Why get a TBN?

As the oil circulates through the harsh environment of a hot, running engine, combustion causes acids to form. These acids can cause increasing wear and corrosion. To prevent this, the oil manufacturers add detergent additives to the oil, which help it buffer those acids and stabilize the oil’s pH. The higher the TBN, the better your oil can resist becoming acidic. That’s the main reason to check the TBN. It’s a helpful data point if you want to extend your oil change interval beyond manufacturer recommendations.

The TAN does essentially the same thing, but we use the TAN on oils that don’t have detergent additives (like hydraulic oil and ATF). Some industrial equipment manufacturers will set standards for when to change the oil based on the TAN.

Which oil has the highest TBN?

The TBN is mainly based on the amounts of calcium and magnesium (detergent additives) in the oil. Oils with more of those additives typically have a higher starting TBN, and those with less will rank lower on the list. Is more better? Not necessarily (and we’ll get into that a little later). Meanwhile, Figure 1 lists a slew of virgin engine oils and their average starting TBNs, from highest to lowest. The progression isn’t perfectly consistent, because we don’t test for every conceivable substance the oil manufacturers might include that determines the TBN. chart showing the TBN for various types of oil

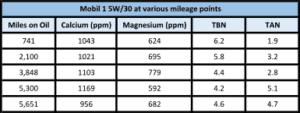
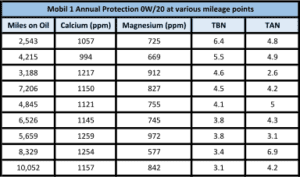
As you probably know, the TBN drops pretty fast when you start using the oil. Then it levels out and drops more slowly, the longer the oil is run. Figures 2 and 3 show two types of Mobil and how the TBN tends to fall as acidic substances start to “use up” the detergent additives. That’s what they’re there for, and we consider any TBN over 1.0 sufficient, while a TBN of 2.0 or greater is ideal when choosing to run the oil longer than you currently are. Note that ppm calcium and magnesium stay roughly the same – it’s their ability to neutralize acids that decreases.

chart showing the TBN and TAN of Mobil 1 5W/30 at various mileage intervals

Figure 2: This oil has an average starting TBN of 7.5. Note the roughly inverse relationship of the TBN and TAN readings; as the TBN decreases, the TAN increases, as less “active additive” is available to neutralize acids.

chart showing the TBN and TAN of Mobil 1 Annual Protection 0W/20 at various mileage points

Figure 3

Figure 3: This oil has an average starting TBN of 7.9. The chart shows the same fairly predictable drop in TBN as miles increase. Interestingly, the TAN is less predictable, probably due to factors outside the scope of this newsletter.

Is more better? A look at two novel blends

It’s easy to see how you might feel like you want an oil with a starting TBN that’s as high as possible. But Figure 1 makes it clear that oils with all sorts of starting TBNs are available. Did the manufacturers at the low end of the scale just cheap out on additive? Not at all. Oil manufacturers have to cater to an array of unique engine designs, operating conditions, etc. As technology evolves, so does oil.

Joe Gibbs

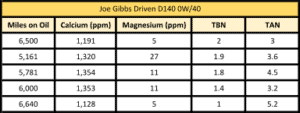
See, for example, Figure 4, which lists a few different samples of Joe Gibbs Driven D140 oil. It had the lowest average starting TBN (4.4) thanks to fairly low levels of calcium and magnesium. This left the TBN between 2.0 and 1.0 after just 5,000-6,000 miles. But the engine that produced those numbers was a Porsche 911 that had excellent wear trends (see Figure 5). This oil is specifically formulated with lower calcium and higher moly to combat low speed pre-ignition and reduce abnormal combustion and wear. While we can’t say whether this oil really does reduce LSPI, it seems to work as well as others do and we see no problems with the novel additive blend.

chart showing TBN and TAN of Joe Gibbs Driven 0W/40 oil at various mileage points

Figure 4

Oil report for the 5 samples of Joe Gibbs oil in Figure 4

Figure 5

Figure 5: Wear trends for the five samples in Figure 4 (and one additional sample, not included there because TBN and TAN were not requested). Wear is consistent over time and compares favorably to averages, despite the low TBNs.

Chevron Delo

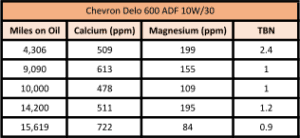
Chevron Delo 600 ADF is another oil that breaks the traditional additive mold, and it’s fairly new to the market. The 15W/40 and 10W/30 formulations hold the 2nd and 3rd place spots for lowest starting TBN in Figure 1, which is surprising, since they’re formulated for diesel engines – diesel oil tends to have more dispersant additive than oil designed for gasoline engines (most of the oils in Figure 1 are gas engine oil). Figure 6 shows the Delo 600’s TBN reaching our “1.0 limit” starting around 9,090 miles. Chevron also had particular goals in mind for this oil – it uses “ultra-low ash additive technology” and is meant for engines with SCR and EGR emissions systems that need to meet state emissions standards.

chart showing calcium, magnesium, and the TBN of Chevron Delo 600 ADF 10W/30 oil at various mileage points

Figure 6

Figure 6: This oil had an average starting TBN of 4.7. The chart shows the low levels of calcium and magnesium that resulted in fairly low TBNs after typical oil runs for diesel engines.

Since additive packages tend to be proprietary and Chevron never did respond to my email, we can only speculate as to how the elements we find in our testing relate these constraints. Maybe such low calcium and magnesium reflect a reduction in calcium sulfonate and magnesium sulfonate (the compounds that register as calcium and magnesium). While these compounds work well as detergent/dispersants and their alkalinity helps buffer acids, their presence would also boost the sulfur content – a potential problem for emissions goals. But the additive package is unique in other ways too.

Oil report for a virgin sample of Chevron Delo 600 ADF 15W/40

Figure 7

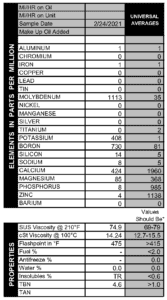
Figure 7 is a virgin sample of Chevron Delo 600 ADF 15W/40. Note the high levels of molybdenum, potassium, and boron, and low levels of phosphorus and zinc, in contrast to the more typical additive package shown in the universal averages column. Moly seems to be providing most of the anti-wear properties that phosphorus and zinc ordinarily would. Potassium is noteworthy and caught our attention right away, since it’s one of two potential markers for anti-freeze.

We’re not certain what additive compound registers as potassium in this oil, but because potassium is alkaline, perhaps it performs some of the same functions calcium sulfonate and magnesium sulfonate do in more traditional additive packages.

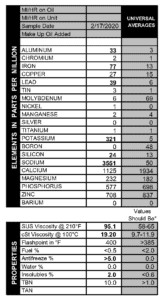
Interestingly, even when potassium (and sodium, which is also alkaline) is truly from coolant contamination, it can skew the TBN. Figure 8 is an example of an engine suffering from coolant contamination, which is taking a heavy toll on the bearings and physical properties of the oil. An oil change (and probably major repairs) are needed, yet out of context, the 10.0 TBN looks great. But that doesn’t mean the oil is ready for more use; rather, coolant is skewing the reading. That’s why we never judge a used oil sample by a single data point!

Oil report for a used sample of Valvoline 10W/30

Figure 8

Figure 8 shows a sample of Valvoline 10W/30, which has an average TBN of 7.2 out of the bottle. The oil was used 3,000 miles in an engine with a major coolant problem, seen in very high levels of potassium and sodium, a thick viscosity, high insolubles, and high wear levels. The TBN is very high at 10.0, but that doesn’t mean the oil is ready for more use; rather, coolant is skewing the reading.

As for Chevron 600 ADF? The jury is still out on what kind of results this oil will produce over time, since most of the samples we’ve tested so far are from young engines going through wear-in. It will be interesting to see how these engines mature, but we suspect in the end, this unique oil will perform as well as any other in the most crucial ways: lubricating, cleaning, and cooling engine parts. We’ll just have to give it some special treatment on our end, to avoid false positives for anti-freeze, and avoid putting too much stock in “low” TBNs.

We hope you’re walking away armed with knowledge and a pretty good idea whether adding a TBN or TAN is going to serve your particular aims. If you’re wanting to extend your oil changes, go for it! If you just want a basic assessment of how your engine and oil are holding up, not to worry! We can provide that with the core tests in the standard analysis. Stay tuned for Part 2 next newsletter, where we venture into the lab, and learn about the effects of heat on TBNs and TANs.

By |2024-09-19T09:13:00-04:00July 28, 2023|Articles, Gas/Diesel Engine, Lab Tests|Comments Off on TBN/TAN: Do You Need One?

Sampling Methods

It’s a perfect spring day. There you are, merrily going about your business of changing the oil. But wait! You forgot the oil sample bottle! A quick scramble to retrieve the bottle gets you back to the oil just as the last of it drains out.

Can you pour a sample out of the filter instead? What if you add a quart a few days before sampling – how does that affect the analysis? What about something like an engine flush – should you use one? Do they work? Your investigative team at Blackstone experimented, and we’ve got answers. While these tests probably won’t qualify for a peer-reviewed journal, they’re a good guide to what you need to know about sampling.

This is part two in our series on sampling methods. Part one, on engine flushes and their effects on analysis, can be found here. Part two covers common sampling scenarios: does it change the results if you take a sample from the filter or dipstick? What if you add fresh oil before sampling? Is it a problem if the oil gets dark right after putting it in the engine? That last question isn’t about sampling methods, but people ask all the time and your investigative team at Blackstone wanted to know, so read on for answers.

Does it matter how you sample?

Our instructions for sampling say to catch a sample as the oil drains from the pan, but that doesn’t always happen. Does it change the date if you take a sample from the filter or pull it through the dipstick?

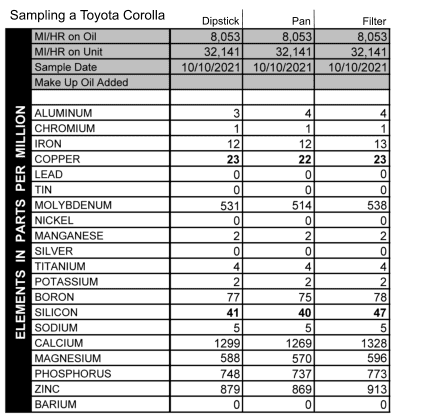
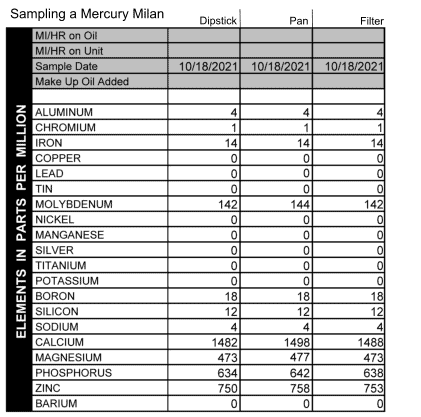
In short: no. Figures 1 and 2 illustrate three consecutive samples taken from two different cars: Figure 1 is from a Toyota Corolla and Figure 2, a Mercury Milan. The column on the left is a sample taken through the dipstick. The middle column was oil taken while the oil drained from the pan. And the right-hand column is oil taken from the filter. Results for a Toyota Corolla, sampling from the dipstick, pan, and filter

Results for a Mercury Milan, sampling from the dipstick, pan, and filter

Results

The samples are unremarkable in that there’s less than 1 ppm difference in the wear metals across all three samples. The sampling method seems to have no impact on the metals that show up in analysis.

The Corolla in Figure 1 does show a higher silicon reading in the sample taken from the oil filter, but perhaps that was due to either dirt collected by the filter that ended up back in suspension in the engine oil, or sample contamination – we did have to use a bit of creativity in removing that filter from the engine, as the filter was overtightened and stuck. (If you’re wondering, we stabbed it with a screwdriver to give us more twisting leverage – we did not sterilize the screwdriver before surgery, so it’s entirely possible some silicon was introduced in that process.)

Does adding fresh oil impact the test results?

It makes sense that that adding fresh oil will dilute the wear numbers. But how much do the numbers change? And does it matter when you add the new oil? In theory, if you have a 4-quart sump, adding one quart of fresh oil shortly before the oil change would mean that your engine’s metals are diluted by 25% from their previous numbers.

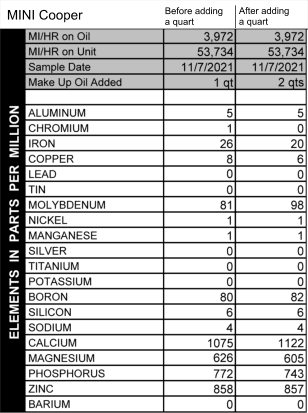
To test this theory, Ryan Stark, Blackstone’s president, pulled a sample from his MINI, then added a quart and sampled again to see how the numbers changed.

Results for a Mini Cooper, sampling before adding a quart of fresh oil, and after

Crunching numbers

The MINI has a total capacity of 4.5 quarts, so the one quart he added comprised 22% of the total engine oil capacity. Most of the metals decreased by approximately the same percentage: iron dropped from 26 ppm to 20 ppm (a decrease of 23%), copper dropped by 25%, from 8 to 6 ppm. If we assume that chrome actually changed by less than 1 full ppm, due to rounding, the average change in metal works out to around 25%, which is what we’d expect from adding a quart of oil to this engine.

The only other appreciable wear metal in his sample is aluminum, which, interestingly enough, read at 5 ppm in both samples, showing no change at all. We couldn’t let that element go without a little suspicion – why didn’t it change when the other metals did? As it turns out, the actual number our spectrometer reads goes four decimal places to the right. We round to the nearest whole number on the report, but if we pull the full spectral data from those tests, aluminum read at 5.4290, and in the second test aluminum read at 4.8995. Both readings were rounded to 5 ppm in the report, but the full spectral data shows a slight change between the two samples, an improvement of 9.7%. So aluminum did change with the added oil, just not quite as much as the other metals and not enough to show on one of our published reports.

The “when” factor

There are other variables to consider like how far into your oil change you add the oil, and how much oil you add. If a quart of oil is added at the 3,000-mile mark and you run your oil 10,000 total miles, the dilution factor probably is going to be a lot different than adding a quart just before changing the oil. That’s harder to test for because there are too many variables to isolate.

So this isn’t the be-all-end-all of the dilution question, but it at least gives some insight into the fact that the metals could be diluted if you’re adding oil, especially if you’re doing it right before an oil change. It is a good idea to add fresh oil when low, even if you’ll be changing the oil soon. Running an engine on a diminished oil capacity isn’t great.

Why does my used oil look so dark?

We get a lot of questions from people who do an oil change then notice that their oil is dark immediately afterward. Is it a problem?

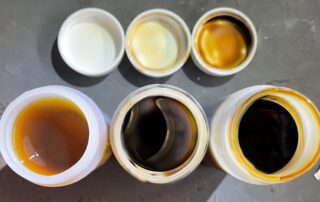
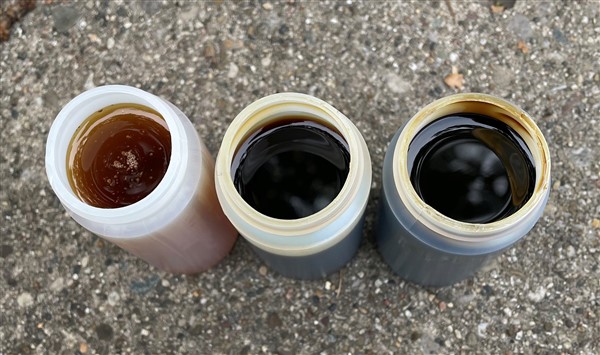
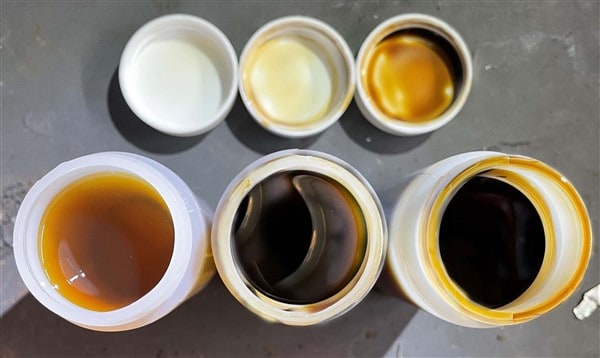
To get to the bottom of this question, we conducted two oil changes on two separate vehicles, idled the fresh oil for five minutes, then sampled and examined the new oil.

The color of three samples of oil from a Toyota Corolla
FIG 4: Toyota Corolla – Left, new oil. Middle, oil after 5 minutes. Right, used oil.

The color of three samples of oil from a Mercury Milan

FIG 5: Mercury Milan – Left, new oil. Middle, oil after 5 minutes. Right, used oil.

In both cases, the oils were quite dark after just five minutes of use. In Figures 4 and 5, the virgin oil is pretty obvious, but there’s not much difference between the new oil with 5 minutes on it and the oil with several thousand miles on it. In terms of the overall sample color, it’s quite hard to tell.

Results

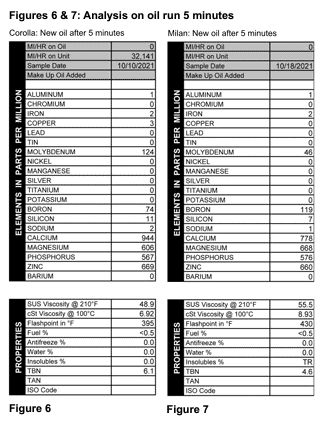
So does the dark oil indicate anything? Figures 6 and 7 show the analytical results of the new (but darkened) oil after being run 5 minutes in two different engines.

Oil reports from the Corolla and Milan on oil run 5 minutes

Both oils look very clean in testing, with minimal insolubles, no contamination, and very low metal counts. You might note that the metals do not start at 0 ppm – that’s because you never get 100% of the old oil out when you do an oil change. There’s always some carryover from one oil change to the next, and you can see that in the results.

So is it a problem that the oil looks dark right after an oil change? Nope. It’s fairly normal for oil to darken quickly after an oil change. If anything, it seems to suggest that the oil is doing just what it’s supposed to be doing: collecting contaminants and combustion by-products and keeping them in suspension so they can be removed when the oil is changed.

Sampling Methods: Go for it!

In the end, although we give you guidelines about how to sample, your method really doesn’t make too much difference. If you don’t catch a sample mid-stream, just let us know when you send the oil in and we’ll take that into account when we do the analysis. If anything unusual shows up and we think it might be related to something you did, we’ll let you know in the comments.

By |2024-09-19T09:14:05-04:00July 28, 2023|Articles, Gas/Diesel Engine|Comments Off on Sampling Methods

The Renuzit Experiment

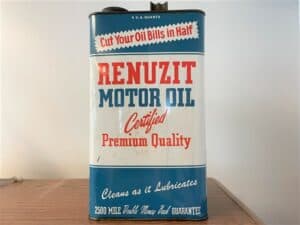
A while back I wrote about buying close to 30 full cans of old oil on eBay, cracking them open, and testing them. It was fun to see what all these old oils looked like, and we ended up learning a lot, but at the end of it all, I had close to 30 Ball jars full of old oil that ended up sitting on the shelf here in the garage, and lingering questions about what to do with it all.

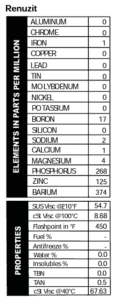
Among the stuff I bought was a gallon can of oil that I never heard of called Renuzit 20W/20. When it first arrived, I was slightly annoyed because the can itself had some rust on the bottom and was seeping oil. However, that turned out to be fortunate because it led me to try an experiment: Can I really run oil this old, and what would happen?

I decided my 1984 Chevy pick-up truck would be a good test bed for this experiment. I have a lot of good base-line data on how it looks. It sees roughly the same type of use year-to-year, and best of all, if the engine exploded, I wouldn’t sue myself for damages.

So on a hot day in August 2012, with the help of my lovely assistant Natalie I actually dumped that stuff in. Was I nervous? You bet! Renuzit doesn’t exactly have a stout additive package, though that didn’t scare me too much. I’ve run oils in this engine that didn’t have any additive at all that we could read.

The viscosity was a little light (in the 20W range), but that didn’t bother me too much either. This engine calls for a 10W/30, and anymore 10W/30 oil looks like 5W/30 after it’s used, and that’s just a few points higher than a 20W anyway.

I guess I was really nervous about destroying my engine. I have rebuilt it in the past, and I know I could do it again, but that doesn’t mean I want to. My wife wouldn’t be too happy about the time away from home and you never know, I might actually need my truck for transportation.

Still, after declaring my intentions to our good customers around the world, I couldn’t back down, so in it went. Upon first start-up I was relieved to see my oil pressure read normally. No funny smells came out of the engine/exhaust, and it seemed to run just fine. So far, so good. And with that, I proceeded to the next part of the test, which is always the hardest, putting miles on the engine.

Adding miles

My truck is basically a backup vehicle, used when I need to haul something or if one of our other vehicles is down, so getting miles on the oil isn’t really all that easy. I live about 1.7 miles from work, so if the weather is nice, I usually ride my bike. On top of that, my daily driver is a MINI convertible, which is about as fun of a car to drive as was ever made. Still, I worked hard and was able to get some miles on my truck.

Right off the bat, I noticed that the engine ran quieter than normal (of course, I also had some muffler work done at the same time, so that may have helped). By November, I was able to get about 400 miles on the engine, so I decided to test the oil (leaving it in use) and see how it was doing.

The test came back showing no trouble at all, so I was happy and started to feel better about this experiment. Winter is a slow time for the truck. It actually lives in my neighbor’s garage and doesn’t see a lot of use. Being a rear-wheel drive pick-up truck, it doesn’t do very well in the ice and snow. Eventually spring came so the truck use started to increase but that’s when tragedy struck!

Sad Mini

My MINI flooded one night while I was in Chicago with some friends. It was a rare occasion that the car actually spent time parked on the street in front of my friend’s house, and it just happened to be the night the north side of Fort Wayne got about six inches of rain in an hour. The street turned into a lake and my car went for a swim.

The bright side 

The good news is that my truck was still running well and, being promoted to daily driver, I was going to start putting a lot of miles on it. Over the summer and into the fall I was able to accumulate almost 2,000 miles which is still short of 2,500-mile double-money back guarantee that the Renuzit can advertised, but a long run for my truck.

In fact, I was thinking about running the oil longer, but it was close to the “Add” mark on the dipstick, and not having any more of this oil, I decided to just go ahead and change it. A sample was taken (of course) and the results aren’t any better or worse that what I’ve received in the past.

So there you have it — an ancient oil run in a fairly modern engine, and no harm done. Would I run it again? Sure thing, except it goes against my principle of not paying any more than I have to for an oil change. That stuff was $75 for 5 quarts, plus $25 for shipping and that’s not in my budget, even if I could find it again. Still, this was a fun experiment, and since Blackstone still had a lot of old oil leftover from the eBay purchases, I decided to run those. Besides, it’s canning season and I need the jars.

By |2024-09-19T09:16:55-04:00July 28, 2023|Articles, Gas/Diesel Engine|Comments Off on The Renuzit Experiment

How Often Should You Change Your Oil?

Change is inevitable, right? But not as inevitable as it used to be, at least for your engine oil. When it comes to the questions we get every day, right up there with “What kind of oil should I use?” is “How often should I change my oil?” Happily, the answer for most people is: Not as often as you used to.

What other people will tell you

Back in the day, everyone knew you changed your oil at 3,000 miles or three months, whichever comes first. Wait, did I say back in the day? Lots of places still tell you that’s how often to change it, and not surprisingly, the places you’re hearing this are oil change places that make money from you coming in regularly. We’re here to help cut through the noise, and hopefully you’ll believe us because hey, we’ve got science on our side. The answer to how often you need to change your oil is: It’s different for everybody.

Owner’s manual

Most cars and trucks (motorcycles, boats, etc.) have guidelines listed in the owner’s manual that outline certain driving conditions and how often to change the oil.

The problem is, sometimes the conditions they outline as “severe” are laughable. We’ve seen manuals that say if you’re doing primarily city driving, that’s severe. Call me silly, but I’d say “severe” should count as something that’s out of the ordinary for most people. Most people drive to work and back. Most people drive to the store, go to school, take the kids to school, whatever.

Severe operation, on the other hand, could legitimately be something like lots of operation on dusty roads, towing constantly, driving really fast in a really hot or really cold place, or driving up and down mountain passes. Under these conditions, we could see needing to change the oil more often. But again, it really is a case-by-case thing. City driving for me, in Fort Wayne, Indiana, is different from city driving in LA.

The point is, despite the best intentions of the people who write the guidelines, how often you should change your oil really depends on you, your engine, how you drive, and where you drive. One caveat: As long as your engine is under warranty, you should change however often the manufacturer says to. That way if something goes wrong, they can’t blame you for lack of maintenance.

OLM

Most new engines also come with an oil life monitor to tell you when to change the oil. This is a good system, and even if it’s not 100% accurate all the time, it’s better than the 3,000 miles or three months system.

Different oil life monitors take different things into account. We’ve been told that certain German automakers changed from basing theirs on variables such as cold starts and RPMs to basically counting down the amount of fuel used. Some have a sensor in the oil that estimates particulates in the oil. Some monitors seem to give better recommendations the longer you use them. All this is fine and it’s better than nothing, but there’s also oil analysis. Guess which method we like best for determining how often you should change the oil?

What we look at

When you send in a sample, we ask on the oil slip if you’re interested in extended oil use. What we want to know is, do you want to run your oil longer than you currently are? We have found that people are often changing their oil too soon. As you know there is not one oil-change interval that’s perfect for everyone, so what do we take into account when we do recommend longer oil changes?

Metal

If you’ve seen our report, you know that we keep a database of all different engine types. We average their wear and then compare that to your sample to see what’s reading high, what’s normal, and what’s better than most. We like it when you send along notes. The more you tell us about how you’re driving or any specific conditions that might affect the sample, the better the recommendation we can give you.

If wear is above average, we always look for reasons that might explain why. For example, say your metals are generally higher than average but you’re also running your oil longer than average. We take that into account and give you an estimate on how much longer we think you can go for the next oil change.

We don’t like to take too big of a leap. We wouldn’t, for example, tell you to go from 5,000 to 10,000 miles because you might send in a 10,000-mile sample and have lots of wear, and we wouldn’t know where the tipping point was. But we might tell you to go 7,500 miles next, and if things look good at that point, to go longer after that.

Some people automatically think having more wear than average is bad, but that’s not necessarily so. If there’s a good reason for the wear, and if there’s not so much metal that it’s making the oil itself abrasive, we’re happy to let a little extra metal ride. The question is, are you okay with it? In the end our recommendation is just our opinion, and you should do whatever you’re comfortable with.

Sometimes we suspect a problem and we’ll recommend a shorter oil change. Obviously shorter oil changes don’t fix a problem if one exists, but they do let you monitor the problem more closely and get the extra metal out of the system. Once a lot of wear builds up, the oil itself can become abrasive, which causes even more wear. It’s a cycle to avoid.

Contamination

We also look at any contamination that might be present in the oil. Obviously no contamination is the best, but your engine can tolerate small amounts of fuel and (sometimes) moisture without it being a serious problem.

Fuel is actually a very common contaminant. It mainly comes from normal operation and idling, and as long as it’s not causing any wear problems, we usually would recommend a longer oil run even with fuel present. But if fuel persists or the trend is one of increasing fuel with each oil change, we’d probably recommend cutting back on your oil changes for the reasons outlined above.

We don’t see water very often because modern engines are closed up tight. But we do see antifreeze, and when it’s present we almost always recommend changing the oil more often. Antifreeze destroys the oil’s ability to lubricate parts, which is why it starts causing poor wear so soon (usually bearing wear).

We also look at how oxidized the oil is with the insolubles test. Oil oxidation happens normally and for the most part, your oil filter removes the oxidized solids from the system just fine.

Occasionally something (excessive heat, contamination) causes the oil to oxidize faster than usual and the oil filter can’t keep up. In this case we would also recommend a shorter oil change, at least until you can figure out why it’s happening.

The insolubles test also helps us determine soot problems for diesel engines. If soot is excessive but everything else looks okay, we might suggest trying a longer run. Or if there is ring wear and other signs of poor combustion, we would probably tell you to cut back.

Operation

How you drive is another factor we take into account when we suggest your next oil change interval. If you and I both have the exact same Subaru engine except you go to the track regularly and all I do is drive to work and the store, then you might get a different recommendation than me. Or maybe you won’t — if your engine looks good and it’s faring well under the racing conditions, we might be running the same oil changes.

Or, if someone tells us their commute is a long highway drive every day, that person may be able to go a lot longer on their oil than someone with the same engine who drives two miles each way to work and back every day. It’s all in the numbers. The numbers don’t lie!

What about the oil?

Notice what we have not said we take into account: the brand you’re using and whether it’s synthetic or petroleum oil. When Jim started this company back in 1985 he came up with a line he liked to use: Oil is oil. We still stand by that today. The oil guys would have you believe otherwise, but brand really does not seem to make a difference in how your engine wears, or how often you can change your oil.

Well, okay, if you were using some guy’s oil that he “recycled” in the back of his garage from emptied-out oil pans that he filtered with a piece of cheesecloth, we might say in that case brand does matter. But as long as you’re using an API-certified oil, your engine probably isn’t going to care what you use. We like synthetics and we like conventional oil. In the end, what you use and how often you change your oil is completely your choice. We’ll give you our recommendation and you can do whatever you want with it. If you want to run longer on the oil despite having high wear, that’s totally fine. And if you have great numbers and you like changing at 3,000 miles, that’s perfectly fine too. It’s your engine, your money, and your life: change it when you want!

By |2024-09-19T09:19:01-04:00July 28, 2023|Articles, Gas/Diesel Engine, Marine|Comments Off on How Often Should You Change Your Oil?

Rebuilding a GM 350 Engine

This is a story of my first complete rebuilding an engine. The engine is a GM 350 V-8 out of a 1984 Chevy Custom Deluxe pickup truck. The truck was custom in that I’m fairly sure no other truck is rusted in exactly the same way, and deluxe in that both windows still roll down.

I purchased this truck in 1999, and one of the sales points of the truck was the engine. It started up and ran well, though it had a super high idle that did not want to drop down after the engine warmed up. The vehicle doesn’t have an RPM gauge so I can’t say exactly how high it was, though it was so fast that I did not need to step on the accelerator after a stop light and it would get up to about 35 MPH on its own. I figured this was a carburetor problem and could be addressed later.

I was in love with the truck and had to have it. I didn’t even bother to do an oil analysis on it before I bought it, partly because I felt I could fix anything that went wrong and partly because I was scared at what I would find.

Oil report on a sludge sample - lots and lots of metal present

After pulling the first sample, I was glad I hadn’t seen it before I bought it. This engine had clearly been used and abused, which was to be expected for a former work truck with over 160,000 miles on it. (See Report #1 B30210.) I felt that if I changed oil several times over the next few thousand miles, I would be able to clean the engine up and hopefully get another 100,000 miles out of it.

This truck was not my daily driver, so the high idle problem and poor wear weren’t too big of a concern. After about two years, I pulled the original carburetor and had it rebuilt by a shop. This seemed to help for about 500 miles, and but then the high idle came back. I was also finding a lot of fuel dilution in the oil. I attributed the idle and fuel to a poor rebuild of the carburetor and my fix was to curse the guy who did the work. This didn’t help the problem, though the truck always started when I needed it, so I didn’t feel the need to try and fix it again.

Smoke on start-up

Eventually the day came when I started seeing some smoke on start-up. At first it wasn’t too bad, just a little for about a minute, but then it stared getting worse — bad enough that the smoke killed all of the mosquitoes in a two-block radius. I was told that replacing the valve seals should fix this, so I decided to take the truck out to my Dad’s barn in Ossian and tear into it.

Ossian is a little town abut 15 miles south of Fort Wayne, and among its many charms is its zip code: 46777. Maybe their town slogan should be “Get Lucky in Ossian!” Or maybe not. Anyway, Dad’s barn wasn’t the best place for engine work, mostly because it didn’t have any doors, had a dirt floor, poor lighting, and birds lived everywhere, but it was better than working on the street.

I dug into the engine hoping that I would just be able to remove the heads, get them cleaned up, replace the carburetor and we’d be back on the road. Unfortunately, when I removed the valve covers, that’s when I ran into my first problem: sludge! Not just a little hidden in the nooks and crannies of the head, but large chunks the size of a golf ball. (See figure 1 and C27858.) This was my first sign that the engine might need a little more love than I have figured on.

After removing the oil pan and finding some scored bearings, I decided to pull the whole engine and do a complete rebuild. So I borrowed an engine puller, got the engine loose, and hooked up the chains, and ran that’s when I ran into my second problem. The puller I borrowed was made for a car and I could not clear the radiator, even after jacking up the puller as far as it would go.

Removing the engine

To get the engine out, we had to lower it onto some wood blocks and hook one removable chain link from the puller arm to the webbing between the holds of the carburetor intake. This was a dicey maneuver to say the least, but it worked. I was originally thinking about swapping out the steel intake manifold for an aluminum one, but after seeing the strength of the original steel one, I was too impressed to scrap it.

Once we got the engine out, I commenced to pull it apart. I got the major parts cleaned, replaced the bearings, painted it up nice, and put it all back together. It took about a month and it was late October, but I finally had it all back together and looking pretty.

I used the same method to get the engine back into the truck. All the necessary parts went back on and I eventually got to the point at which I was ready to start it up. At the much-anticipated turning of the key, I ran into the third problem: nothing happened. Sure, the starter was trying to turn the engine over, but the engine itself was locked up solid. After some discussion, we decided I may have mixed up the order of the rod-end caps, and this acted like a clamp around the crankshaft and prevented it from turning. In hindsight, I guess I should have realized something was wrong when the engine was out and it took a crowbar on the flywheel to make it turn so I could adjust the valves, but hey, that’s hindsight, and I was a rookie.

Well, it being late October in Northern Indiana in an open barn with no heat, I didn’t really look forward to the prospect of pulling the engine out again, doing another rebuild, and then putting it all back together. Fortunately, we had just bought a new building for Blackstone to move into. It was a construction building in its previous life that had a nice big garage, a chain hoist, and a heated workshop. So we loaded the Custom Deluxe onto a flatbed and had it taken to the new building.

After a few months of off-and-on work, I had the engine back in place and ready to start up. This time it cranked over just fine and eventually started with some timing adjustments and only a little eyebrow hair burned off during a backfire.

The first few oil reports weren’t pretty, but it’s been 8,000 miles and five years since the rebuild and I’m happy to say it’s still running well. It’s still not wearing as well as I would like, but the truck doesn’t see a lot of use, so I blame that on corrosion due to inactivity. The fuel dilution is pretty much gone and I don’t get any smoke on start-up, so all in all it was a successful job.

Now that the engine is pretty much past wear-in, I’ve decided to start experimenting with it. There has been a lot of talk lately about the importance of zinc in an engine. All gasoline engines oils have an additive called zinc dithiophosphate. It’s an anti-wear additive and is normally present at a level between 500 ppm and 1,000 ppm. Apparently, newer gasoline engine oils are dropping their zinc level and this is causing cam failures in flat-tappet engines. Being a bit of a skeptic, I’m not sure this is the case, so I’ve decided to use my freshly overhauled flat-tappet GM 350 as a test bed. Stay tuned for the next newsletter as I try running Aeroshell W65 in it — an oil that doesn’t have any zinc additive it in at all.

Oil report showing improved wear after the rebuild

I’d like to thank Jim Stark (my Dad) for letting me use his barn and all the help he gave me during the process. Also C&P Machine shop for letting me know which rod end cap went to which rod (very important). And also my wife, for not throwing me out during this project.

By |2024-09-19T09:20:45-04:00July 28, 2023|Articles, Gas/Diesel Engine|Comments Off on Rebuilding a GM 350 Engine

The Fuel Experiment

When I first started at Blackstone, one of the contaminants that intrigued me the most was fuel. I guess I don’t know why finding fuel in people’s oil surprised me. Maybe I thought fuel and oil were separated by a giant wall somewhere in the engine. Or maybe (probably) I really didn’t understand engines very well to begin with and that only served to fuel (ha!) my interest in the contaminant.

We test for fuel using the Cleveland Open Cup method. Basically, we record the temperature at which the vapors from the oil ignite. All oils have a specification for what the flashpoint should be. When it’s lower than that, it’s because a contaminant is present. About 98% of the time, that contaminant is fuel (sometimes a solvent or refrigerant will lower a flashpoint, but rarely in gas or diesel engines). Basically, the lower the flashpoint, the more fuel you’ve got.

We can accurately measure fuel down to less than 0.5%, so that’s the lowest fuel measurement you’ll see on your report. The upper limit of what we can accurately read is 10.0%. If you’ve got more fuel than 10.0%, you’ve got bigger problems to worry about than the actual quantity of fuel in the oil.

When the opportunity came up to write an article for the newsletter, I readily accepted and already knew I wanted to write about fuel. In fact, I was not just going to write about it–I was going to get to the bottom of it. I was going to discover what causes fuel dilution and what causes fuel to disappear.

The plan

The guinea pig was my trusty Kia Optima (2.4L, 4 cylinder). I use my Kia mostly as a daily driver, traveling about seven miles to and from work each way. I love to travel and occasionally I get in a trip to Wisconsin or Iowa. By the time I started my quest to debunk fuel, I’d done a few samples with my Kia and only a trace of fuel had ever turned up so I didn’t have any known fuel system problems to contend with.

I decided to take the highway route home every day to ensure that every day I would cook out any extra fuel that was present in my oil. My 40-minute drive consisted of some city streets with a few stoplights at the beginning and end of my trip, and mostly sustained highway speeds through the middle of my trip.

Start your engines

The first thing I wanted to test was how much fuel entered the oil simply from starting the engine. Many people believe that starting an engine is one of the most taxing and wear-producing events throughout the engine’s life. To make that process easier, engines tend to start slightly rich (more fuel, less air). So, I set out to find out exactly how much fuel my car dumps into the oil upon startup.

After letting the engine sit all night, I took a pre-experiment test sample (to ensure no fuel was present) then I started my engine one, two, and three times, sampling after each event. The results were surprising. So surprising, in fact, that I re-ran this test two more times to make sure my results were correct.

The pre-experiment test sample revealed a flashpoint of 360ºF (fuel at <0.5%). Okay, good. No measurable fuel was present, which is exactly what I was hoping for since I’d taken the highway route home the night prior.

After one engine start, the flashpoint read 385ºF. Wait a minute. That’s higher than the pre-sample, so there’s definitely still no measurable fuel present. Okay, maybe that was just an anomaly.

I started the engine again (for a total of two engine starts in a row). The flashpoint measured 380ºF. That meant the flashpoint was heading in the expected direction (lower flashpoint = more fuel), but still, the flashpoint wasn’t low enough to show any significant fuel.

After the third start in a row, the flashpoint read 375ºF, which was again lower (and heading in the expected direction), but not low enough to show any measurable fuel. So all four of my samples from that morning had the same fuel measurement: <0.5%.

I was stumped. I was so certain I’d have some fuel in my oil! So I ran the test again and the same thing happened: no measurable fuel present in any of the samples. I re-ran the same exact test once again, and once again got similar results.

I decided perhaps my Kia was just very good about keeping fuel out of the oil, so I took my husband’s car with a supercharged 2.0L Ecotec engine for a day and tried the same test. The results? Same thing: no fuel, with slight fluctuations in the flashpoint.

Then I had an “a-ha!” moment. Maybe the fuel just wasn’t getting a chance to seep down past the rings into the oil. I had been sampling immediately after starting, so maybe that’s why no fuel showed up. So I ran the test again, only this time I let my engine sit overnight after the three starts.

In the pre-experiment test, the flashpoint measured 370ºF, showing <0.5% fuel. I started my engine three times and immediately after the third start, the flashpoint measured 360ºF, which was lower but still not low enough to show any measurable fuel.

Then I let the engine sit all night and sampled before work in the morning. That test revealed a flashpoint of 365ºF; still no measurable fuel. By this point I wanted to find a brick wall to repeatedly press against my forehead in a semi-violent manner. I was frustrated, confused, and worried that I’d have nothing to write about.

I suppose if we wanted to get into semantics, we could talk about the slight differences in flashpoints as showing some fuel, though it takes a 20ºF drop in flashpoint (for gasoline engines) to show 1.0% fuel dilution. So that means the 5ºF drops in flashpoint I’d noticed likely show just 0.25% fuel.

Does starting cause fuel? Perhaps. I did find slight dips in the flashpoint, though as I’ve mentioned, 5ºF isn’t enough to show any serious contamination. Maybe four starts would have given me enough of a drop in flashpoint to get a decent amount of fuel in the oil, but really, who starts their engine four times in a row? Honestly, who starts their engine even three times in a row on a regular basis? I wanted these to be relatively real-world scenarios, so I couldn’t justify four starts in a row, and I figured three was pushing it.

Idling

I couldn’t get any serious fuel to appear in my oil from starting the engine, so I figured I’d try idling. For a week, I drove the same highway route home, let my engine sit all night, then in the morning I’d take a pre-experiment sample (to confirm no fuel dilution was present to begin with), and then I’d sample after a certain number of minutes of idling.

I tried a five-minute idle; no measurable fuel. The next morning, I idled for ten minutes and this time I had more success: 1.0% fuel had accumulated in the oil. You know, for someone trying to get fuel contamination in my oil, 1.0% isn’t an impressive amount, but it’s more than I’d gotten before. I figured I was on to something with the idling, so I tried 15 minutes the next morning, but much to my dismay only 0.5% fuel turned up. After 20 minutes of idling, still only 0.5% fuel.

Does idling cause fuel dilution? It would seem so, except that there’s a cut-off point in there somewhere. This is just hypothetical, but maybe after ten minutes the engine heats up enough that it either starts cooking off the excess fuel dilution or it just stops pumping in extra fuel. I’m not even sure one of those is the answer, but it’s the best guess I can come up with.

Shopping for science

With my newsletter article deadline quickly approaching, I had to come up with one last-ditch effort to get a bunch of fuel in my oil. Think of this as Custer’s Last Stand (except with less bloodshed).

For one afternoon, I vowed to do everything “wrong” in order to get as much fuel as possible in my oil. I was going to run a bunch of errands, idle my engine excessively, make frequent starts and short trips. The best way I could think to do this (without just circling around my block several times in one afternoon) was in one, massive shopping trip.

I did about 40 minutes of highway driving Saturday evening then let my Kia sit all night. Sunday after church (we took the other car to ensure the consistency of my results), I went on my scientific shopping trip.

Here’s the summary of my trip. I spent a total of about six hours shopping Sunday afternoon. In those five hours, I started my engine seven times, idled at the ATM for about 2 minutes and traveled a grand total of 6.4 miles. The longest drive was from my last stop to home, which was about 2.5 miles.

I spent a fair amount of time at each stop in hopes that my engine would stay relatively cool (so as to not burn off fuel). When all was said and done, I left my engine sit overnight and sampled in the morning before work. The flashpoint read 375 ºF: <0.5% fuel.

Usually, I’m fairly good at things when I put my mind to it, but when it comes to getting fuel dilution in my engine oil, I failed. Then again, if you’re going to fail at anything, this is a good thing to fail at.

What happened?

So why couldn’t I get any serious fuel dilution? I have a couple of ideas. First, I think my Kia is just too smart. It has an on-board computer that senses things like ambient temperature, engine temperature, and elemental composition of the exhaust gas, and it uses these things to calculate the exact amount of fuel it needs to operate most efficiently. So my engine never puts in more fuel than it needs, and therefore that fuel doesn’t end up in my oil.

Second, I think ambient temperature probably has a lot to do with it. I did most of my testing in May and June in temperatures were almost always above 70ºF. We tend to see more fuel in the winter months, and I suspect that if I’d done my testing in the winter, I might have had different results. I’ve heard that on a cold day, fuel from the air/fuel mixture will condense on the cylinder walls almost instantaneously. Those beads of fuel will sit on the cylinder walls for a brief moment until the piston rings scrape that fuel down into the oil. Maybe I’d get more fuel in my oil in winter, but I’m not sure I’m willing to do these experiments in the dead of winter in the name of science. If I do, you’ll hear from me again and I’ll let you know what I find out.

Does the fact that I couldn’t get any fuel in the oil mean that idling, city driving, and frequent starts do NOT cause fuel dilution? We don’t think so. In some cases these things can cause fuel contamination, especially in carbureted engines.

We saw it with our own eyes several years ago, when an intern did a similar experiment out in the parking lot. He took a sample from his 1978 Ford pickup truck when it was cold, and that oil had no fuel in it. Then he started the engine and took another sample right away, and presto! Fuel contamination at 1.3%. So start-up can indeed cause fuel to enter into the oil, but newer engines may be better at avoiding excessive contamination.

Since fuel often comes and goes, we still believe operational factors are likely sources for fuel dilution, though perhaps injector problems are responsible for more of the fuel we see in new engines than we originally thought.

Now here’s the big question: if fuel is present at 2.0% in your sample, does that mean you have a problem? Not necessarily. Just because my Kia didn’t produce fuel dilution doesn’t mean your Honda, Ford, GM, Volvo, or other engine won’t. Every engine operates a little differently and uses a different calculation to figure out how much fuel to spray into the cylinders. Some engines tend to run a little richer for some reason or another.

Of course, if your engine doesn’t have an on-board computer, you won’t have the opportunity to benefit from its fuel-reducing powers, so fuel may be more prevalent in your samples. It should be noted that I didn’t have the opportunity to test a carbureted engine or a diesel engine, which would almost certainly render different results. So I can’t say what’s normal for those types of systems.

So how do you know if fuel is a problem? There isn’t a one-size-fits-all answer. Whether or not fuel is a problem depends on your circumstances. Some engines will always see some fuel dilution because of the operation they see or the type of engine they are. Turbo and supercharged engines, for example, have higher compression, which means more blow-by, and we sometimes see that raw fuel blowing past the rings. In small amounts, that can be fine. In larger amounts, it’s probably not.

If you start to notice that fuel is increasing wear or diluting the additives in your oil, that can be a sign that fuel’s a problem. If you notice increased wear and lingering fuel dilution, it may be time to get the fuel issue taken care of. Finally, if you notice your engine is “making oil” (the oil level seems to be rising on the dipstick), you might have a fuel system problem. I can tell you this: if you have a Kia 2.4L 4-cylinder engine and you find fuel at more than 1.0%, you may have a problem. You might also have an e-mail in your inbox from me asking you for pointers.

By |2024-09-19T09:21:21-04:00July 28, 2023|Articles, Gas/Diesel Engine, Lab Tests|Comments Off on The Fuel Experiment
Go to Top