Rebuilding a GM 350 Engine
This is a story of my first complete rebuilding an engine. The engine is a GM 350 V-8 out of a 1984 Chevy Custom Deluxe pickup truck. The truck was custom in that I’m fairly sure no other truck is rusted in exactly the same way, and deluxe in that both windows still roll down.
I purchased this truck in 1999, and one of the sales points of the truck was the engine. It started up and ran well, though it had a super high idle that did not want to drop down after the engine warmed up. The vehicle doesn’t have an RPM gauge so I can’t say exactly how high it was, though it was so fast that I did not need to step on the accelerator after a stop light and it would get up to about 35 MPH on its own. I figured this was a carburetor problem and could be addressed later.
I was in love with the truck and had to have it. I didn’t even bother to do an oil analysis on it before I bought it, partly because I felt I could fix anything that went wrong and partly because I was scared at what I would find.
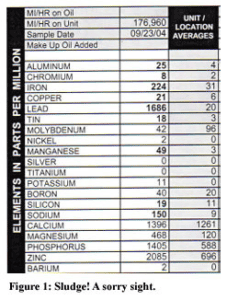
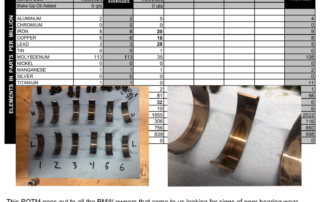
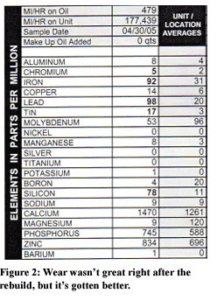
After pulling the first sample, I was glad I hadn’t seen it before I bought it. This engine had clearly been used and abused, which was to be expected for a former work truck with over 160,000 miles on it. (See Report #1 B30210.) I felt that if I changed oil several times over the next few thousand miles, I would be able to clean the engine up and hopefully get another 100,000 miles out of it.
This truck was not my daily driver, so the high idle problem and poor wear weren’t too big of a concern. After about two years, I pulled the original carburetor and had it rebuilt by a shop. This seemed to help for about 500 miles, and but then the high idle came back. I was also finding a lot of fuel dilution in the oil. I attributed the idle and fuel to a poor rebuild of the carburetor and my fix was to curse the guy who did the work. This didn’t help the problem, though the truck always started when I needed it, so I didn’t feel the need to try and fix it again.
Smoke on start-up
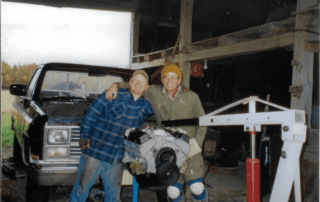
Eventually the day came when I started seeing some smoke on start-up. At first it wasn’t too bad, just a little for about a minute, but then it stared getting worse — bad enough that the smoke killed all of the mosquitoes in a two-block radius. I was told that replacing the valve seals should fix this, so I decided to take the truck out to my Dad’s barn in Ossian and tear into it.
Ossian is a little town abut 15 miles south of Fort Wayne, and among its many charms is its zip code: 46777. Maybe their town slogan should be “Get Lucky in Ossian!” Or maybe not. Anyway, Dad’s barn wasn’t the best place for engine work, mostly because it didn’t have any doors, had a dirt floor, poor lighting, and birds lived everywhere, but it was better than working on the street.
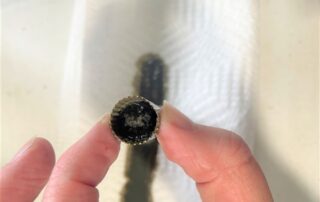
I dug into the engine hoping that I would just be able to remove the heads, get them cleaned up, replace the carburetor and we’d be back on the road. Unfortunately, when I removed the valve covers, that’s when I ran into my first problem: sludge! Not just a little hidden in the nooks and crannies of the head, but large chunks the size of a golf ball. (See figure 1 and C27858.) This was my first sign that the engine might need a little more love than I have figured on.
After removing the oil pan and finding some scored bearings, I decided to pull the whole engine and do a complete rebuild. So I borrowed an engine puller, got the engine loose, and hooked up the chains, and ran that’s when I ran into my second problem. The puller I borrowed was made for a car and I could not clear the radiator, even after jacking up the puller as far as it would go.
Removing the engine
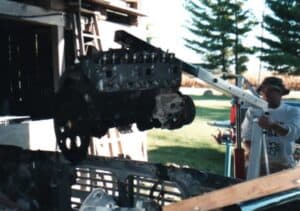
To get the engine out, we had to lower it onto some wood blocks and hook one removable chain link from the puller arm to the webbing between the holds of the carburetor intake. This was a dicey maneuver to say the least, but it worked. I was originally thinking about swapping out the steel intake manifold for an aluminum one, but after seeing the strength of the original steel one, I was too impressed to scrap it.
Once we got the engine out, I commenced to pull it apart. I got the major parts cleaned, replaced the bearings, painted it up nice, and put it all back together. It took about a month and it was late October, but I finally had it all back together and looking pretty.
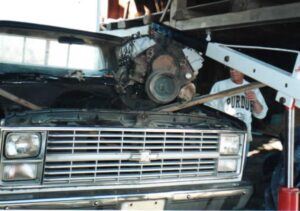
I used the same method to get the engine back into the truck. All the necessary parts went back on and I eventually got to the point at which I was ready to start it up. At the much-anticipated turning of the key, I ran into the third problem: nothing happened. Sure, the starter was trying to turn the engine over, but the engine itself was locked up solid. After some discussion, we decided I may have mixed up the order of the rod-end caps, and this acted like a clamp around the crankshaft and prevented it from turning. In hindsight, I guess I should have realized something was wrong when the engine was out and it took a crowbar on the flywheel to make it turn so I could adjust the valves, but hey, that’s hindsight, and I was a rookie.
Well, it being late October in Northern Indiana in an open barn with no heat, I didn’t really look forward to the prospect of pulling the engine out again, doing another rebuild, and then putting it all back together. Fortunately, we had just bought a new building for Blackstone to move into. It was a construction building in its previous life that had a nice big garage, a chain hoist, and a heated workshop. So we loaded the Custom Deluxe onto a flatbed and had it taken to the new building.
After a few months of off-and-on work, I had the engine back in place and ready to start up. This time it cranked over just fine and eventually started with some timing adjustments and only a little eyebrow hair burned off during a backfire.
The first few oil reports weren’t pretty, but it’s been 8,000 miles and five years since the rebuild and I’m happy to say it’s still running well. It’s still not wearing as well as I would like, but the truck doesn’t see a lot of use, so I blame that on corrosion due to inactivity. The fuel dilution is pretty much gone and I don’t get any smoke on start-up, so all in all it was a successful job.
Now that the engine is pretty much past wear-in, I’ve decided to start experimenting with it. There has been a lot of talk lately about the importance of zinc in an engine. All gasoline engines oils have an additive called zinc dithiophosphate. It’s an anti-wear additive and is normally present at a level between 500 ppm and 1,000 ppm. Apparently, newer gasoline engine oils are dropping their zinc level and this is causing cam failures in flat-tappet engines. Being a bit of a skeptic, I’m not sure this is the case, so I’ve decided to use my freshly overhauled flat-tappet GM 350 as a test bed. Stay tuned for the next newsletter as I try running Aeroshell W65 in it — an oil that doesn’t have any zinc additive it in at all.
I’d like to thank Jim Stark (my Dad) for letting me use his barn and all the help he gave me during the process. Also C&P Machine shop for letting me know which rod end cap went to which rod (very important). And also my wife, for not throwing me out during this project.
On Towing
A harrowing tale
It was a late and dark night in the California mountains. Our 36-foot, hinged-in-the-middle rig was straddled in a sharp “V” across a two-lane mountain highway, with no obvious way to get unstraddled. Behind us was a vertical rise in the terrain going straight up, in front of us a sheer drop off that appeared to be a black abyss. Up and down the highway the pavement curved to invisibility. We were sitting ducks for any unsuspecting semis that may have been motoring innocently along the route at highway speeds. I could imagine our stranded rig suddenly coming into view of a trucker who knew in a flash his goose was cooked: He could shoot off the cliff or T-bone us. It would be a spectacular crash.
How we got in this predicament is embarrassing. It was the fourth consecutive driving error on my part and it could have been my last. My truck was not ideal for towing: I had the off-road package, not the towing package. Gas stops in the California mountains are infrequent, making it nearly impossible to drive on the bottom half of the tank. We had planned to arrive on the west coast at 6:30 pm. But we needed gas, and no gas was available in the foreseeable future, so we had to turn around. We’d passed a Shell station 35 miles back and the only solution was to drive back and fill the tank.
We were quite tired by this point, and frustration was setting in. The drive back was up and down steep grades. When the station finally came into view we were coming down a steep grade and we saw the station on the right. What we missed was, the road curved sharply to the right and the station was actually on the left. This is important, as you’ll see.
After filling up, I ran over a tall curb getting back to the road. It wasn’t a huge problem, but the camper doesn’t have much ground clearance and the scraping noise was painful. I turned left to finish our drive to the coast. Kathy dozed in the right seat.
Maybe 45 minutes later, I started wondering where all the hilly terrain was that we had driven over getting back to the gas station. I woke Kathy and asked her to turn on the GPS. You can probably see where this is going, right? We were headed east, not west! The frustration level immediately increased to a silent roar inside my head.
I needed to turn around (again) but there were precious few places to do so. I finally found a wide spot in the pavement, just wide enough you could pull a car clear of the road. I pulled as close to the side of the mountain as I could and swung a hard left to make the u-turn. As we neared the far shoulder Kathy screamed, “STOP!” I raised up off my seat for a look and our right tire was about to drop off the side of the cliff, into the blackness.
What to do? I was already jack-knifed. I didn’t know if I could gain anything in reverse but I sure couldn’t go any further forward. After a moment’s consideration, I cranked hard right in reverse and forced the jack-knife as tight as I could without breaking anything. I cranked hard left, shifted to 1st gear and popped the clutch. I’ll never know if that right front tire caught air or not, but we didn’t drop off the cliff.
We finally made our destination at 11:30 that night. We had to stop at the Shell station a second time to assure we would make it. All the rest of the drive I was thinking, don’t make a fifth error. It will surely be the end!
The trailer
We were pulling new camping trailer we had bought the week before we left. I had no experience towing loads other than incidental occasions in my 50-plus years of driving. A couple times unreasonable trailer loads had nearly overwhelmed whatever vehicle I had been driving at the time. This was experience I didn’t want to repeat.
We had been planning to drive to the west coast for some time, but only at the last moment did we realize we had the funds to buy a camper. Kathy used to own a trailer that she pulled with a half-ton pick-up. It was an older unit and heavier than what we eventually bought, a 16-foot unit that weighs just short of 3,000 pounds empty.
I drive a Toyota Tacoma and until I actually studied the owner’s manual about weights and capabilities (well into our towing trip), I had no idea the limits of my truck. I made the trailer purchase based on hitch weight, a number I looked up as we were talking to the camper salesman. He said we could pull this unit and I was little less than shocked to find he was right. The hitch weight of the trailer we were looking at was about 50 pounds less than the Toyota book suggested I could put on the hitch. With that fact alone, we went ahead and bought the trailer. The salesman said: “You won’t even know the trailer is on there!” How many times have you heard something like that?
The experiment
I wanted to leave my old oil in the crankcase to demonstrate how abrasive, used oil can affect the bearings when you work an engine hard. Toyota engines don’t make much metal under any circumstances, and for the near 100,000-miles I have driven this truck, I’ve never seen as much as 1 ppm lead in the oil from the bearings. Typically I change oil every 9,000 miles. Most of my driving is easy: country roads at moderate speeds, only rarely hauling anything, though I don’t hesitate to bump redline often…like nearly every time I drive. Don’t ask why. I’m out in the country and I just like the feel of the engine as it accelerates past 5,000 rpm. I’ve always contended that driving an engine hard doesn‘t hurt anything so long as you stay within redline. I’m still of that opinion.
Anyway, for this trip, I wanted to demonstrate that you can get poor bearing wear if you work an engine hard with dirty oil in it. I had more than 5,000 miles on the oil when I bought the trailer. Miles on the oil were accumulating fast and I still hadn’t left. I knew the next drive was going to be more than 6,000 miles…and at the last minute I chickened out. I could imagine the oil was going to be running warmer than usual and at 11,000 miles or so, the 5W/30 oil could turn to sludge and I’d puke the engine. I’d never live that down.
So I changed oil at the last minute and also had the rear differential and transmission serviced since I knew those gearboxes would run warmer as well. When I got back from the drive I knew I would have a nice apples-to-apples oil analysis comparison for the engine: the first analysis showing routine wear under no-load driving, the second I assumed would show much higher wear after abusing the engine to the extreme with a heavy load in mountains and across deserts.
Get up & go!
Kathy had a week to load the camper. I realized I had no idea how much weight she was putting into it. I thought momentarily about driving to a local stone quarry and having it weighed. That thought didn’t take root. Life is a gamble, right? Start to finish. In the end I loaded up a full row of firewood in the front of the truck bed, threw in the heavy cooler, hooked up and towed the load into a cold, gloomy, late October evening.
The first leg was 100 miles due south. There was a nasty, gusting crosswind from the west and it had me talking to myself for a couple of hours. I was sincerely wishing for another 50 horsepower and a heavier truck. Then we turned due west into the wind and things started settling down. I had Kathy drive to tell me how it felt compared to her half-ton pulling her old camper. She liked the feel of it. My heart rate was trying vainly to return to normal and her opinion helped a lot. Being married to an excellent driver is a blessing I hope you enjoy. I even started getting some honest hope that the next 6,000 miles wasn’t going to be a nightmare.
We crossed the fields and plains and wove our way into the mountains. The driving got easier. I never did get to the point the trailer salesman suggested (“You’ll never know it’s there!”) but mile after mile, the tension eased and we started having fun. We made Las Vegas a day early even though the normal approaches to the Hoover Dam were closed, causing long detours. We parked at an RV park just on the south side of Vegas proper and at the appointed hour, enjoyed talking about Blackstone to a large group of RVers.
Mountain driving got serious after we toured Death Valley and headed west across California. The climb out of Death Valley was memorable. From 282 feet below sea level to about 7,000 feet above in a very short stretch of road, we did our hardest climbing. Twice the steep grade got me down to second gear. That’s second gear on an Interstate highway and no one else was doing much better.
All this hard climbing, and all through the trip the coolant temperature didn’t vary at all. It just sat there like the needle was painted on. I’ve had normal cars overheat climbing up places like Pike’s Peak, just plain old cars with hardly any load in them. Here’s my Tacoma (we started calling it Taco-Ma) leaving Death Valley pulling 3,000 pounds of trailer and all the stuff Kathy packed in it along with a heavy cooler and a full row of firewood, and we got no variation in water temperature. I’m more than impressed. I’m amazed!
Gas mileage, however, was terrible. Normally Taco-Ma averages about 22 mpg on the highway. For the total trip, we averaged 12.6 mpg. There are long stretches of highway in the west where you can’t find gas. We had one “white-knuckle” drive that left us with less than a half-gallon by the time we found a station. After that, we started carrying four gallons in the bed of the truck.
Drive it like a bug
Towing the trailer reminded me of driving the original, underpowered VW Bugs. They could run about 70 mph on the flat, full-out. If you wanted to not slip too slow on the next upgrade, you held the petal to the metal on the downgrade and held it there, using momentum keep the speed from decaying. The end result is you keep the petal planted hard for most all hilly driving. Watch redline like a hawk. Shift when you must. Don’t let RPM sag too low. Driving like this, no wonder we lost ten mpg on this trip.
The drive took us to southern California for a couple of days, then back into Nevada and on down to Tucson for a couple more days. We crossed New Mexico, entered Texas down near El Paso where immigration problems are evident. We passed through a check station and as we approached we passed by a dozen sensors of some type staring us in the face, like so many cameras of a sort in a bank of equipment. They can apparently see through cars, trucks, and campers because they let us pass without much thought. There were no stowaways aboard.
We drove Texas diagonally ending up at Texarkana. You can drive 80 mph in southwest Texas. We didn’t. Could have, I suppose, though by that stage of the trip, I’d had enough of pushing the engine.
When Taco-Ma’s V-6 shoulders into a hard, long pull (which was invariably accompanied by Kathy and I shouting in unison, “Go Taco-Ma, go!”) you hear a sound of seriousness. The engine is an airpump. When you work it as hard as you can, throttle mashed to the floor, mile after mile, the serious roar is the scream of air intaking, passing through the core of the engine, and the jetting out of exhaust. It’s a heavy growl, an awesome sound. I’d heard it enough by the third week. And by then I was thinking seriously we might get home with no serious problems. The day-long drive across Texas was made about as cautiously as I could make it.
From the barren plains of Texas to the beauty of Arkansas was dramatic. Arkansas comparatively, looked like the Garden of Eden; like less populated parts of Wisconsin or Michigan. It also felt like we were closing in on home. Mountains and deserts behind us. Now just stay awake and drive.
We finally got to use the firewood in Tennessee. We burned it all in one night and what I learned was, the extra weight in the bed had been a nice asset. We had played with weights and balances daily for the trip, trying to find the magic balance for perfect handling. Turns out, using the firewood made the most difference of anything we’d tried. Less weight all around and almost none in the truck bed left the unit squirrelier than for any other trip leg.
The moment of truth
As soon as we got back I had the engine oil changed, along with any other gearboxes I hadn’t already changed out earlier. A day later my emailed report arrived. To my amazement and delight, engine wear hadn’t changed at all! Not a bit! The extra 1 ppm iron that turned up is from the longer oil change (6,672 miles vs. only 5,175 miles for the pre-trip sample). Iron tends to accumulate with more miles on the oil.
I was wrong in my assumption that towing and mountain driving would cause excessive wear. In large part I think this can be chalked up to the engine type. Perhaps it would have turned out differently had I been using old oil; the metals could have conceivably accumulated to levels that would have made the oil abrasive, which will cause excessive wear. But with clean oil, I didn’t find any change at all. Taco-Ma did us up right.
So will the same thing happen for you? If you run autocrosses or run at a drag strip or do anything other than ordinary driving, does your engine wear change as engine stress increases? Sometimes it does, but in the end there’s no hard and fast rule. So much depends on the engine, the driver, and the environment.
That’s why it’s no good to say all engines should have an oil change at 3,000 miles or 5,000 miles or beyond. The oil and engine combination that works for one guy may not work for the next, simply because all situations are different. It seems logical that if you don’t keep clean oil in the sump when loading the engine heavily, you will wear more at bearings. But if you run clean oil? Maybe no change. Try it and see.
Aircraft Problems: Should I Be Worried?
One of the main purposes of oil analysis it to find problems that might be developing in an engine, and after doing this for a lot of years, I can say without a doubt that it works. However, some problems are more urgent than others, and part of our job is to determine if a problem is a major one or not. Most engine problems start out minor but if left unchecked can lead to major issues, which eventually result in an engine’s demise.
Minor problems
Abrasive Contamination
Dirt getting past the air filter will cause a lot of problems in an engine, and piston scuffing is the primary concern. Fortunately, most air filters do a really good job even when they are dirty. If you change your air filter on a regular basis, then this type of problem is pretty easy to avoid, but remember, it’s also important to check the whole air induction system down-stream of the air filter to make sure no cracks or other problems exist that could be letting dirt in.
Fuel dilution
This generally includes any fuel level between 1.0% and 3.0% that keeps showing up again and again. This is not a normal situation, but it doesn’t necessarily cause an engine problems in the short term. Still, since fuel is a contaminant, it will cause the oil to oxidize faster that it normally would. That typically causes problems like stuck oil control rings, which leads us to our next minor issue.
Oil Consumption
This one isn’t really a problem at low levels because all engines are designed to use some oil. What you really want to watch out for is a change in how much oil is being burned. If you always use 1 quart every 10 hours and it suddenly jumps to 1 quart every 3 hours, then you know something has changed. That’s part of the reason we ask about oil added between changes. If you’re not losing oil due to a leak, it’s either getting past the rings or the valve guides. Granted, you can buy a lot of make-up oil for the cost of a top overhaul, but there will probably come a time you’ll have to bite the bullet and fix the issue.
Corrosion
If you fly around 5 hours per month, that should keep this minor problem off you mind, though we all know that life doesn’t necessarily allow this. Still, if corrosion is minor it should easily disappear once the engine is back to flying regularly. If corrosion gets so bad that it causes pitting on the parts, that’s when the problem elevates to major status.
Major problems
Cam spalling
This one is often directly related to corrosion getting out of hand, though it can also be related to oil starvation on things like cold starts and high RMP starts. It takes time for that thick oil to get circulating through the engine and if it doesn’t get to the cam and followers fast enough, metal-to-metal contact happens. Problems of this nature won’t necessarily cause an engine to fail, but can lead to loss of some power, which might be needed to clear that 50’ obstacle at the end of the runway.
Excess Heat
This is really a pretty broad category and is often due to operational factors, though it’s almost always avoidable if you are paying attention to your cylinder head temperatures. If those are getting too hot, then maybe the cooling baffles aren’t quite working like they should. Maybe you have a crack in an air induction tube. That could allow abrasive dirt into the combustion chamber, but would also cause that one cylinder to run leaner than others (due to extra air being sucked in) and likely hotter. Excess heat causes the parts to expand more than they were designed for and that’s when wear starts getting heavy.
Stuck or Burned Valves
Abrasive contamination, fuel dilution, and oil consumption will all contribute to this type of problem. Sticking valves can be identified by things like morning sickness (not necessarily in the morning), intermittent rough running, and high mag drops (not due to a fouled spark plug). Burned valves are usually pretty easy to spot with a borescope though might not necessarily cause major operational problems until they burn to a point where compression has significantly degraded.
Detonation
This issue develops in an engine when the combustion process is not completed correctly, usually when an engine is under a heavy load and producing a lot of heat. It can easily burn a hole right through the top of a piston, resulting in all of the oil in your engine being pushed out the breather tube and oil starvation (see below). If your engine had a good muffler, you would hear a ticking or pinging noise, but since those don’t exist in general aviation, this problem can often go unnoticed without the help of oil analysis and/or engine monitor data. If this problem exists, running a richer fuel/air mixture to keep the engine cooler should help.
Instant failure
Oil starvation
Whether it’s caused by oil consumption left unchecked or severely worn bearings not letting oil get to all of the parts, this type of problem will cause an engine to fail in short order and it’s usually accompanied by the worst sound your engine can make — silence.
Spun bearings
When the babbit is worn off your bearings, either due to hard use, abrasive oil, or lack of oil, you will start to lose oil pressure. If the problem gets severe enough, the spinning shaft will actually weld to the bearing itself and spin in place. Once this happens, the engine is pretty much shot, though amazingly enough it might still run (but not for long).
Outside causes
Of course there are lots of other things that can cause instant engine death — see the first cartoon on this link for an example, or, although it’s not a plane, this picture of my flooded MINI. Unfortunately, outside factors probably take more engines down than anything else.
It’s pretty rare for engines to fail suddenly due to minor issues, so when we see something going on, that doesn’t necessarily mean you need to get out the wrenches or head straight to the engine builder and demand a repair. Usually, you’ll have some time to see if the problem persists or is getting worse. Once that has been established, then some action will likely be required to keep the engine going, but the cost should be minor compared to the hassle and expense of having to replace the whole engine. So test your oil every now and then. Chances are good your engine will look perfect, but if it doesn’t, you’re better off knowing about it sooner rather than later.
Critical Component Failures
This article, by Mike Busch, originally appeared in the March 2010 issue of Sport Aviation as part three in the series “Reliability-Centered Maintenance.” We are reprinting it with the permission of the author.
To properly apply reliability-centered maintenance (RCM) principles to the maintenance of our piston aircraft engines, we need to analyze the failure modes and failure consequences of each major component part of those engines.
In this article we’ll examine the critical components of these engines, how they fail, what the consequences are of those failures on engine operation and safety of flight, and what sort of maintenance actions we can take to deal with those failures effectively and cost-efficiently.
Crankshaft
It’s hard to think of a more serious piston engine failure mode than a crankshaft failure. If it fails, the engine quits. Yet crankshafts are rarely replaced at overhaul. Lycoming says their crankshafts often remain in service for more than 14,000 hours and 50 years! TCM hasn’t published this sort of data, but TCM crankshafts probably have similar longevity.
Crankshafts fail in three ways: 1) infant-mortality failures due to improper material or manufacture, 2) failures following unreported prop strikes, and 3) failures secondary to oil starvation and/or bearing failure.
We’ve seen a rash of infant mortality crankshaft failures in recent years. Both TCM and Lycoming have had major recalls of crankshafts that were either forged from bad steel or were physically damaged during manufacture. Those failures invariably occurred within the first 200 hours after a newly manufactured crankshaft entered service. If a crankshaft survives the first 200 hours, we can be pretty confident that it was manufactured correctly and should perform reliably for many engine TBOs.
Unreported prop strikes seem to be getting rare because owners and mechanics are becoming smarter about the high risk of operating an engine after a prop strike. Both TCM and Lycoming state that any incident that damages the propeller enough that it has to be removed for repair warrants an engine teardown inspection. This applies even to prop damage that occurs when the engine isn’t running. Insurance will pay for the teardown and any necessary repairs, no questions asked, so it’s a no-brainer.
That leaves us with failures due to oil starvation and/or bearing failure. We’ll talk about these when we look at oil pumps and bearings.
Crankcase
Crankcases are also rarely replaced at major overhaul, and they often provide reliable service for many TBOs. If the case stays in service long enough, it will eventually crack. The good news is that case cracks propagate slowly, so a detailed annual visual inspection is sufficient to detect such cracks before they pose a threat to safety. Engine failures caused by case cracks are extremely rare.
Camshaft and lifters
The cam/lifter interface endures more pressure and friction than any other moving parts in the engine. The cam lobes and lifter faces must be hard and smooth in order to function and survive. Even tiny corrosion pits (caused by disuse or acid build-up in the oil) can lead to rapid destruction (spalling) of the cam and lifters and the need for a premature teardown. This is the number one reason that engines fail to make TBO. This problem mainly affects owner-flown airplanes because they tend to fly irregularly and sit unflown for weeks at a time.
Camshaft and lifter problems seldom cause catastrophic engine failures. The engine will continue to make power even with severely spalled cam lobes that have lost a lot of metal, although there is some small loss of power. Typically, the problem is discovered when the oil filter is cut open and found to be full of metal.
If the oil filter isn’t cut open and inspected on a regular basis, the cam and lifter failure may progress undetected to the point that ferrous metal circulates through the oil system and contaminates the engine’s bearings. In rare cases, this can cause catastrophic engine failure. A program of regular oil filter inspection and oil analysis will prevent such failures.
If the engine is flown regularly, the cam and lifters can remain in pristine condition for thousands of hours. Some overhaul shops routinely replace the cam and lifters with new ones at major overhaul, but other shops use reground cams and lifters and most knowledgeable engine experts agree that properly reground cams and lifters are just as reliable as new ones.
Gears
The engine has lots of gears: crankshaft and camshaft gears, oil pump and fuel pump drive gears, magneto and accessory drive gears, prop governor drive gears, and sometimes alternator drive gears. These gears typically have a very long useful life and are not usually replaced at major overhaul unless obvious damage is found. Gears rarely cause catastrophic engine failures.
Oil pump
Failure of the oil pump is occasionally responsible for catastrophic engine failures. If oil pressure is lost, the engine will seize quite quickly. The oil pump is very simple, consisting of two gears in a close-tolerance housing, and is usually trouble-free. When trouble does occur it usually starts making metal long before complete failure occurs. Regular oil filter inspection and oil analysis will normally detect oil pump problems long before they reach the failure point.
Bearings
Bearing failure is responsible for a significant number of catastrophic engine failures. Under normal circumstances, bearings have a very long useful life. They are always replaced at major overhaul, but it’s quite typical for bearings that are removed at overhaul to be in excellent (sometimes even pristine) condition with very little measurable wear. Bearings fail prematurely for three reasons: (1) they become contaminated with metal from some other failure; (2) they become oil-starved when oil pressure is lost; or (3) they become oil-starved because the bearing shells shift position in the crankcase saddles to the point where the bearing’s oil supply holes become misaligned (“spun bearing”).
Contamination failures can be prevented by using a full-flow oil filter and inspecting the filter for metal on a regular basis. So long as the filter is changed before its filtering capacity is exceeded, particles of wear metals will be caught by the filter and won’t contaminate the bearings. If significant metal is found in the filter, the aircraft should be grounded until the source of the metal is found and corrected.
Oil starvation failures are fairly rare. Pilots tend to be well-trained to respond to loss of oil pressure by reducing power and landing at the first opportunity. Bearings will continue to function properly even with fairly low oil pressure (e.g., 10 psi).
Spun bearings are usually infant mortality failures that occur either shortly after an engine is overhauled (assembly error), or shortly after cylinder replacement. Failures can also occur after a long period of crankcase fretting (which is detectable through oil filter inspection and oil analysis), or after extreme cold-starts without proper pre-heating. These are usually random failures, unrelated to hours or years since overhaul.
Connecting rods
Connecting rod failure is responsible for a significant number of catastrophic engine failures. When rod fails in flight, it often punches a hole in the crankcase and causes loss of engine oil and subsequent oil starvation. Rod failures have also been known to result in camshaft breakage. The result is invariably a rapid loss of engine power.
Connecting rods usually have a very long useful life and are not normally replaced at major overhaul. (The rod bearings, like all bearings, are always replaced at overhaul.) Some rod failures are infant mortality failures caused by improper torque of the rod cap bolts. Rod failures can also be caused by failure of the rod bearings, and these are usually random failures unrelated to time since overhaul.
Pistons and rings
Piston and ring failures can cause catastrophic engine failures, usually involving only partial power loss but occasionally total power loss. Piston and ring failures are of two types: (1) infant mortality failures due to improper manufacture or installation; and (2) heat-distress failures caused by pre-ignition or destructive detonation events. Heat-distress failures can be caused by contaminated fuel or improper engine operation, but they are generally unrelated to hours or years since overhaul. Use of a digital engine monitor can usually detect pre-ignition or destructive detonation episodes and allow the pilot to take corrective action before heat-distress damage occurs.
Cylinders
Cylinder failures can cause catastrophic engine failures, usually involving only partial power loss but occasionally total power loss. A cylinder has a forged steel barrel mated to an aluminum alloy head. Cylinder barrels normally wear slowly, and excessive wear is detected at annual inspection by means of compression tests and borescope inspections. However, cylinder heads can suffer fatigue failures, and occasionally the head can separate from the barrel, causing a catastrophic engine failure. Cylinder head failures can be infant mortality problems (due to improper manufacture) or can be age-related. Age-related failures seldom occur unless the cylinder is operated for more than two or three TBOs. Nowadays, most major overhauls include new cylinders, so age-related cylinder failures have become quite rare.
Valves and valve guides
It is quite common for valves and guides (particularly exhaust) to develop problems well short of TBO. Valve problems can usually be detected prior to failure by means of compression tests, borescope inspections, and surveillance with a digital engine monitor (provided the pilot knows how to interpret the engine monitor data). If a valve fails completely, a significant power loss can occur.
Rocker arms and pushrods
Rocker arms and pushrods (which operate the valves) typically have a very long useful life and are not routinely replaced at major overhaul. (Rocker arm bushings are always replaced at overhaul). Rocker arm failure is quite rare. Pushrod failures are caused by stuck valves and can almost always be avoided through repetitive valve inspections and digital engine monitor usage, as discussed earlier.
Magnetos
Magneto failure is uncomfortably commonplace. Fortunately, aircraft engines are equipped with dual magnetos for redundancy, and the probability of both magnetos failing simultaneously is extremely remote. Mag checks during pre-flight run-up can detect gross magneto failures, but in-flight mag checks are far better at detecting subtle or incipient failures. Digital engine monitors can reliably detect magneto failures in real time if the pilot knows how to interpret the data. Magnetos should be disassembled, inspected, and serviced every 500 hours—doing so drastically reduces the likelihood of an in-flight magneto failure.
The bottom line
The “bottom-end” components of these engines—crankcase, crankshaft, camshaft, bearings, gears, oil pump, etc.—are very robust. They normally exhibit very long useful lives that are many times as long as recommended TBOs. Most of these bottom-end components (with the notable exception of bearings) are reused at major overhaul and not replaced on a routine basis.
When these items do fail prematurely, the failures mostly occur shortly after engine manufacture, rebuild, or overhaul, or they are random failures that are unrelated to hours or years since overhaul. The vast majority of random failures can be detected long before they get bad enough to cause catastrophic engine failure simply by means of routine oil filter inspection and laboratory oil analysis. There seems to be no evidence that these bottom-end components exhibit any sort of well-defined steep-slope wear-out zone that would justify fixed-interval overhaul or replacement at TBO.
The “top-end” components—pistons, cylinders, valves, etc.—are considerably less robust. (The “top end” of a piston engine is analogous to the “hot section” of a turbine engine.) It is not unusual for top-end components to fail prior to TBO. However, most of these failures can be prevented by regular inspections (compression tests, borescope, etc.) and by use of digital engine monitors (by pilots who have been taught how to interpret the data). Furthermore, when potential failures are detected, the top-end components can be repaired or replaced quite easily without the need for engine teardown. Once again, the failures are mostly infant-mortality failures or random failures that do not correlate with time since overhaul.
The bottom line is that a detailed failure analysis of piston aircraft engines using RCM principles strongly suggests that what the airlines and military found to be true about turbine aircraft engines is also true of piston aircraft engines: The traditional practice of fixed-interval overhaul or replacement is counterproductive. A conscientiously applied program of on-condition maintenance that includes regular oil filter inspections, oil analysis, compression tests, borescope inspections, and in-flight digital engine monitor usage can be expected to yield improved reliability and much reduced maintenance expense and downtime.
Magnetos are an exception. They really need to go through a fixed-interval major maintenance cycle every 500 hours, because we have no effective means of detecting potential magneto failures without disassembly inspection.
Under Pressure! (Part 2)
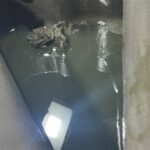
In Part 1 of this saga, our flying club’s newly installed O-360 lost oil pressure in flight with a student pilot at the controls. After a brief landing then an immediate a go-around (you read that right), and a fair amount of sweat and tears – but fortunately no blood – we found the engine had digested an errant paper towel, which was blocking the suction screen.
Crud in the pan
The hard part begins
Now that we knew the engine actually did suffer a loss of oil pressure (it wasn’t just the gauge) and the filter analysis showed that some damage had been done, our next step was to figure how to proceed.
We consulted as many experts as we could and received suggestions ranging from “just go fly it” to “pull a cylinder and look for damage” to “overhaul it” and everything in between. The jury was out, and we had to decide whose suggestion to follow.
Lycoming has a convenient Service Bulletin about what to do if you find metal in the oil filter, so we started there. Service Bulletin 480F suggested, based on the amount and size of metal in the oil filter, that we remove the oil pan and check for metal. That seemed like a good idea; not only were we still troubleshooting mechanical wear, but also, we didn’t know how much paper towel was still in the engine.
It took two solid days of work to remove, inspect, clean, and reinstall the oil sump, which still had paper towel in it. Once that was done, after finding no large pieces of metal in the sump and being sure there weren’t any leftover paper towels in the engine, we did a 30-minute ground run then drained the oil, and cut the filter to check for metal.
Intestinal fortitude
The oil analysis was unremarkable, but the oil filter report noted 10-15 non-ferrous metallic flakes per pleat with a few dozen larger pieces that had scrape marks on them. So – a little better than

Metal from the filter, magnified in analysis
before, but certainly not clean. But this was only a 30-minute ground run compared to the 20-some hour sample. Were the improvements from the shorter oil change, or an actual improvement? We didn’t know.
Now, I’ve been an analyst at Blackstone for over a decade. I’ve helped countless customers diagnose their own engine issues and told people to go fly it and check back. But there isn’t any amount of intestinal fortitude that prepares someone for the reality of experiencing a problem, diagnosing engine damage, doing what you can to fix it, and know that the next step is to go flying and see how it goes.
The two A&Ps on the field agreed that if we made it past the first 10 hours (if) without any oil pressure issues, then we should be fine. “But watch that oil pressure,” they cautioned.
Going up
We took all the precautions we could: we went up in pairs (so one person could watch the oil pressure), we selected calm days, affording us four runway options for an emergency landing, and we stayed within glide distance of the airport for 10 long hours.
I am glad to say that those first 10 hours were uneventful. Oil pressure remained strong, the engine ran great, and we had no issues. With each hour that passed, our confidence grew, so we eagerly sent another oil and filter sample for analysis, hoping for hard data to bolster our confidence.
The oil analysis was unremarkable, but the filter – not great. Approximately 30 variously sized non-ferrous flakes were present per pleat, along with one piece of steel.

Not what you want to see
This wasn’t what we were hoping for, but this oil run was 10 hours long as opposed to the previous 30-minute ground-run sample. There was bound to be more metal, right? Regardless, there was still more metal after 10 hours than there was in our previous 50-hour samples, so we weren’t in the clear yet.
Our solution? Do another 10-hour oil run for an apples-to-apples comparison. At this point, with 10 hours of uneventful flying under our belt, our confidence was starting to grow, so we ventured out a little from the airport environment. After 10 hours, we sent the oil and filter for analysis, fairly confident that this second sample would reveal the improvement that was bound to come.
Instead, we received the disheartening news that “the overall quantity and size of the non-ferrous flakes was similar to the previous filter.” Dang.
Hard discussions
We debated what to do next. Are we throwing money away on oil and filters when we might need an overhaul anyway? Do we keep wasting filters when the nationwide filter shortage might ground us anyway? Do we run 25 hours, despite not seeing an improvement in the metals?
We reconsidered an earlier suggestion to pull a cylinder and look for crank/bearing damage, but that might raise more questions than answers: what should a 1500-hour crank/bearing look like? How will we know if the damage is excessive without pulling all four cylinders and comparing? And at that point why not just overhaul?
Opinions varied among our club members. One thought we were overreacting and that a paper towel couldn’t cause engine damage. Others of us were more cautious, remembering how little metal our engine used to make in 50 hours. As a group, we exchanged some vibrant text conversations as we decided how to proceed.
With our concern about irreversible, ongoing damage, we opted to do another short 10-hour oil change to try and limit further damage and get another good comparison to gauge progress. I was afraid that if this sample didn’t come back cleaner, we’d start considering exploratory surgery and watch the summer tick by from the ground.
Baby steps
We knocked those 10 hours out in less than a week and had results early the following week. I jokingly told my coworker that I’d bribe him with beer if he gave us a good enough report that we wouldn’t have to ground the aircraft for the summer.

Still with the metal
As it turned out, no bribery was needed: the oil analysis came back clean and the filter report contained good news: less metal than before. Finally! Maybe everything was going to be okay. Granted, we’re not totally out of the woods yet – we’re still monitoring and we’re going to change the oil in 25 hours, but at least we’ve got data that suggests we’re past the worst of it. If the numbers are good in 25 hours, then we’ll try 50. That night of the improved report was the best night’s sleep I’d gotten in months.
Lessons learned
Hindsight is always 20/20, as they say, but looking back I think there are several lessons to be learned.
First, when you’re troubleshooting a problem, do your research and get as much data as you can. It honestly shocked me how many different opinions we received. At one point I called Lycoming. They called me back several days later, and after listening to my story the tech said we needed an overhaul.
I replied, “Well in the week I was waiting for you to get back to me, we did a 30-minute ground run, tested the oil and filter, and we’ve since flown a couple of uneventful hours, as per SB 480 and we’re planning on flying a total of 10 hours before retesting.”
He said, “Okay, that’s good. Do that and proceed as planned.”
In less than five minutes he went from telling me to overhaul to “go fly.” There’s a vast dichotomy there. I get that there’s a lot of liability in aviation, but that just makes it harder to make good, educated decisions. We did a lot of research, gathered data, and consulted with as many people as we could to make the best decision for us. Do your homework.
Second, remember that you have many tools in your toolbox for diagnosing problems. Our oil reports came back clean all along – it was the filter analysis that was showing metal. Oil analysis measures the microscopic particles in the oil; the filter/screen is where you’ll see visible metal. Always cut your filter open, and use oil analysis in conjunction with other tests (like borescope and compression checks). The more data you have, the better decision you can make.
Third, as we said last time – trust your gut. If your intuition tells you something is wrong, don’t ignore it. But the reverse is also true: after all those hours of flying the pattern with strong oil pressure, good RPMs, and normal oil temps, we had a strong feeling that our engine was going to be okay – we just had to wait a few oil changes for the data to support our intuition.
And last but certainly not least – keep the damn paper towels far away from your engine!

