Protecting from Corrosion

Considering the relative inactivity of much of the general aviation fleet, it’s not surprising that corrosion is a hot topic. It’s also fodder for aviation oil makers to claim their oil is better than others at protecting engine parts from corrosion.

The frustrating thing when you can’t find the time to go flying is, your beautiful bird is languishing alone in a dark hangar accumulating rust on its parts and dust and bird doo on its wings. What to do?

If you can’t fly it, you don’t want to just ground-run the engine since it’s pretty well accepted that doing so may cause more harm than good. In the end, the path most often chosen is to “leave her sit.” But that’s the maddening part. You just know that corrosion has begun at the cylinders, cam, and lifters, as well as all the other parts that are parked above the engine’s oil level. “Dammit! Maybe I should go out and shoot some landings.” But you don’t. So the question still stands…what to do?

We get a lot of questions about which oil protects aircraft engines best from corrosion. If there were a sure answer as to which oil is best, someone would surely have come up with it. Since they haven’t, perhaps we should reconsider the question. Maybe what we should be asking is, “What can I do to prevent corrosion in my (not flown frequently enough) aircraft engine, regardless of the oil I use?”

Turned around that way, there may be an answer.

Water orbs

Oil and water don’t mix at the atomic level. Since there is no such thing as dry oil — both hot and cold oil suck moisture from the air like a sponge — the only way these dissimilar types of matter can coexist is for the moisture to ball itself up into minute spheres, so tiny that they can exist in suspension. If the water orbs get large enough they will precipitate, that is, fall out of suspension. But there is almost no limit to how tiny they can be. The longer the oil sits undisturbed, the more water it will accumulate.

Oil routinely has some moisture in it, usually at levels between 40–400 ppm. In amounts greater than that, it can start to make your oil look like chicken gravy. Once moisture sets in, heat and/or pressure are the only way to get it out. If you go out and fly for an hour, the oil temperature and agitation will dismiss the moisture droplets like unruly elementary students. The moisture accumulation process will start all over again once you pull idle cut-off, but at least you have the satisfaction of knowing that, at least for now, the fine film of oil clinging to the metal parts is not heavily populated with tiny balls of water.

Fighting corrosion

After you lock the hangar door, the dry (well, reasonably so) oil film doesn’t last long on all those parts that are parked about the oil level. If your engine is a dry-sump type, none of the parts are parked in an oil bath.

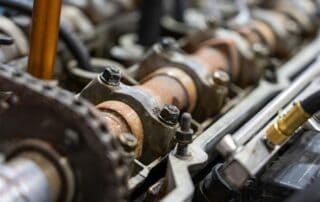
If you can’t fly, you might consider using a pre-oiler once a week to rebathe all the parts in oil. The oil from the pre-oiler will reach all parts that see oil pressure during engine operation. It would require only turning on the master and the oiler switch for a short while, no longer than it takes to check the lights and flaps during a preflight, a few minutes at most. The oil should reach all the way up into the rocker boxes and then drain to form a brief pool over the tappets and cam, parts that are notoriously prone to corrosion pitting in all but the most active engines.

After the pre-oiling dose, you could get out and pull the prop through a few blades (normal direction of rotation, of course) to ensure all moving parts rotate through a couple of full cycles. Further, you will be giving all the rod bearings an oily trip through the sump reservoir, for wet sump engines. (Some people are queasy about touching the prop, so running the starter is an acceptable alternative, if you have confidence in the integrity of the battery.)

Cold dousing all oil-wetted parts isn’t nearly as good as an hour’s flight, but it seems far superior to the ground run-up, or the more often chosen “letting her sit.”

By |2024-09-18T13:48:37-04:00July 18, 2023|Aircraft, Articles|Comments Off on Protecting from Corrosion

Aircraft Problems: Should I Be Worried?

One of the main purposes of oil analysis it to find problems that might be developing in an engine, and after doing this for a lot of years, I can say without a doubt that it works. However, some problems are more urgent than others, and part of our job is to determine if a problem is a major one or not. Most engine problems start out minor but if left unchecked can lead to major issues, which eventually result in an engine’s demise.

Minor problems

Abrasive Contamination

Dirt getting past the air filter will cause a lot of problems in an engine, and piston scuffing is the primary concern. Fortunately, most air filters do a really good job even when they are dirty. If you change your air filter on a regular basis, then this type of problem is pretty easy to avoid, but remember, it’s also important to check the whole air induction system down-stream of the air filter to make sure no cracks or other problems exist that could be letting dirt in.

Fuel dilution

This generally includes any fuel level between 1.0% and 3.0% that keeps showing up again and again. This is not a normal situation, but it doesn’t necessarily cause an engine problems in the short term. Still, since fuel is a contaminant, it will cause the oil to oxidize faster that it normally would. That typically causes problems like stuck oil control rings, which leads us to our next minor issue.

Oil Consumption

This one isn’t really a problem at low levels because all engines are designed to use some oil. What you really want to watch out for is a change in how much oil is being burned. If you always use 1 quart every 10 hours and it suddenly jumps to 1 quart every 3 hours, then you know something has changed. That’s part of the reason we ask about oil added between changes. If you’re not losing oil due to a leak, it’s either getting past the rings or the valve guides. Granted, you can buy a lot of make-up oil for the cost of a top overhaul, but there will probably come a time you’ll have to bite the bullet and fix the issue.

Corrosion

If you fly around 5 hours per month, that should keep this minor problem off you mind, though we all know that life doesn’t necessarily allow this. Still, if corrosion is minor it should easily disappear once the engine is back to flying regularly. If corrosion gets so bad that it causes pitting on the parts, that’s when the problem elevates to major status.

Major problems

Cam spalling

This one is often directly related to corrosion getting out of hand, though it can also be related to oil starvation on things like cold starts and high RMP starts. It takes time for that thick oil to get circulating through the engine and if it doesn’t get to the cam and followers fast enough, metal-to-metal contact happens. Problems of this nature won’t necessarily cause an engine to fail, but can lead to loss of some power, which might be needed to clear that 50’ obstacle at the end of the runway.

Excess Heat

This is really a pretty broad category and is often due to operational factors, though it’s almost always avoidable if you are paying attention to your cylinder head temperatures. If those are getting too hot, then maybe the cooling baffles aren’t quite working like they should. Maybe you have a crack in an air induction tube. That could allow abrasive dirt into the combustion chamber, but would also cause that one cylinder to run leaner than others (due to extra air being sucked in) and likely hotter. Excess heat causes the parts to expand more than they were designed for and that’s when wear starts getting heavy.

Stuck or Burned Valves

Abrasive contamination, fuel dilution, and oil consumption will all contribute to this type of problem. Sticking valves can be identified by things like morning sickness (not necessarily in the morning), intermittent rough running, and high mag drops (not due to a fouled spark plug). Burned valves are usually pretty easy to spot with a borescope though might not necessarily cause major operational problems until they burn to a point where compression has significantly degraded.

Detonation

This issue develops in an engine when the combustion process is not completed correctly, usually when an engine is under a heavy load and producing a lot of heat. It can easily burn a hole right through the top of a piston, resulting in all of the oil in your engine being pushed out the breather tube and oil starvation (see below). If your engine had a good muffler, you would hear a ticking or pinging noise, but since those don’t exist in general aviation, this problem can often go unnoticed without the help of oil analysis and/or engine monitor data. If this problem exists, running a richer fuel/air mixture to keep the engine cooler should help.

Instant failure

Oil starvation

Whether it’s caused by oil consumption left unchecked or severely worn bearings not letting oil get to all of the parts, this type of problem will cause an engine to fail in short order and it’s usually accompanied by the worst sound your engine can make — silence.

Spun bearings

When the babbit is worn off your bearings, either due to hard use, abrasive oil, or lack of oil, you will start to lose oil pressure. If the problem gets severe enough, the spinning shaft will actually weld to the bearing itself and spin in place. Once this happens, the engine is pretty much shot, though amazingly enough it might still run (but not for long).

Outside causes

Of course there are lots of other things that can cause instant engine death — see the first cartoon on this link for an example, or, although it’s not a plane, this picture of my flooded MINI. Unfortunately, outside factors probably take more engines down than anything else.

It’s pretty rare for engines to fail suddenly due to minor issues, so when we see something going on, that doesn’t necessarily mean you need to get out the wrenches or head straight to the engine builder and demand a repair. Usually, you’ll have some time to see if the problem persists or is getting worse. Once that has been established, then some action will likely be required to keep the engine going, but the cost should be minor compared to the hassle and expense of having to replace the whole engine. So test your oil every now and then. Chances are good your engine will look perfect, but if it doesn’t, you’re better off knowing about it sooner rather than later.

By |2024-09-18T13:49:41-04:00July 18, 2023|Aircraft, Articles|Comments Off on Aircraft Problems: Should I Be Worried?

How Often Should I Change My Oil?

When it comes to the questions we get here at the lab every day, right up there with “What kind of oil should I use?” is “How often should I change my oil?” Continental and Lycoming both have guidelines in place, and generally speaking it’s 50 hours for those with spin-on filters and 25 hours for engines equipped with oil screens. But as you know, way more than calendar time should go into determining how often you should be changing your oil. There’s not just one answer for everyone. The engine manufacturer’s guidelines are better than nothing, but there’s also oil analysis. Guess which method we like best for determining how often you should change the oil?

Inactivity

One of the biggest factors we use in determining how often to change your oil is how active the engine is. We used to say you need to fly ten hours a month to keep corrosion away, but a few years back we realized that people were doing fewer hours than that and still getting decent wear numbers. So we lowered our general threshold to five hours of flying a month as what we consider “active” for an aircraft engine.

The problem is, a lot of people don’t like to admit their beloved aircraft has been inactive. But it’s okay to admit it. We can almost always tell. We even have a little question on the back of the oil slip that says “Any inactivity or problems/suspicions?” Inevitably, someone will pen a big NO in that space when in reality, he or she let the plane sit for eight months, then flew it 10 hours in the span of a month. “No!” they protest. “It hasn’t been inactive! I flew 10 hours this month!”

Inactivity usually shows up as aluminum and iron, from oxides and wear at the pistons and cylinders, though other metals can show up too. Trust me, it’s okay to admit when your engine has been inactive. That’s generally an easier and more fun problem to have than a bona fide mechanical issue. When we suspect corrosion, we almost always recommend cutting back to a shorter oil change. While changing the oil more often doesn’t prevent corrosion from happening, it does allow you to 1) monitor the corrosion to make sure it’s not getting out of hand, and 2) get the metal-laden oil out of the system sooner, so not as much metal gets washed into the oil when you crank over the engine. Abrasive oil causes more wear. Even if you have to change the oil with just two or three hours on it, that’s fine. We’d much rather see that than a fill that sat a year, accumulated 20 hours, and was full of metal.

Metal

Of course, as an oil analysis lab we also look at how much metal your engine is producing. If you’ve seen our reports, you know that we keep a database of all the engines we’ve ever seen. We average their wear and then compare that to your own sample to see what’s reading high, what’s normal, and what’s better than most. We like it when you send along notes. The more you tell us about what’s been happening with the engine lately or any specific conditions that might affect the sample, the better our comments on your sample will be.

An engine that’s making more metal than average will usually need more frequent oil changes. That doesn’t fix a problem, if one exists, but it does help you to monitor it more closely and get the abrasive oil out of the system sooner rather than later.

Contaminants

The main contaminants in aircraft engine samples are fuel, water, and blow-by. Blow-by is hard to avoid ¾ all engines blow by to some extent. You want to see lead holding steady from sample to sample. If it’s increasing, we’ll often recommend shorter oil changes until you can figure out what’s going on.

Water can enter the system just from condensation in the air, though we don’t usually see more than a trace from that. And traces of moisture, while not ideal, probably aren’t going to hurt too much. They might accelerate corrosion if you’re not flying all that much, but usually a trace of moisture won’t cause too many problems. When more than a trace of water is showing up, and it’s showing up in every sample, it can be a sign of something else going on. Often, an incorrectly set-up air/oil separator will cause moisture in the oil. When we’re consistently seeing more water than normal, we’ll often recommend going to a shorter oil change.

Fuel is also a common find in aircraft samples. We recommend taking the sample hot to eliminate any normal traces of fuel and moisture, but sometimes people have to take a cold sample, which results in fuel. And that’s okay. As long as you tell us about it, we’ll take that into account when we write the comments and we probably would not recommend using a shorter oil change just for traces of fuel. You can also get fuel in the oil from excessive priming, and again, as long as it’s not showing up in every sample, this is usually something that does not affect wear and will clear up next time. If, however, we’re seeing a lot of fuel from sample to sample, it can be a sign of something else going on so we would likely recommend a shorter oil change until you can figure out what’s up.

Environment

Where you fly also affects how often you need to change your oil. Inactive engines in a dry place like Arizona can usually get away with keeping the oil in place longer than someone in Michigan or North Carolina. In fact, humidity can cause us to alter our standard less-than-5-hours-is-inactive rule. Someone in Georgia may be flying 8 to 10 hours a month and still getting signs of corrosion and need to change more often than someone with the same engine near a desert.

Acids

There’s a lot of talk out there about needing to change the oil more often due to acid build-up in the oil, and we’d say that’s a load of hogwash. In fact we did an article on that topic for our last newsletter. Basically we ran total acid tests on a whole slew of aircraft samples and only three out of 63 samples had a TAN (Total Acid Number) over 2.0. And 2.0 is still a low reading ¾ we consider anything above ~4.0 to be acidic. Never say never, but I predict pigs will be flying before we’ll tell you to change your aircraft oil because it’s getting too acidic.

What about the oil?

Notice what we have not said we take into account: the brand you’re using and whether it’s straight-weight or multi-grade oil. When Jim started this company back in 1985 he came up with a line he liked to use: Oil is oil. We still stand by that today. The oil guys would have you believe otherwise, but brand really does not seem to make a difference in how your engine wears, or how often you can change your oil.

Well, okay, if you’re using Joe Bob’s Oil that he “recycled” in the back of the hangar from emptied-out oil pans that he filtered with a piece of cheesecloth, we might say in that case brand does matter. But as long as you’re using an aircraft-certified aircraft oil, your engine probably isn’t going to care what you use. We like straight weights and we like multi-grade oils. In the end, what you use and how often you change your oil is completely your choice. We’ll give you our recommendation and you can do whatever you want with it. If you want to run longer on the oil despite having high wear, that’s totally fine. And if you have great numbers and you really like changing the oil often, we’re not going to send out the Blackstone henchmen to tell you to start running longer. Keep your own situation in mind and make your informed decision based on what’s showing up in the oil and filter/screen, what the engine monitors are telling you, and your own comfort level. It’s your airplane and your money!

By |2024-09-18T14:06:58-04:00July 18, 2023|Aircraft, Articles|Comments Off on How Often Should I Change My Oil?

The Acidity Question

Every now and then you hear about oil becoming acidic and causing internal corrosion in an aircraft engine. Usually that goes along with the oil absorbing water and then forming acids, but I’ve always disagreed with this statement.

It’s a well-known fact that corrosion is a problem for a lot of aircraft engines that don’t see much use, but is it really acidic oil that’s causing the corrosion, or simply bare metal parts being exposed to the atmosphere? So I decided to run some testing to see what I could find about acidity and aircraft oils.

Now, think back to high school chemistry. Remember learning about acids and bases? Normally with something like water, you measure the pH to determine how acidic or basic a liquid might be. A pH of 7 is neutral, lower than 7 is acidic, while higher than 7 is basic.

The problem with oil is, you can’t run a pH on it directly. So instead, we have the Total Base Number (TBN) and Total Acid Number (TAN) tests.

These are fairly simple tests and the basic principle is this. After you mix a measured amount of oil with some chemicals, you can run a pH on those chemicals. But that doesn’t equate to the TBN or TAN.

To get the TBN you add acid to the chemical mixture until it reaches a pH of 4. To get the TAN, you add a base to the mixture (in this case, potassium hydroxide) until the pH reaches 10. (You might wonder why we don’t just report the pH of the chemical mixture and have that be the end of it, and the answer to that is unknown, at least to me.)

The TBN test

The TBN test is commonly done on automotive oils, but not aircraft oil. That’s because the TBN always reads 0 or close to it with aircraft oil.

Automotive oil has a lot of additive packed in there and that is what the TBN reading is based on. That additive makes the TBN increase. Oil salesmen use the TBN test to help sell their oil, with the idea being that the higher the TBN, the better the oil. But the TBN is really just a testament to how much additive the oil starts with, not necessarily how well the oil will work in any given engine.

You might wonder why aircraft oil doesn’t use the same additives? It’s because the additives used in automotive oils aren’t ashless. The additives present in all aircraft oils have to be ashless, meaning when the oil burns nothing is left. This is why it’s a bad idea to use anything other than aircraft oil in your aircraft engine.

The TAN test

The TAN test is commonly done on industrial oil like hydraulic fluid. There is a theory that when oil becomes acidic it will accelerate wear and cause all kinds of problems, but that’s just a theory — and a pretty weak one in my book.

When most people think of acid, they might think of something like acid reflux and heartburn. Or maybe sulfuric acid burning a hole in their clothes, but that gives acids a bad rap. If it weren’t for acid, your food wouldn’t get digested and we’d be without a lot of very important chemical compounds. What’s more, there is no known correlation between acidic oil and higher wear that I know of.

It is commonly talked about that water in oil will cause it to become acidic, and maybe it will if the water has something to react to. But with aircraft oil, it doesn’t. The additives present aren’t sulfur-based like they are with automotive oils, so when water gets into oil, it usually just stays there until the oil gets hot enough to cook it back out.

Testing the theory

So for this newsletter article, I decided to run some TAN tests on various aircraft oils and see what shows up. Virgin aircraft oils usually have a TAN in the range of 0.4 to 0.8. It’s important to know where the TAN starts out, so you know how acidic the oil has become after use. (You’d think that oil starts out with a TAN of 0.0, but usually it does not.)

For the used oil data, we tested the TAN on 63 random aircraft samples.

Acid Chart

The average TAN reading for those samples was 1.3. That might seem like a fairly large increase, but in the oil analysis world, 1.3 is considered a low acidity reading for any type of system. A reading of 3.0 shows some acidity and anything over 4.0 can be considered fairly acidic.

The highest TAN reading we found was 2.3, but in our testing any readings over 2.0 were rare. In fact, only three samples read higher than 2.0 and none of those had water present, but two were considered inactive. Five of the samples we tested did have a trace of water present, but their average TAN was just 1.1, so we didn’t find any correlation between water and a high TAN.

Acid Chart 2

So how about inactive engines? Two samples that were inactive did have a TAN of over 2.0, but they were the exception, not the rule. We had 11 samples in our test run that were considered inactive, but the average TAN of those was just 1.2.

Based on this testing, it doesn’t look like oil acidity is really a factor at all. Does that mean you shouldn’t worry about inactivity? No — we’ve seen too many examples of poor wear from inactive engines to say that’s not a problem. What it does mean is that in our opinion you don’t need to worry about your oil being acidic. And in life, one less thing to worry about is a good thing!

By |2024-09-18T14:08:24-04:00July 18, 2023|Aircraft, Articles, Gas/Diesel Engine, Marine|Comments Off on The Acidity Question

Building an Engine Dehumidifier

Continental and Lycoming typically rate their engine life from 1,600 to 2,000 hours of operation between overhauls on most models. However, the only owners likely to achieve that kind of rated performance are those who use their aircraft on a nearly daily basis. Why? The reason is not the flying. It’s the parking!

A primary culprit for premature aircraft engine overhaul is corrosion caused by condensation that occurs after shutdown. Aircraft engines that are used daily frequently reach their rated TBO because liquid condensate is boiled off on a regular basis. Low use rate often results in reduced engine life.
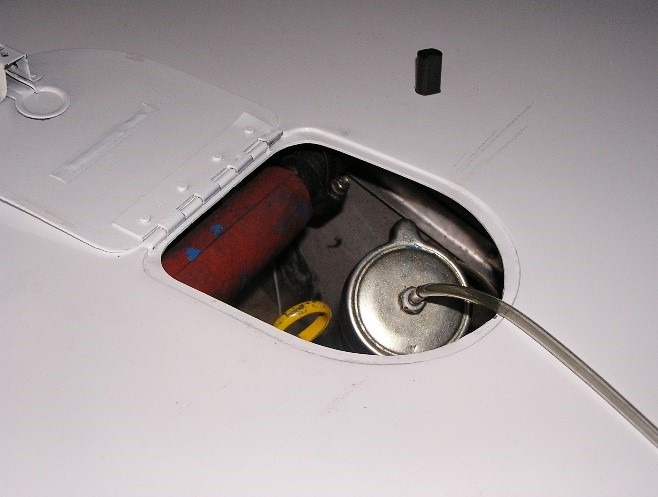
Air Inlet Fitting In Oil Filler Cap

As the engine cools and the internal temperature drops below the dew point, liquid moisture condenses out of the vapor and clings to internal engine surfaces. This liquid water then resumes its ongoing process of eating up your engine from the inside out. However, if the dew point can be made sufficiently low, then liquid water will never form. This engine dehumidifier provides a continuous positive pressure injection of extremely dry air (dew point approximately -100oF) on a 24/7 continuous flow basis. It is recovered at the crankcase blow-by vent, returned to the pump, dried again and re-injected in the oil fill port of the engine.

How it works

The dehumidifier is connected the engine as soon after engine shutdown as possible, before the engine cools. It is then run on a 24/7 basis. A small aquarium-type air pump forces ambient humid air though plastic bottle containing silica gel (this is the stuff used in shipping and storing aircraft engines and electronics).
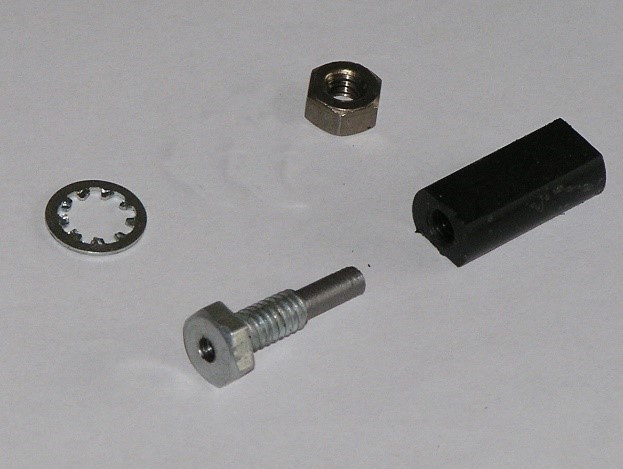
Air Fitting For Oil Cap

The silica gel has a great affinity for moisture and literally sucks it out of the air. The dried air is filtered and injected into the engine crankcase. Any moisture inside the engine vaporizes with the incoming dry air and is moved by the constant positive pressure from the air pump to the crankcase blow-by vent, then back to the pump and the silica gel dryer. At some point in time, the silica gel will absorb all the moisture it can hold. This is obvious because about 5% of silica gel crystals are dyed blue that changes to a pinkish color when saturated with moisture. At that point:

  • Remove the saturated silica gel from the bottle
  • Spread it out on a cookie sheet
  • Heat in oven at 275o F until the silica turns blue again
  • Cool and return to the bottle

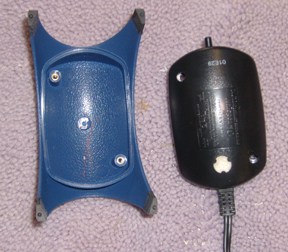
Disassembled air pump. Remove the felt
filter in the bottom of the pump and plug
the hole with glue.

The frequency of this recycle rate will depend up the humidity of the environment. This may vary from months or more in dry regions down to just a week or so in the humid southeastern United States. Adding more silica gel to the bottle will extend the service interval.

Build your own

Connect the drier output via Tygon plastic tubing to the engine oil filler cap. A return line of Tygon tubing is fitted to the crankcase blow-by port. The preferred means of connection is to drill a ¼” hole in the oil filler cap and then install a short standpipe to the cap. I modified the oil filler cap by installing a hollow ¼”-20 carriage bolt. (I used a lathe to cut off the threads on the leading ½” of the bolt. This permits a slip fit of the Tygon dry air supply hose.)

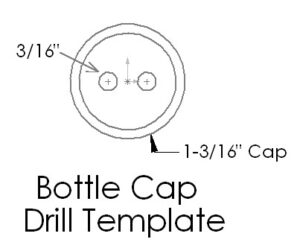
The hollow bolt was then installed on the oil fill cap. Additionally, I made a ¼”-20 threaded Delrin plastic plug to cap this little standpipe during flight. Also, you will need to make an adapter to fit the crankcase blow-by tube. This can be a rubber stopper drilled to fit the Tygon return hose or a piece of rubber tubing with the return Tygon tube hot glued into it. drill two 3/16" holes in a 1 and 3/16" cap for the tubing
Please note that you will have to also devise a plug for the freeze-emergency blow-by vent located few inches up the blow-by vent pipe inside the aircraft engine nacelle. This can be a rubber flapper that normally closes the freeze vent. If the blow-by tube is frozen shut, crankcase pressure will push the rubber flap open.

The dehumidifier components consist of:

  • A vibrating reed “silent” type aquarium air pump
  • Two-liter plastic pop bottle with screw on cap
  • Airstone aquarium air bubbler
  • Ten feet of 1/8″ bore Tygon plastic aquarium tubing
  • Twelve inches of 3/16″ outside diameter (1/8″ inside diameter) rigid plastic tubing
  • One pound of 5% blue dyed silica gel
  • ¼-20 custom air fitting hollow bolt
  • Pump air intake tube

Note: Low-cost aquarium pumps do have an irritating 60 Hz buzz caused by their vibrating reed design. So-called “silent” pumps are the same design but are supported in a manner that will minimize noise. If you spend a lot of time in the hangar, I strongly recommend the “silent” type pump.

To construct the dehumidifier, you will need an X-acto knife, a drill and ¼” and 3/16” drill bits, a hot glue gun, and gel super glue.

Extending the dessicant recycle time

The following modification can extend the intervals between service times for the desiccant. It revamps the dryer cycle from an open- loop system into a closed-loop. Dry air is still injected as before into the oil filler neck, but in addition, a vacuum line is attached to the crankcase blow-by tube that returns dry air back through the engine. This eliminates the continuous drying of external incoming humid air into the system and provides for continuous circulation of ever-drier air in the crankcase.

Implementation

The air pump must be converted to a blow-and-suck configuration. To do this you will need to make an additional fitting for the air intake port next to the air output port on the pump. Drill a 3/16” hole about ½” to the right of the exhaust port. Remove the felt filter in the belly of the pump case and plug the hole with glue.
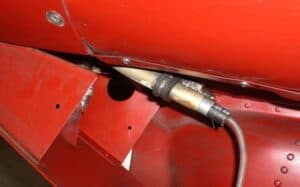
Pump Return Line Installed In Blow By Port

Pump Return Line Installed In Blow By Port

To work as a vacuum pump, the pump case must be made airtight. This is done by disassembling the air pump case (two screws) and applying RTV silicon aquarium cement around the entire case seam and around all four sides of the power cord strain relief. Then reassemble the case and allow it to dry. Also, add RTV glue to any screw heads or tape over recess holes in the case bottom for an airtight seal.

You will also need to make an adapter fitting such as a rubber hose or rubber stopper fitted with a length of the Tygon tubing to serve as an air return to the pump.

Fabrication

Drill two 3/16” holes about ¼”off the center in the top of the bottle cap, close enough to the center to allow easy tube clearance of the bottle neck interior wall. For the pump inlet input, insert a 2” length of the rigid tubing in one hole and hot glue it into place. Insert the remaining 10” rigid tube in the other hole and hot glue it so the bottom end of the tube is positioned about 2″ from the bottom of the bottle.

Use a 1″ length of the Tygon flex tube to connect the aquarium bubbler airstone to the end of the longer rigid tubing. The Airstone is used as a dust filter to keep silica gel particles out of the engine. The airstone should lie on the bottom of the bottle.

To prep the silica gel, it in your kitchen oven at 275oF until the dyed silica gel pellets turn blue (they are pinkish when saturated with moisture). Open the bag and pour the contents into a clean and dry two-liter pop bottle. Insert the airstone/tube assembly, work the airstone to the bottom of the silica gel, and tighten the cap. Do not delay, as it will absorb moisture from the air.
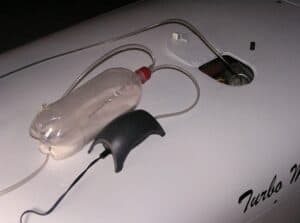
open-loop dryer assembly

Open-loop dryer assembly

Use about a foot of the Tygon tubing to plumb the air pump to the short air input stub. Connect 6 feet or more of Tygon tubing to the airstone-equipped exit port, then to the air fitting on the oil filler cap. Connect the pump return line to the crankcase breather port via an airtight rubber seal.

Note: All connections and seals must be a leak-tight fit. Mating via the crankcase blow-by vent tube (usually located near the firewall) may be done by inserting a piece of the rigid tubing through a 3/4” closed-cell-foam ball or a tightly fitting rubber stopper.

A secondary modification required is a plug for the freeze slot in the blow by tube. This can be a rubber flap around the blow-by pipe that is normally closed over the freeze slot, but is pushed open by crankcase pressure if the exit end of blow-by tube end should freeze shut. Finally, a foam plug fitted to your aircraft’s air intake with a “REMOVE BEFORE FLIGHT” flag attached will close up the system circulation (in the case of a crankshaft position that leaves an intake valve open).

By |2024-09-18T14:19:35-04:00July 18, 2023|Aircraft, Articles|Comments Off on Building an Engine Dehumidifier
Go to Top