How Often Should You Change Your Oil?

Change is inevitable, right? But not as inevitable as it used to be, at least for your engine oil. When it comes to the questions we get every day, right up there with “What kind of oil should I use?” is “How often should I change my oil?” Happily, the answer for most people is: Not as often as you used to.

What other people will tell you

Back in the day, everyone knew you changed your oil at 3,000 miles or three months, whichever comes first. Wait, did I say back in the day? Lots of places still tell you that’s how often to change it, and not surprisingly, the places you’re hearing this are oil change places that make money from you coming in regularly. We’re here to help cut through the noise, and hopefully you’ll believe us because hey, we’ve got science on our side. The answer to how often you need to change your oil is: It’s different for everybody.

Owner’s manual

Most cars and trucks (motorcycles, boats, etc.) have guidelines listed in the owner’s manual that outline certain driving conditions and how often to change the oil.

The problem is, sometimes the conditions they outline as “severe” are laughable. We’ve seen manuals that say if you’re doing primarily city driving, that’s severe. Call me silly, but I’d say “severe” should count as something that’s out of the ordinary for most people. Most people drive to work and back. Most people drive to the store, go to school, take the kids to school, whatever.

Severe operation, on the other hand, could legitimately be something like lots of operation on dusty roads, towing constantly, driving really fast in a really hot or really cold place, or driving up and down mountain passes. Under these conditions, we could see needing to change the oil more often. But again, it really is a case-by-case thing. City driving for me, in Fort Wayne, Indiana, is different from city driving in LA.

The point is, despite the best intentions of the people who write the guidelines, how often you should change your oil really depends on you, your engine, how you drive, and where you drive. One caveat: As long as your engine is under warranty, you should change however often the manufacturer says to. That way if something goes wrong, they can’t blame you for lack of maintenance.

OLM

Most new engines also come with an oil life monitor to tell you when to change the oil. This is a good system, and even if it’s not 100% accurate all the time, it’s better than the 3,000 miles or three months system.

Different oil life monitors take different things into account. We’ve been told that certain German automakers changed from basing theirs on variables such as cold starts and RPMs to basically counting down the amount of fuel used. Some have a sensor in the oil that estimates particulates in the oil. Some monitors seem to give better recommendations the longer you use them. All this is fine and it’s better than nothing, but there’s also oil analysis. Guess which method we like best for determining how often you should change the oil?

What we look at

When you send in a sample, we ask on the oil slip if you’re interested in extended oil use. What we want to know is, do you want to run your oil longer than you currently are? We have found that people are often changing their oil too soon. As you know there is not one oil-change interval that’s perfect for everyone, so what do we take into account when we do recommend longer oil changes?

Metal

If you’ve seen our report, you know that we keep a database of all different engine types. We average their wear and then compare that to your sample to see what’s reading high, what’s normal, and what’s better than most. We like it when you send along notes. The more you tell us about how you’re driving or any specific conditions that might affect the sample, the better the recommendation we can give you.
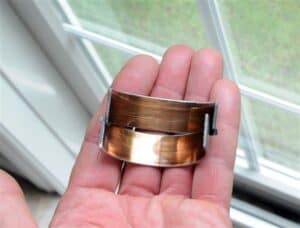
If wear is above average, we always look for reasons that might explain why. For example, say your metals are generally higher than average but you’re also running your oil longer than average. We take that into account and give you an estimate on how much longer we think you can go for the next oil change.

We don’t like to take too big of a leap. We wouldn’t, for example, tell you to go from 5,000 to 10,000 miles because you might send in a 10,000-mile sample and have lots of wear, and we wouldn’t know where the tipping point was. But we might tell you to go 7,500 miles next, and if things look good at that point, to go longer after that.

Some people automatically think having more wear than average is bad, but that’s not necessarily so. If there’s a good reason for the wear, and if there’s not so much metal that it’s making the oil itself abrasive, we’re happy to let a little extra metal ride. The question is, are you okay with it? In the end our recommendation is just our opinion, and you should do whatever you’re comfortable with.

Sometimes we suspect a problem and we’ll recommend a shorter oil change. Obviously shorter oil changes don’t fix a problem if one exists, but they do let you monitor the problem more closely and get the extra metal out of the system. Once a lot of wear builds up, the oil itself can become abrasive, which causes even more wear. It’s a cycle to avoid.

Contamination

We also look at any contamination that might be present in the oil. Obviously no contamination is the best, but your engine can tolerate small amounts of fuel and (sometimes) moisture without it being a serious problem.

Fuel is actually a very common contaminant. It mainly comes from normal operation and idling, and as long as it’s not causing any wear problems, we usually would recommend a longer oil run even with fuel present. But if fuel persists or the trend is one of increasing fuel with each oil change, we’d probably recommend cutting back on your oil changes for the reasons outlined above.

We don’t see water very often because modern engines are closed up tight. But we do see antifreeze, and when it’s present we almost always recommend changing the oil more often. Antifreeze destroys the oil’s ability to lubricate parts, which is why it starts causing poor wear so soon (usually bearing wear).

We also look at how oxidized the oil is with the insolubles test. Oil oxidation happens normally and for the most part, your oil filter removes the oxidized solids from the system just fine.

Occasionally something (excessive heat, contamination) causes the oil to oxidize faster than usual and the oil filter can’t keep up. In this case we would also recommend a shorter oil change, at least until you can figure out why it’s happening.

The insolubles test also helps us determine soot problems for diesel engines. If soot is excessive but everything else looks okay, we might suggest trying a longer run. Or if there is ring wear and other signs of poor combustion, we would probably tell you to cut back.

Operation

How you drive is another factor we take into account when we suggest your next oil change interval. If you and I both have the exact same Subaru engine except you go to the track regularly and all I do is drive to work and the store, then you might get a different recommendation than me. Or maybe you won’t — if your engine looks good and it’s faring well under the racing conditions, we might be running the same oil changes.

Or, if someone tells us their commute is a long highway drive every day, that person may be able to go a lot longer on their oil than someone with the same engine who drives two miles each way to work and back every day. It’s all in the numbers. The numbers don’t lie!

What about the oil?

Notice what we have not said we take into account: the brand you’re using and whether it’s synthetic or petroleum oil. When Jim started this company back in 1985 he came up with a line he liked to use: Oil is oil. We still stand by that today. The oil guys would have you believe otherwise, but brand really does not seem to make a difference in how your engine wears, or how often you can change your oil.

Well, okay, if you were using some guy’s oil that he “recycled” in the back of his garage from emptied-out oil pans that he filtered with a piece of cheesecloth, we might say in that case brand does matter. But as long as you’re using an API-certified oil, your engine probably isn’t going to care what you use. We like synthetics and we like conventional oil. In the end, what you use and how often you change your oil is completely your choice. We’ll give you our recommendation and you can do whatever you want with it. If you want to run longer on the oil despite having high wear, that’s totally fine. And if you have great numbers and you like changing at 3,000 miles, that’s perfectly fine too. It’s your engine, your money, and your life: change it when you want!

By |2024-09-19T09:19:01-04:00July 28, 2023|Articles, Gas/Diesel Engine, Marine|Comments Off on How Often Should You Change Your Oil?

Do I Need to Worry?

Last month we got an email from John, who had some questions about his report. His F250 was showing trac­es of coolant in the oil, and lead­, from bearings, was elevated. He had the engine out of the truck pending repairs and wanted to know: how much lead is too much? Did he need to replace the bearings?

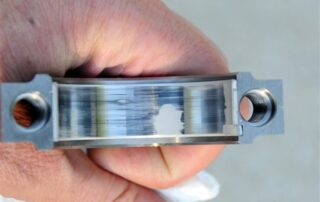
“Do I need to worry?” is a common question, and one there’s not one easy answer for. We’ve had people pull the bearings out of a Corvette when lead was only a few ppm above average and we said in the report, “You don’t need to do anything about this yet.” (For the record, that guy called us and said his bearings looked fine and was kind of honked off about it.) Oil report showing high, but steady, lead readings

We’ve had people with metals that are high all along, but not changing, and it never turns into a problem. And we’ve had people not pursue what appeared to be a problem, and re­gret it in the end (this is especially problematic when the engine is in an airplane).

So how do we decide what’s a problem and what’s not? It would be great if there was a magic number, but there’s not. We assess each en­gine individually, mainly focusing on these things:

  • How your sample com­pares to your trends
  • How your sample com­pares to average
  • The balance of metals to each other
  • Whether you’re using additives

Trends

Oil report showing a trend of steady lead, then an increase in leadIf you have them, trends are the most helpful thing we look at in determining your engine’s health. It takes three samples to get a good trend going (though we can often tell if something is amiss earlier than that).
All engines are different, as are their drivers, how they’re used, and where they are in the country. As such, it’s very helpful to sample a few oil changes in a row, at least at first, and have a baseline established for your specific engine. Consistency counts. If your engine is wearing a lot but it’s doing so steadily, it’s possible that the metal isn’t a problem. Problems tend to get worse over time – not remain stagnant.

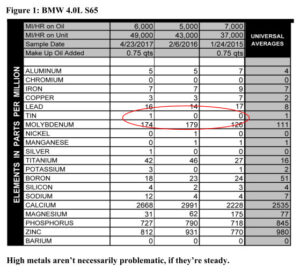
Figure 1 is a good example where lead (a bearing metal) doesn’t appear to be a problem. That engine has more lead than average, but it’s consistent. Since the owner wasn’t having any problems, our recommendation was to just watch lead as time goes on. Side-by-side oil reports showing different wear metals for a Toyota 1.8L and an Oldsmobile 455 engine

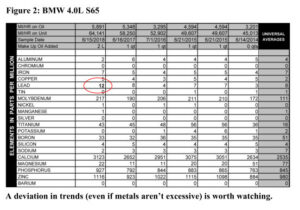
But on the other hand, look at Figure 2. Lead read at just 12 ppm in this sample—that’s well within the average range, but we marked it because lead had always been much lower than this. If this had been his first report, we might have thought lead was okay. But since we know that lead is usually low, we told him the bearings are wearing more than they were and to watch for abnormalities like low oil pressure.

Universal averages

Of course, when you start sampling, you don’t have trends to rely on. So our second line of defense, when we’re looking at your numbers, is universal averages.

We have averages established for most of the engines out there, though we’re always adding to our database as new types of engines (and transmissions and generators and other machinery) are being made all the time. When you do your first sample, we’ll compare your metals to averages for your specific engine.

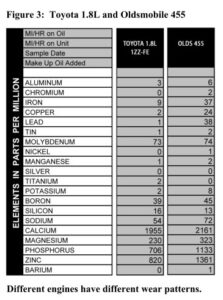
It’s helpful for us to know what kind of engine you have. Look at Figure 3, for example. This is a comparison between the Toyota 1.8L 1ZZ-FE (used in Corollas and Vibes), and the Oldsmobile 455 (used in older motorhomes and the Cutlass and Trans Am). Toyotas don’t wear much, whereas the Olds 455 makes a lot of metal.

Oil report for an armored vehicle in New York City, with consistently more metal than averageIf we don’t know what kind of engine you have, we might end up comparing your numbers to the wrong set of averages, or just a generic engine file. We can still tell if something is way out of line, but the more subtle differences between your engine and averages are harder to see.
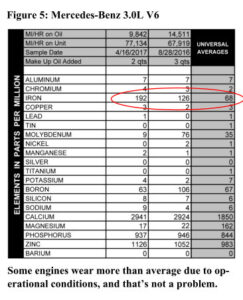
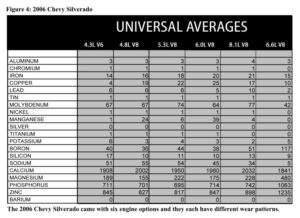
Along those same lines, some vehicles come with many different engine options, so just telling us the year, make, and model of your vehicle isn’t always enough. The 2006 Silverado, for example, could have one of five different gas engines or the 6.6L diesel engine in it. We have different averages for each of those engine types. Take a look at Figure 4.  The metals are similar in those en­gines, but they’re different enough to matter when we’re determining if something is too high or not.

Generally speaking, we’ll mark a metal in bold when it’s twice average or more. But not always—there are also times when we don’t mark elevated metals, if we know something else is going on.

We test a fleet of ar­mored Sprinter vans that operate in New York City, for example. The vehicles are loaded up with armor and spend their entire lives idling and driving in unforgiving traffic conditions. It’s no surprise that the engines wear more than average. (See Figure 5.)

Balance of metals

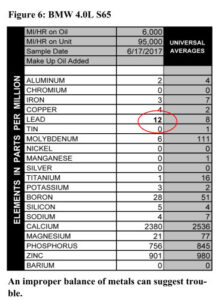
We also look at the balance of metals relative to each other. In Figure 6, lead is not reading twice average but we marked it anyway. According to averages, lead and iron should be at about a 1:1 ratio. In this sample, the lead: iron ratio is more like 4:1. This bal­ance tells us the bearings are wearing more than the rest of the engine, and that can be a sign of trouble too. Oil report for a Mercedes Benz 3.0L with high, but steady, iron readings

Additives

Another factor to consider is the use of additives and/or leaded fuel. Lots of people use Restore, which has copper and lead in it, and although in that form those elements aren’t harmful, they do make your numbers read high.

Likewise, if you’re using leaded fuel, racing fuel or certain octane boosters, fuel blow-by will cause high lead readings. The highest lead reading we’ve seen in any BMW S65 engine was 1055 ppm. The rest of the metals looked great, though, and the customer had mentioned using an additive, so we were pretty sure the lead in his sample wasn’t a sign of an impending bearing failure.

How much metal is too much?

So how much metal is too much? In truth that num­ber is different for every engine. You already know that we take a lot of things into account in trying to answer that question. Usually we’ll call you to get more information if we’re not sure, and we’ll suggest giving it an oil change or two to see how trends shake out. If something is seriously out of line we can usual­ly tell, even if we don’t know your engine type or how you use it.

High lead in an oil report for a BMW engine known for bearing problems

We will say this, though: it’s pretty rare for a major mechanical problem to happen unexpectedly over­night. Most engines will give at least some warning before things go south, and that’s why you do analy­sis. Follow the trends to see what’s normal for your engine, and when deviations occur, you’re informed enough to make a good decision.

By |2024-09-19T10:07:41-04:00July 28, 2023|Articles, Gas/Diesel Engine, Marine|Comments Off on Do I Need to Worry?

Oil Filter Inspection

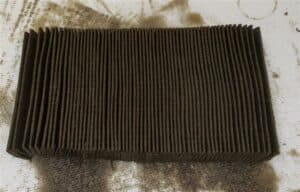
Routine oil filter inspections are a useful tool in the aircraft owner’s diagnostic toolbox. We use spectrometers to test for metals on a microscopic level, smaller than you can see and smaller than an engine’s oil filter will remove from the oil. Larger pieces of metal that might not show up in spectral testing will be trapped in the oil filter. By checking the filter at each oil change, you’ll get a good idea of what normal is for your engine and be able to quickly identify any changes that might be the early signs of a problem.

Cutting the housing

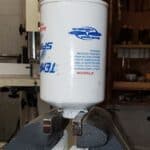
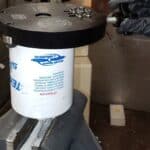
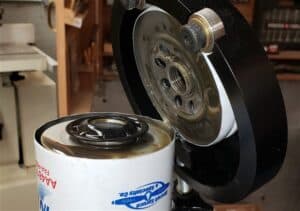
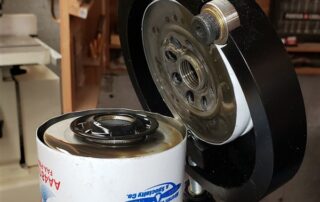
In order to inspect the filter pleats, they must first be removed from the housing. While a hacksaw or angle grinder might get you there, we strongly recommend using a filter cutter to remove the lid of the filter housing. A filter cutter cleanly cuts the robust steel housing without producing metal shavings that might find their way onto the filter pleats you are about to examine. Plus, who doesn’t like a good specialty tool?

The AFC-470 from Airwolf Filter Corp is our go-to cutter here at the lab: http://www.airwolf.com/aw/products/oil-filter-cutter. This tool fits the filter from any Lycoming or Continental engine we’ve come across. Airwolf also offers a smaller cutter for Rotax engine filters. For those who might also want to examine filters from other engines, like their car or truck, filter cutters that cover a wider range of filter sizes are available from speed shops such as Summit Racing. (https://www.summitracing.com/parts/sum-900511)

  1. Secure the filter lug in a bench vice. If the filter doesn’t have a lug, you can secure the lower section of the filter housing in the vice – just be careful to not crush the housing or it may trap the internal cartridge with the filter pleats. Poking a hole in the housing to allow oil to drain can also trap the internal cartridge, so we recommend avoiding that as well.
  2. Place the filter cutter on the filter and gently tighten the cutting wheel. We like to take a conservative approach in cutting the housing, progressively tightening the cutting wheel over a few rotations, rather than trying to cut through in one pass.
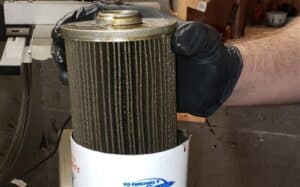
  3. Once the lid has been cut, the cartridge with pleats can be removed from the housing. It is also good to inspect the inside of the filter housing for metallic particles and other debris that may not be trapped in the filter pleats.

Removing pleats from the cartridge

You have two options at this point. You can use a solvent such as mineral spirits to wash debris from the pleats, leaving the cartridge assembly intact. The resulting solvent/debris slurry is then filtered for examination. In our experience, this flushing method may not always remove all of the debris from the filter pleats. We prefer to cut the filter pleats from the cartridge for examination by the following method.

Disclaimer: There is the potential to guillotine a finger or two during this process. Proper technique greatly reduces the chances of extensive cursing and an unplanned trip to the local emergency room.

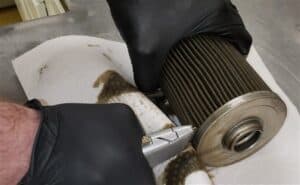
  1. Place the filter cartridge horizontally on the bench and hold with your non-dominant hand. Locate the filter pleat seam that adjoins the two ends, usually with a metal band or glue.
  2. Hold the knife with your knuckles against the bench for stability. Starting at the seam and using only downward force, cut along the edge of the pleats opposite the side you are holding. We prefer to rotate the pleats into the knife blade, firmly holding the knife in a fixed position. This method, when done properly, protects your off-hand’s fingers from the knife blade, where the knife moves downward into the bench if it were to slip.
  3. Flip the cartridge around and repeat steps 1-3 on the other side. You may have to make a few passes on each side to fully cut the pleats. Using a new razor blade helps.
  4. Again locate the seam where the two ends of the filter pleats are joined together. Cut across the pleats on either side of the seam.
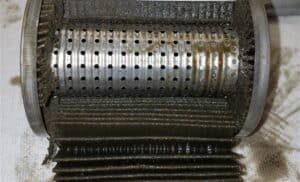
  5. The pleats can now be removed for examination. If properly cut, the pleats will come out in one long piece with a clean edge on both sides.
  6. The pleats will still contain a fair amount of oil at this point, making it difficult to see metallic debris. If time allows, you can place the pleats on paper towels to drain overnight. You can also squeeze the pleats like an accordion and mop up the oil that squeezes out with paper towels.

Inspecting the pleats and basic identification of common particles

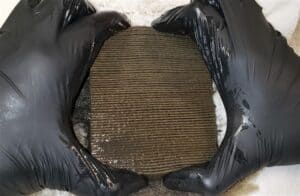
Stretch the pleats out under a bright light or outside on a sunny day. Larger metal slivers will be obvious, but you may have to look quite closely to identify smaller particles. Here at the lab, we have a dedicated space with clamps that stretch the filter pleats out in one long section. You can improvise in the shop by placing something heavy on both ends of the pleats.

  • A strong magnet (covered with a plastic baggie or cling wrap) will remove ferrous particles from the pleats. We also suggest checking the pleats themselves with a magnet. Severe steel wear may generate enough small ferrous particles to make the pleats react to magnet.
  • Aluminum has a bright, silver appearance and will not react to a magnet.
  • Copper-containing alloys, such as brass or bronze, vary from a light straw to copper color and will not react to a magnet.
  • It is also common to find carbon, especially in the filters from turbocharged engines. Carbon is black, hard particles that can be broken apart between your fingers. A large amount of carbon might indicate excess blow-by, but what counts as excessive is unique to each engine. Regularly checking the oil filter will give you a good idea of how much carbon is normal for your engine. You might also find carbon with steel embedded in it, so it is good to check carbon particles with a magnet.
  • Small bits of sealer material may also be found, especially after repairs. We generally don’t worry about this sort of non-metallic debris.
  • You might also find lead deposits from fuel blow-by. These particles have a bright, foil-like appearance that can look very much like a metallic wear particle. These deposits can be distinguished from metallic wear by their soft and “smudgy” texture. It is worth mentioning that these deposits are not lead from the wearing surface of a crank or camshaft bearing.

Steel sliver

Aluminum flakes under magnification

Brass/bronze under magnification

Carbon deposit

Sealer material

Lead deposit

Evaluating Filter Debris/Conclusion

In some cases, a filter will contain so much metal that a looming problem is almost certain. But it is more often the case for the findings to land in an ambiguous gray area, where the severity of the metal is situationally dependent. You can expect to find some metal and other debris in the filter from a fresh overhaul, for example, where the same findings would be unusual in a routine filter inspection for that same engine at 500 hours since major.

Lycoming offers good guidance on the identification and evaluation of filter debris in Service Bulletin 480F. In our opinion, a lot of the information in that bulletin can also be applied to Continental engines. Blackstone also offers a filter and filter screen examination service as a compliment to oil analysis – but we recommend doing routine filter screenings yourself to get familiar with what’s normal for your particular engine. Save your money for flying — check your filter yourself!

Further Reading

https://www.lycoming.com/content/suggestions-if-metal-found-screens-or-filter

By |2024-09-18T14:16:01-04:00July 18, 2023|Aircraft, Articles, Gas/Diesel Engine, Lab Tests|Comments Off on Oil Filter Inspection

Under Pressure! (Part 1)

About a year ago I started a flying club at my local airport with three other pilots – that was a long and interesting process that I won’t go into here – but after a few months of trying to get the right people together then struggling to buy an airplane in a hot market, we were able to purchase a 1965 Cessna 172 F with the Air Planes 180hp Lycoming O-360-A4M upgrade, with about 1300 hours SMOH. The pre-buy inspection went well and I had the honor (with another member) of flying our new ship home to Illinois from Florida.

As a 12-year analyst at Blackstone Laboratories, of course I did an oil and filter analysis as part of the pre-buy inspection. With that data in hand and considering how active our new aircraft was, we decided to proceed with Lycoming-recommended 50-hour oil changes right off the bat.

The first few oil analysis reports were excellent, and the oil filters came back nice and clean. The first time we pulled the oil suction screen we found a small amount of fibrous material in it, but the previous owner confessed that they hadn’t ever pulled the screen, so we assumed the debris was probably years – if not decades – old. We didn’t worry too much about it. When the next screen came back clean, save for a mere spec of carbon, we forgot about the fibrous debris entirely and happily went about enjoying our new bird.

Lost oil pressure

That is… until March 29th, when one of our newer student pre-solo members texted that, 10 minutes after takeoff, the engine lost oil pressure. He and the instructor landed without incident and reported everything looked ok, hoping it was a bad gauge.

The questions from the other partners streamed in: where were you? How was the engine running? How was oil temperature? The student pilot clarified: they took off to the north, climbed to 5,000’ to work on maneuvers, and when they did the cruise checklist they noticed the low oil pressure. He reported returning to the airport immediately with no issue. The engine ran great the whole time, and oil temperature was fine. No apparent oil loss.

I was out having coffee with a friend at the time, but my heart sank and I couldn’t focus on anything else, so she and I ended up going to the airport, with an A&P friend on the phone to look for something obvious, like an oil leak at the oil pressure gauge or where the line comes through the firewall. I didn’t find anything, but I wasn’t too discouraged: I knew we had a lot of things to troubleshoot before suspecting engine damage, so I tried not to jump to any conclusions.

filter pleats with slimy debris embedded in t

Filter pleats with slimy debris embedded

Initial shock and investigation

The following day, our club maintenance director – under the watchful eye of our A&P – started working through the troubleshooting list. We quickly determined it wasn’t the gauge, and it wasn’t the line, so the easy, cheap fixes were off the table.

Now concern was starting to mount; the deeper we had to dig, the deeper our pockets were going to have to be. We’re a new club, already operating on a shoestring budget, so we didn’t have time or money for costly repairs. But we had a problem to solve.

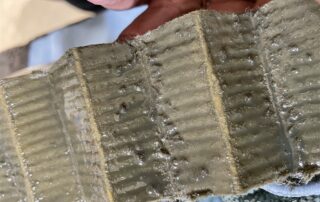
The next step in our troubleshooting process was to start looking for a problem. We drained the oil, pulling an oil sample in the process, and we removed, cut, and inspected the oil filter. The only abnormalities were some clumpy, slimy looking lumps (see figure 1) and a giant piece of carbon (figure 2). The carbon was large enough to wonder if something similar had gotten stuck in the oil pressure relief valve, so we pulled the oil pressure relief valve off hoping for a big piece of carbon to be our easy culprit.

Much to my dismay, the oil pressure relief valve was totally clean.

Looking at the screen

Later that night, with the oil drained, the filter cut and the oil pressure relieve valve not the suspect, I pulled the oil suction screen. My heart sank. The screen was completely blocked by fibrous

Debris on the end of a fingertip

Debris on the end of a fingertip

material. It looked like the same stuff we found in our earlier oil change, only a whole lot more of it. The pickup screen was so caked full that I had to use a screwdriver to pry the debris out of the screen (figures 3a and 3b).

That’s when concern really started to set in: we actually did lose oil pressure, and there could be some serious damage here.

A few days later the oil analysis and official filter report came back: the oil report was unremarkable, but the oil filter report was disheartening. Our engine had gone from making “no appreciable metal” in 50-hour oil change intervals to making “non-ferrous metallic flakes at an approximate rate of 20 pieces per filter pleat” in a matter of 20 hours. Great. Now what?

Fact-finding

The filter report stirred up more questions than it did answers. The next step in the process was to figure out how much damage was done, what that fibrous material was, how it got there, how much remained, and, most importantly, what to do next?

The fibrous material turned out to be the easiest question to answer – it was a paper towel. When examined under a microscope, it had the very distinctive dimpled pattern you see on “quilted” paper towels (see figure 4). Once we identified the contaminant, the next step was figuring out how it got there.

Fluffy stuff that came out of the suction screen

Fluffy stuff that came out of the suction screen

Interestingly enough, the previous owners provided the answer in the photographs they shared with me during the pre-buy. A couple of photos showed the process of swapping the original O-300 with the O-360. In figure 5 you can see a couple of paper towels sticking out the back of the engine where the magnetos should be. I believe that some (or all) of that paper towel somehow ended up getting stuck in the engine – either someone turned the prop and the gears pulled it in, or some of it got wet with engine oil and broke off into the engine.

You did what?

There’s another interesting twist to this story: as we were trying to figure out how long the engine ran with no oil pressure, we looked at the flight track on FlightAware. As reported, the plane took off to the north, climbed to about 5,000’ turned around then did a 360’ turn, presumably to lose altitude. Then there’s a normal approach to landing and…a go-around.

Wait, what?

That’s right – a go-around. With no oil pressure measuring on the gauge. When we confronted the CFI about the flight track, he confirmed: the student pilot was flying, and he came in too high and too fast to salvage the landing, so a go-around was initiated. *face palm*

Why didn’t the CFI take control of that flight and land? Because he assumed it was a gauge problem. Oil temp was fine, the engine was running well, so he didn’t worry about it.

magnified quilted paper towel

Ground up paper towel under a microscope

The good news was that the CFI confirmed that oil pressure wasn’t lost entirely (as the student pilot had reported). It was only lost when at idle. If there was some power, there was some (albeit not much) oil pressure reading on the gauge. With that information, and knowing the engine hadn’t seized entirely, we were hopeful the engine damage was limited.

Moving forward

So, we’ve finally found the culprit, and now the long road to recovery begins. The main takeaway from this part of the story is, if you see anything unusual at all – anything – get on the ground as soon as possible. Don’t assume a low oil pressure reading is a bad gauge, and don’t fly when something might be wrong. Don’t dilly-dally, waiting for traffic to clear. Declare an emergency if you have to and diagnose with two feet firmly planted on terra firma.

Check back in the next newsletter as we discuss the confusing, gut-wrenching process of figuring out whether we could salvage the engine!

By |2024-09-18T14:22:01-04:00July 14, 2023|Aircraft, Articles|Comments Off on Under Pressure! (Part 1)
Go to Top