Finishing the RV-12

For those of you who have been reading these newsletters, you’ll know that I have been in the process of building a light-sport kit plane made by Van’s Aircraft called the RV-12. Last year I chronicled the progress and mentioned that I was getting close to the end. Well, thankfully the end has come, though I have to say it took quite a bit longer than expected.

Excitement/Burnout

We moved the project from the garage here at the lab to a hangar out at Fort Wayne International Airport in early July 2019. The days following the move were a time of excitement and hope, though that feeling wouldn’t last. My wife and I have been working on this project since the summer of 2016 and we were both kind of getting burned out.

However, actually being at the airport and talking with the other owners there helped keep our enthusiasm for the project going. In talking with the other homebuilt owners, it became apparent that even after it’s flying, there is always something to work on, but we didn’t worry about that much. We still had a lot of work to do just to get ours in the air. This was the part of the building process that’s a running joke among homebuilders — 90% done, 90% left to go!

Ironing Out the Details

Soon the prop was installed and the final fitting work on the cowling was done. We ironed out some bugs in the electronics and communication systems, most of which were mistakes we brought upon ourselves. Before too long, we came to the point where there was nothing left to do in the building instructions.

Next came a thorough checkout of all the systems. Van’s provides what they call the production acceptance procedures, which is a very helpful document that tells you how to go through all the systems to make sure they are set up and working properly. It includes things like “Move the control stick to neutral and measure the right aileron drop, it should be 1/4 to 1/2 inch.” Sounds easy enough, until you realize that just about every step requires some type of filling or adjustment on your part.

The Fuel Flow Blues

After a few months of work, we got to the fuel flow test. That’s exciting because right after that you get to start the engine for the first time. We had built the fuel tank about a year and a half earlier and up until then, it had not had any fuel in it. I was dreading putting fuel in for the first time, and for good reason, because as soon as I did, it started leaking out of a return line fitting.

That was a pretty dark point in the whole process because it meant I had to pull the fuel tank, open it up, fix the leak, and reseal it. Anyone who has ever worked with fuel tank sealant knows this is not fun stuff to work with, and it’s even less fun to try and clean it off parts. It’s also the point at which I realized that I had spent a significant portion of my life building something that would only fly about 120 knots max (with a tailwind) and wouldn’t even be able to haul my whole family while doing it. And to further sour my mood, this was mid-October and I knew at that point there was no way I’d be able to get it done in 2019.


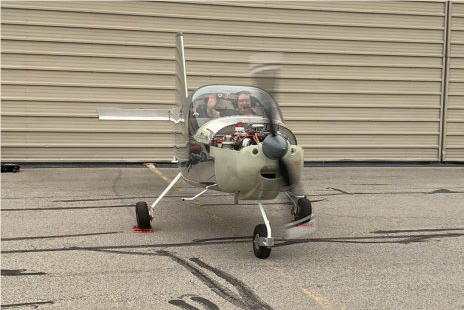
Starting the engine for the first time!


Trying Again

So, after a good pity party and some time off, we got back to work. The fuel tank was fixed and reinstalled, though by that time it was too cold to get any serious work done at the hangar. That was okay though because it was also time to start the paperwork.

As some of you know, I inherited this project from my father and I can say for sure that the paperwork part would have been what he hated the most. Still, if you keep plugging away, eventually it all comes together. I was able to obtain a N-number (on my second try) and by the time spring rolled around, we were ready to test the fuel flow again and start the engine. As you might imagine I was fairly nervous about this whole process, but the fuel tank held up, the fuel flow test went well, and on May 3, 2020, our Rotax 912 fired up for the first time since it left Austria.

But is it Airworthy?

With the motor running and fuel tank sound, I was starting to feel a lot better about this project, though I still had the airworthiness inspection to deal with. This is generally the last step before you can fly and was a big unknown in my mind. It was also a little tough to get scheduled because not only did the FAA switch to a new and confusing online application process, the Indianapolis office had been closed since mid-March due to Covid-19.

They were just starting to reopen in mid May when I contacted them, but they were facing a serious back log of work that needed to be processed before they got to me. That basically left me with the choice to either wait until they got time to send someone up (for no charge) or I could contact a DAR (designated airworthiness inspector) and pay to have them take a look. Not wanting to delay this project into 2021, I chose the DAR and scheduled an inspection. Surprisingly enough, the actual inspection was painless and lasted just three hours. At the end I found myself wanting to show the inspector more of my airplane, so he could see the safety wire on the gascolator that I redid three times. Or admire the beautiful fiberglass work on the cowl that took several weeks to sand to perfection.

Ryan's RV-12 returns from its first flight
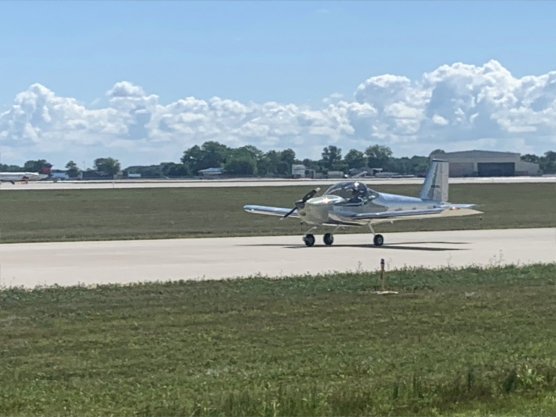
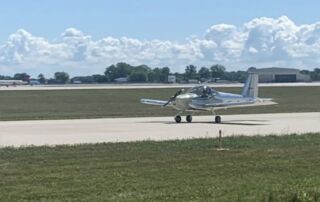
A successful first flight


Airborne!

With all the paperwork done and my airworthiness certificate on board, I was finally able to make my first flight on Monday July 13th. It went well, the wings stayed on, and the airplane showed no tendency to do anything crazy. As you can imagine, I was relieved. Now, on to some flight testing, as soon as I can get my transponder to report altitude… ahh the joys of homebuilt ownership.

By |2025-02-06T15:38:44-05:00February 6, 2025|Aircraft, Articles|Comments Off on Finishing the RV-12

Building an RV-12 (Part 3)

Since my last newsletter about building the Van’s RV-12, my wife and I have made quite a bit of progress. In fact, we’re nearly done. I believe the phrase commonly used in the homebuilt industry is “90% complete, 90% left to go.” But really, we’re getting down to the short strokes though it’s been a long process since we are mainly only able to work on it over the weekends.

Rapid progress…at first

When we started working, the plane was in a garage in Ossian, Indiana, about 15 miles south of Fort Wayne. The tail and wings were mostly done and the fuselage kit (the third of six kits total) was about one-sixth finished. After buying some videos on how to build the RV-12, we got started. I was actually blessed with a whole garage to work in (many thanks to my step-mother Kathy), and plenty of table space. We were also able to bring some parts home to work on in my basement, which was a nice help.

Progress proceeded rapidly when we started in June 2016. The side and bottom skins of the fuselage were installed that summer, and the basic fuselage structure was pretty well completed by November 2016, just in time to crack into the fourth kit, known as the finishing kit.

This name is a bit misleading because we were nowhere near finishing at this point, but that name has a better ring to it than “halfway kit,” or “other stuff you’ll need kit.” Actually, once that kit was done we were getting close to being finished, and by close, I still mean at least a year away at our pace. This kit included parts like the landing gear, canopy, cowling, and control cables.

The finishing kit

The first section of the finishing kit was wing installation, which was exciting. It’s starting to look a little more like an airplane. At that point, we didn’t have the tail on yet and that was by design. 
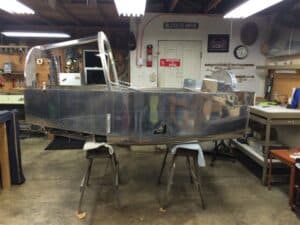
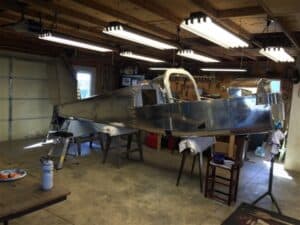
It’s a lot easier to walk around the thing without a tail in the way and it didn’t need the tail on until later, when we started stringing the controls for the rudder and horizontal stabilator. I picked up the suggestion while attending a forum at Oshkosh and also learned there that it wasn’t really necessary to complete the sections in order. Things like the rear window installation could be completed after we installed the wiring in the tail section and fuel tank.

The tail was attached shortly after the wings in April of 2017, and the vertical stabilizer and rudder followed shortly afterwards. Next we attacked the bubble canopy, which on an RV-12 hinges forward — similar to what you might find on a Diamond. This task required our first attempt at fiberglass work. You might not think that would be necessary on an aluminum airplane, but it was and it wasn’t the last of the fiberglass work either. The EAA offers training courses for homebuilders on things like sheet metal, fiberglass lay-ups, and electrical wiring to name a few, and I’d highly recommend taking those if you’ve got your sights set on building your own plane.

Installing the landing gear

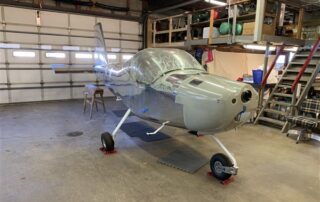
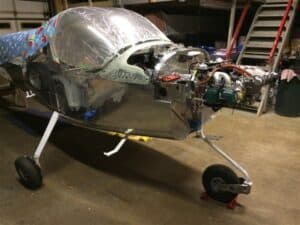
By the end of 2017, the canopy was on and we were ready to install the landing gear, and this is when we started to outgrow the garage. The problem was that I couldn’t have the vertical stabilizer on and the canopy open with the landing gear on or the canopy would have hit the ceiling. Those items were temporarily removed so we could proceed building, though it became obvious that we would need to move to a larger location soon.

Soon we were on to the avionics, so we still had a lot of work we could do in the garage without a canopy. For the RV-12, Van’s offered two choices of avionics suppliers: Garmin and Avidyne.

We talked with both at Oshkosh, and not seeing a major difference between the two, we chose Garmin due to the fact that I have been flying behind the G1000 for a while now and was pretty comfortable with it. Other than having to do some minor body contortions to get all the wiring installed, that part went fairly smoothly and before long it was time to move.

At this point, most people would head to the airport and work at a hangar, but fortunately, Blackstone has a large heated garage with a high ceiling, so I gave up my parking space in that garage and moved the plane there, as well as my work tables in preparation for the final kit — the engine.

Engine installation

Unlike a lot of other kits available, there was only one choice for engines from Van’s and that was the Rotax 912 ULS. The good news is that this is an excellent choice. 
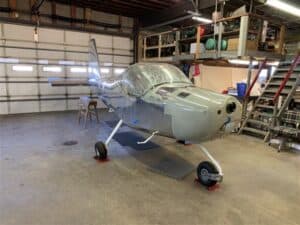
We see a lot of samples from that engine and they virtually always look great. The big difference between this and other 100 HP selections is that it has liquid-cooled cylinder heads. With that present, it can run either unleaded fuel or leaded fuel, so now I have the option of buying my own fuel instead of always having to buy airport fuel.
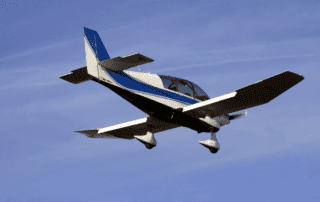
The engine is also equipped with altitude-compensating carburetors, so no mixture adjustments are necessary; one less thing for the pilot to worry about.

The engine was hung on December 21, 2018, a banner day in any airplane’s life. Everyone was excited, things are coming together, we’ll be in the air in no time now.

Well, here it is six months later and we still aren’t ready to fly, but as I said at the start of this article we are getting close. We flipped the master switch last weekend and powered up the avionics for the first time. Nothing caught on fire and the Garmin GX3 started just like it should, so that was another step in the right direction. We’ve rented a hangar at Fort Wayne International and will move it there at the end of the month. From there we’ll install the prop and start the test-flying process.

Time invested

I get asked occasionally how many hours we have in it and I really don’t know. Seems like keeping track of that would just make you depressed. With a project like this you have to just keep plugging away and sooner or later, the end will happen. In our case it’s been later, but the project has been fun and I’m glad my wife and I took it on. Still, I don’t think I’ll tackle another one any time soon. I’ll report back next newsletter, once we’re in the air!

By |2024-09-18T14:08:56-04:00July 18, 2023|Aircraft, Articles|Comments Off on Building an RV-12 (Part 3)

Building an RV-12 (Part 2)

I have been a pilot since 2005, and while I have done a fair amount of flying since that time, I have always rented the planes I have flown. This has both advantages and disadvantages, but for me the advantages have always been greater. Since earning my license, I have never really had any place I needed to fly. I have taken trips to see my in-laws around the Chicago area. I have picked up my Mom from various business trips that she’s taken, and I’ve done a few business flights, but none of these things were consistent enough need to warrant my own plane.

The ownership dream

It’s not that I haven’t been tempted, mind you. Like most pilots, I have my favorite aircraft (Republic SeaBee, Lake LA-4, Cessna Skymaster, to name a few) and have often dreamed of driving to the airport, opening up the hangar, and seeing my own aircraft sitting right there just waiting to be fired up. Having a window in my office doesn’t help either. Looking out on a nice sunny day, I feel a strong pull to stop when I’m doing, head to the airport, and take off, knowing that my airplane will be ready to go. However, obligations to family and business have kept those dreams at bay.

It helps that I can rent possibly the nicest Cessna 172SP in the tri-state area virtually anytime I like, so I can satisfy my flying itch when it needs scratching. I can also say that I have really appreciated not having to deal with the hassles that inevitably go along with ownership, like oil changes, annuals, and the guilt I’d feel when I go three to four months between flying.

Working in the oil analysis business, I can see the problems that develop in aircraft engines when they aren’t flown enough. Still, when you rent an aircraft, you never really know it like you would as an owner. All the little quirks that might identify a particular airplane are lost on me and if something changes in the one I fly, I don’t know if it’s a normal occurrence or possibly a problem.

Enter the RV-12

All of this changed with the unfortunate passing of my father Jim Stark back in November. He was assembling a Van’s RV-12 kit plane at the time of his death. It was always his dream to build an airplane, but until he retired and moved to a different house where he actually had some room to work, building an airplane was never in the cards.

I was the prime motivator in getting him working on an airplane, though I was never really interested in building one myself. If I were to ever get a plane, I would just bite the bullet and buy one, skipping all of the time it takes to assemble once, which can easily stretch out into a multiple-year endeavor. However, when Dad died I suddenly found myself with a half-finished airplane and a bunch of tools I don’t know how to use. So after some discussion with my wife, we decided to jump in and start building.

One of the big factors in this decision was how fun the RV-12 is to fly. I took a demo flight at Oshkosh last summer and decided that this was a plane I could easily get used to. The only downfall was that it only had two seats, so I couldn’t take my wife and kids anywhere at the same time. But I could see that this was a good introduction to aircraft ownership and also fun to build.

The up-side to building your own plane is you will know exactly how it all goes together and you can also do all of your own maintenance, which can be a big time- and money-saver down the road. Plus, depending on how the building goes, I could make a 4-seat RV-10 my next project and then I’d have something the whole family could take somewhere. But that’s getting ahead of myself.

Attacking the learning curve

I have what I consider to be a fairly strong mechanical background, but I’ve never done anything on an aircraft other than fly it. So far, building the RV-12 has been an adventure. The laboratory business is all metric, but I quickly learned that the metric system has no place in the aircraft industry. In fact, in some areas like drill bits, they don’t even use standard measurements, so buying my drill bits at the hardware store is out.

It also appears that deburring parts will be a large part of my life for the next few years. Fortunately my wife is ready and willing to help and will probably be the driving force in getting this project done. Deburring parts is a good place to start, at least until she is strong enough to run the rivet gun (better start hitting the gym, baby!).

its (a tool box and a section of wing), so I bought those and have been trying my hand at running a rivet gun. The results weren’t pretty, but I keep saying to myself that I’ll be more careful when it comes time to actually work on the plane. At least I hope I will.

I also bought a set of DVDs that show exactly how to build the RV-12 step by step. I know this is something Dad wouldn’t have approved of (he never met a set of instructions he didn’t throw away), but I don’t have the advantage of having an A&P license like he did, so I’ll take any help I can get. At this point, I’m just getting started, but with any luck the project will move quickly. Now if you’ll excuse me, I’ve got a fuselage to finish!

By |2024-09-18T14:10:08-04:00July 18, 2023|Aircraft, Articles|Comments Off on Building an RV-12 (Part 2)

Building an RV-12 (Part 1)

Like probably most of you, I read aviation magazines, including Sport Aviation, the EAA’s contribution to general aviation flying. In the 30 years since I first subscribed, I have read countless stories about building airplanes. After all those years the stories run together in a blurred line but a few oft-repeated ideas stand out. They don’t say much about what it is like to spend a couple or possibly a dozen years of your life trying to assemble something that may fly. You pick up instead the thought that if you want to finish the job you’d better do something on the airplane every day.

I’m retired. I have time on my hands. I’ve gotten much like the guys who write about building airplanes. I’m getting long in the tooth. We live on a farm property built more than 100 years ago and there is always work to do on the property. But after living here seven years, a lot of the essential stuff has been done. I talked with my wife Kathy about building the airplane, mentioning the time element —  maybe 700-900 hours, as suggested by the kit manufacturer.

Turns out those hours were for someone else. Me? I’m a slow guy. I can’t predict how long something is going to take until I do it. So neither Kathy nor I suspected that nearly two years from the time I picked up the first kit, I would still be lingering on the wings with the third kit waiting on me to open and inventory. I’m looking forward to that third kit. It is the part of the airplane with seats you can sit in and make airplane noises. It is also the part that the wings slide into and the rear fuselage rivets to, which will surely make the project look more like what I tell people it is.

The tools of the trade

I started out in the basement doing the most elemental work while remembering the tools of the trade I once worked with as an aspiring aviation mechanic. That was in school, not the real world. In the real world I didn’t remember as much as I thought. Thank goodness there is no welding or much fabrication with this kit. Van’s, the manufacturer, suggests they supply everything but the engine fluids and paint. I’ll take a minor exception to that. There is some fabrication.

There are a lot of tools required, few of them I already had. I bought tools piecemeal, suffering the waiting time for each to arrive, and then about halfway to where I am now, I read where Aviation Tool Company had a complete set of tools you will need at about half the cost I probably paid buying them one at a time. And yes, you really do need the exact tools Van’s recommends, not some dusty, rusty tool you have stored under your bench. I speak from experience: you can only fool yourself on this type of project.

Mistakes will be made

Van’s does an amazing job with their kits. They are exact. All the holes line up, even across the kits. The instructions are good, precise, and accurate. Written by engineers, you really need to pay attention to what is stated. Miss something and you will be rebuilding.

This attention to detail is not a natural thing. We tend to gloss over things, thinking we know what is being said and then moving on. But that won’t work for you on a Van’s kit. Read it. Read it. And read it again. Repeat as many times as necessary to fully understand what is being said. You will make mistakes¾everyone does. So I suppose there are no perfect airplanes. Maybe I should say there are no perfect homebuilt airplanes. It is up to the builder to decide if an error weakens the airframe. Being trained as an A&P mechanic, I think I have a fairly good feel for making that determination. Up to now any errors have been correctable and I’m confident when I test fly it there will be no problems.

I made a mistake on the vertical stabilizer, the first large piece I assembled. The last step to that part is bolting on the rudder hinges. The bolts suggested for the job would not go into the locking nut-plate holes I had riveted on the inside of the spar. I could not believe it. I called Van’s. The guy I talked with led me to understand the error, which was going to require drilling out a bunch of rivets to get down to the spar, drilling out the countersunk 3/32” rivets and riveting the right nutplates to the spar. No harm done, but it cost me a few days’ work.

So I’ve had to back up a few times but I’ve learned to read these plans better. I think harder on things before proceeding. A friend said he needed to build an airplane so he had a place to focus his thoughts. That’s a good description of what the building is like. It gets intense. Time flies.

You need space

When I started the wings I had to move out to the garage. They run about 15 feet, though nearly 4 feet of the inboard spars overlap in the cockpit behind the seats. There wasn’t enough room in my short-guys basement to get the wings built. It was fall when the wings arrived, so I was thinking about winter. I have a fine garage, but no one ever thought about heating it so far as I can determine.

I spent October insulating and installing heat in the garage. Even with that, the warmth is minimal. When it really gets cold, down around 10 degrees F, I have to find something else to do. I can’t tell you how many times my airplane building has been interrupted. I only thought I could build an airplane without a bunch of additional work to provide a good workspace (first the basement, then the garage).

All in all I’m happy with what I’ve put together so far. The RV-12 looks like a small Cherokee, though two seats instead of four. The wings are about the same, using the Hershey Bar design. This airplane is light, maybe 800 pounds including the engine, which may go more than 300 pounds. It’s stick-flown so I would expect it to be twitchy, especially in pitch. But Van’s says no. It is sensitive, maybe, but not twitchy. I’m looking forward to finding out. Maybe by next summer I will get this airplane built.

By |2024-09-18T14:13:13-04:00July 18, 2023|Aircraft, Articles|Comments Off on Building an RV-12 (Part 1)
Go to Top